![[Updated] Virtual Room Recordings Desktop & Mobile Tips](https://thmb.techidaily.com/f02c60ec75f846fa2b4ccaf9e1cd79d7d6223ca424f0cd6791d36a2f65c9d0a1.jpg)
"[Updated] Virtual Room Recordings Desktop & Mobile Tips"
Virtual Room Recordings: Desktop & Mobile Tips
How to Record Teams Video Meeting?

Richard Bennett
Mar 27, 2024• Proven solutions
If you are hosting a Microsoft Teams meeting or are an important attendee, you may want to record the entire video session for official records. Therefore, the following sections explain how to record Teams meeting on a desktop/laptop computer and a mobile device with ease. In addition, here you will also get to know how to record a Teams meeting automatically, locate the recorded files, and share them conveniently.
Now, because Microsoft Teams notifies all the attendees when you start recording a meeting, one of the sections will also teach how to record Teams meeting secretly, i.e., without letting anyone know that you’re capturing the footage behind the scenes, just in case you want so.
- Part 1: Record Microsoft Teams Meetings on Desktop and Mobile
- Part 2: Automatically Record Microsoft Teams Meetings
- Part 3: Find Recorded Meetings in Teams
- Part 4: Share Recorded Teams Meetings
- Part 5: Record Teams Meeting Secretly

Part 1: How to Record Microsoft Teams Meetings on Desktop and Mobile?
The methods that are given below explain how to record Teams meeting on a PC, an iOS device (typically an iPhone), and Android.
Prerequisites to Record Teams Video Meeting
In order to record a Teams meeting, you:
- Must be a meeting organizer
- Must be using Office 365 Enterprise with an E1, E3, E5, F3, A1, A3, A5, M365 Business, Business Essentials, or Business Premium license
- Must have the recording feature turned on by the IT administrator of the organization
- Must not be a guest or attendee from another organization
1. Record Teams Meeting on Desktop/Laptop
Once you are sure that all the prerequisites that are listed above are met, you can go through the following instructions to learn how to record a Teams meeting on a computer:
Step 1: Start a Teams Video Call
Launch Microsoft Teams on your PC (a Windows 10 laptop here). On the main interface, make sure that the Chat option is selected in the pane on the left. Then, click Video Call (the Camcorder icon) from the top-right area of the Chat pane.
Step 2: Start the Recording
During an ongoing meeting session, click the More actions icon from the top-right area of the Meeting with box, and click Start recording from the menu that comes down next to start the recording.


Step 3: Stop the Recording
Once the meeting session is over, you can open the More actions menu again, and click Stop recording this time to stop the recording.

2. Record Teams Video Meeting on Smartphones
There are a couple of things that you must ensure before a Teams meeting can be recorded on smartphones. The list is given below:
- The correct licenses for Office 365 Enterprise as listed earlier
- The IT administrator has NOT disabled the recording feature
- The Teams data is NOT set to be stored in-country
- You are using the latest version of Teams
- The recording is NOT set in any private team channel
Once all the requirements listed above are met, you can safely continue with the following methods to learn how to record a Teams meeting on a smartphone.
2.1 Record Teams Meeting on iPhone
You can learn how to record Teams meeting on an iPhone with the help of the following instructions:
Step 1: Start a New Meeting on iPhone
Launch Microsoft Teams on your iPhone. Make sure that Chat is selected from the options available at the bottom, tap Instant meeting (the Camcorder icon) from the top-right area of the screen, and tap Start meeting from the Instant meeting box that pops at the lower section to start a new Microsoft Teams meeting.
Step 2: Start the Recording
During the meeting session, tap More actions from the bottom, and tap Start recording to start the recording.
Step 3: Stop the Recording
After the meeting session, tap More actions again, and tap Stop recording this time to stop the recording.
Step 4: Record Meeting on iPhone Externally
Before starting the meeting session, swipe the screen from top-right to bottom (in iPhone X and later) to get to the Control Center screen, and tap the Record button to start the recording secretly. Next, start a new meeting normally. To stop the recording, get to Control Panel again, and tap Stop Recording.
2.2 Record Teams Meeting on Android
The steps that are given below teach how to record a Teams meeting on an Android smartphone:
Step 1: Start a New Meeting
Launch Microsoft Teams on your Android smartphone, make sure that the Chat option is selected from the bottom, tap the Instant meeting icon from the top-right area of the screen, and tap Start meeting from the Instant meeting box. On the next screen, tap Join now to start or join a meeting.
Step 2: Start the Recording
While in the meeting session, tap the More actions icon from the bottom, and tap Start recording from the menu that comes up.
Step 3: Stop the Recording
After the meeting session, tap the More actions icon again, and tap Stop recording from the menu to stop recording the meeting.
 Greeting Card Builder
Part 2: How to Automatically Record Microsoft Teams Meetings?
Quite recently, Microsoft integrated a new feature to the Teams app that allows the organizers to automatically record all the meeting sessions that take place. The recording starts automatically as soon as the first participant joins a meeting. This automatic recording function can be easily turned off if the organizer wants to.
You can learn how to record a Teams meeting automatically by following the instructions that are given below:
Step 1: Get to the Meeting with Box
Launch Microsoft Teams on your computer, and use the method explained earlier to get to the Meeting with box by initiating a new meeting.
Step 2: Get to the Meeting options Page
When on the Meeting with box, click Join now to start a new meeting, click the Show participants icon from the upper-right area, and when the Participants box comes up, click Manage permissions.
Step 3: Enable Automatic Recording
On the Meeting options page, turn on the Record automatically switch. Once this is done, you can safely share the invitation link with the people you want to attend the meeting, and Teams will start the recording as soon as the first participant joins in.
Part 3: How to Find Recorded Meetings in Teams?
The recorded files of the Teams meetings are saved to SharePoint in case of a channel meeting, or to the ‘Recordings’ folder on OneDrive if it was any other type of meeting. The processes of locating the Teams meeting files are given below:
For Channel Meetings
- Launch Microsoft Teams
- Click to select the Files option from the left pane
- Click to select Microsoft Teams from the Files pane
- Locate the recorded meeting from the window on the right
For Other Meeting Types
- Get to the Files pane using the method explained in the previous section
- Click to select OneDrive from the Cloud storage section
- Locate the recorded meeting file from the right window
Part 4: How to Share Recorded Teams Meetings?
Sharing the recorded meetings is as easy as sharing any other file. The process to share the recording of a meeting file saved on OneDrive is given below:
- Click to select OneDrive from the Cloud storage section of the Files pane as explained earlier
- Locate and right-click the meeting file that you want to share
- Click Share from the context menu
- Use the Share box that opens next to add the participants you want to access the recorded file
- Click Send to start sharing
Part 5: How to Record Teams Meeting Secretly?
Although Microsoft made Teams quite transparent by sending notifications to all the attendees as soon as you start recording a meeting, sometimes you may not want this to happen. In such a case, you must rely on a third-party app that can record your computer screen behind the scenes.
One such program is Filmora by Wondershare. Although Wondershare Filmora is primarily used for industry-standard post-product tasks such as video editing, apply effects and filters to the motion clips, etc., it offers the option to record computer screen , webcam, and audio as additional features so you don’t have to depend on any other software for screencasting.
 With Screensaver Wonder you can easily make a screensaver from your own pictures and video files. Create screensavers for your own computer or create standalone, self-installing screensavers for easy sharing with your friends. Together with its sister product Screensaver Factory, Screensaver Wonder is one of the most popular screensaver software products in the world, helping thousands of users decorate their computer screens quickly and easily.
 Download Mac Version ](https://tools.techidaily.com/wondershare/filmora/download/ )
With that said, the steps that are given below teach how to record Teams meeting secretly with Wondershare Filmora:
Step 1: Get to the Wondershare Screen Recorder Panel
Launch Wondershare Filmora on your PC (a Windows 10 computer is used here for illustration), click the Record menu from the top of the Media window, and click Record PC Screen from the menu that comes down.


Step 2: Configure Recording Preferences
On the Wondershare Screen Recorder panel, expand the advanced options by clicking Settings from the lower section. Next, use the available menus and boxes to set up the recording preferences such as full screen, audio, save location, framerate, recording quality, etc.
Step 3: Start Recording Teams Meeting Secretly
After the recording preferences are set, click the Record button to start the screen recording. After this, use the method explained earlier to join or start a new Microsoft Teams meeting.


Step 4: Stop the Recording and Export
Once the meeting session is over, press F9, or right-click the Screen Recorder icon from the notification area, click Open recorder, and then click the Stop button from the panel that appears next to stop the recording.
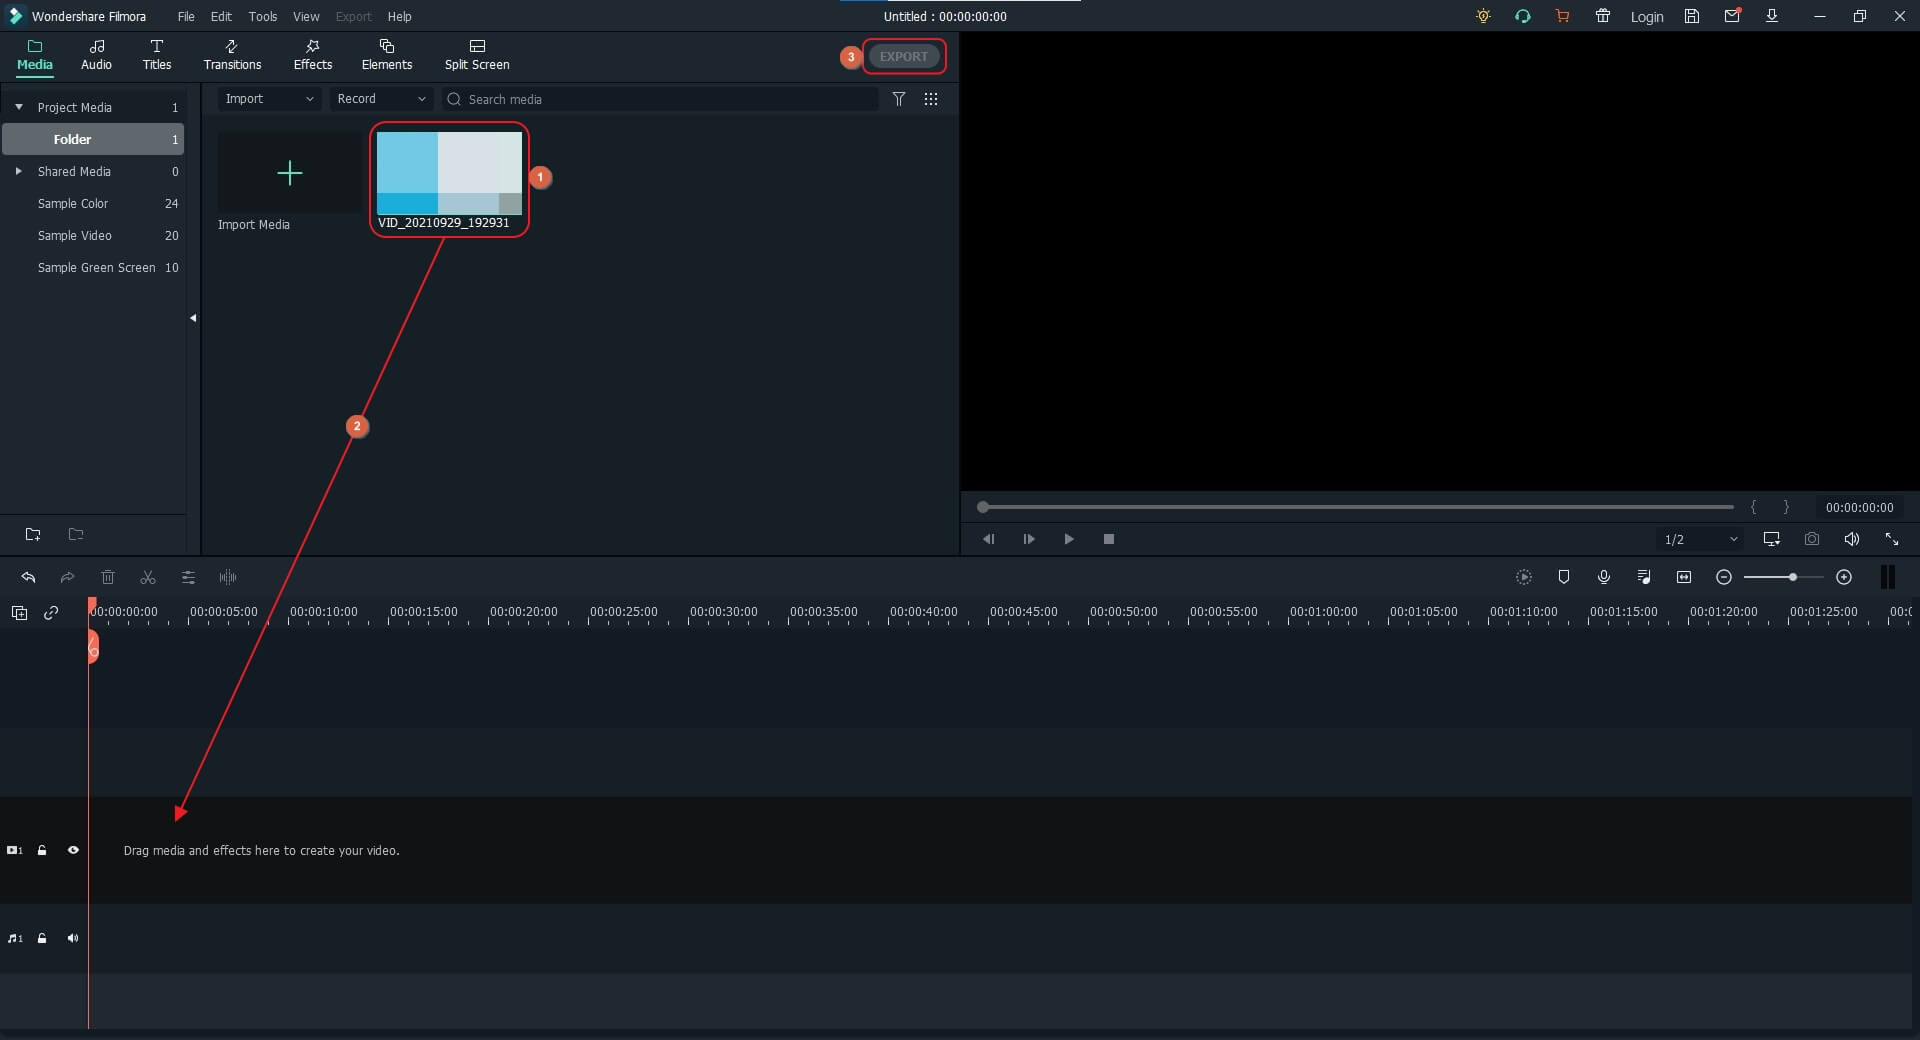
Now, you can drag the recorded footage from the Media box to the Filmora timeline at the bottom to start editing the clip, and then can click EXPORT from the top of the interface to save the final version of the video that can be shared on your preferred platform or with your colleagues, team members, managers, etc.
Find out more solutions to record Teams video meeting .
FAQs About Microsoft Teams Meeting Recording
Q1) Can I record a meeting in Microsoft Teams on mobile?
A1) Yes. As long as you are using the correct license that comes along with the recording feature, you can record Microsoft Teams meetings on both Android and iOS devices. The licenses that allow recording are Office 365 Enterprise E1, E3, E5, F3, A1, A3, A5, M365 Business, Business Essentials, or Business Premium.
Q2) Who can start or stop a recording of a Teams meeting?
A2) The organizer of the meeting or a person from the same organization can start or stop the recording.
Q3) Will people know if I start a recording on Teams meeting?
A3) Yes. If you are using the Teams’ built-in recording feature to record a meeting, all the attendees will be notified about it. If you don’t want anyone to know that you are recording a session, you can use an efficient third-party app like Wondershare Filmora, and follow the steps explained earlier to learn how to record Teams meeting behind the scenes.
Richard Bennett
Richard Bennett is a writer and a lover of all things video.
Follow @Richard Bennett
Richard Bennett
Mar 27, 2024• Proven solutions
If you are hosting a Microsoft Teams meeting or are an important attendee, you may want to record the entire video session for official records. Therefore, the following sections explain how to record Teams meeting on a desktop/laptop computer and a mobile device with ease. In addition, here you will also get to know how to record a Teams meeting automatically, locate the recorded files, and share them conveniently.
Now, because Microsoft Teams notifies all the attendees when you start recording a meeting, one of the sections will also teach how to record Teams meeting secretly, i.e., without letting anyone know that you’re capturing the footage behind the scenes, just in case you want so.
- Part 1: Record Microsoft Teams Meetings on Desktop and Mobile
- Part 2: Automatically Record Microsoft Teams Meetings
- Part 3: Find Recorded Meetings in Teams
- Part 4: Share Recorded Teams Meetings
- Part 5: Record Teams Meeting Secretly
Part 1: How to Record Microsoft Teams Meetings on Desktop and Mobile?
The methods that are given below explain how to record Teams meeting on a PC, an iOS device (typically an iPhone), and Android.
Prerequisites to Record Teams Video Meeting
In order to record a Teams meeting, you:
- Must be a meeting organizer
- Must be using Office 365 Enterprise with an E1, E3, E5, F3, A1, A3, A5, M365 Business, Business Essentials, or Business Premium license
- Must have the recording feature turned on by the IT administrator of the organization
- Must not be a guest or attendee from another organization
1. Record Teams Meeting on Desktop/Laptop
Once you are sure that all the prerequisites that are listed above are met, you can go through the following instructions to learn how to record a Teams meeting on a computer:
Step 1: Start a Teams Video Call
Launch Microsoft Teams on your PC (a Windows 10 laptop here). On the main interface, make sure that the Chat option is selected in the pane on the left. Then, click Video Call (the Camcorder icon) from the top-right area of the Chat pane.
Step 2: Start the Recording
During an ongoing meeting session, click the More actions icon from the top-right area of the Meeting with box, and click Start recording from the menu that comes down next to start the recording.
Step 3: Stop the Recording
Once the meeting session is over, you can open the More actions menu again, and click Stop recording this time to stop the recording.
2. Record Teams Video Meeting on Smartphones
There are a couple of things that you must ensure before a Teams meeting can be recorded on smartphones. The list is given below:
- The correct licenses for Office 365 Enterprise as listed earlier
- The IT administrator has NOT disabled the recording feature
- The Teams data is NOT set to be stored in-country
- You are using the latest version of Teams
- The recording is NOT set in any private team channel
Once all the requirements listed above are met, you can safely continue with the following methods to learn how to record a Teams meeting on a smartphone.
2.1 Record Teams Meeting on iPhone
You can learn how to record Teams meeting on an iPhone with the help of the following instructions:
Step 1: Start a New Meeting on iPhone
Launch Microsoft Teams on your iPhone. Make sure that Chat is selected from the options available at the bottom, tap Instant meeting (the Camcorder icon) from the top-right area of the screen, and tap Start meeting from the Instant meeting box that pops at the lower section to start a new Microsoft Teams meeting.
Step 2: Start the Recording
During the meeting session, tap More actions from the bottom, and tap Start recording to start the recording.
Step 3: Stop the Recording
After the meeting session, tap More actions again, and tap Stop recording this time to stop the recording.
Step 4: Record Meeting on iPhone Externally
Before starting the meeting session, swipe the screen from top-right to bottom (in iPhone X and later) to get to the Control Center screen, and tap the Record button to start the recording secretly. Next, start a new meeting normally. To stop the recording, get to Control Panel again, and tap Stop Recording.
2.2 Record Teams Meeting on Android
The steps that are given below teach how to record a Teams meeting on an Android smartphone:
Step 1: Start a New Meeting
Launch Microsoft Teams on your Android smartphone, make sure that the Chat option is selected from the bottom, tap the Instant meeting icon from the top-right area of the screen, and tap Start meeting from the Instant meeting box. On the next screen, tap Join now to start or join a meeting.
Step 2: Start the Recording
While in the meeting session, tap the More actions icon from the bottom, and tap Start recording from the menu that comes up.
Step 3: Stop the Recording
After the meeting session, tap the More actions icon again, and tap Stop recording from the menu to stop recording the meeting.
Part 2: How to Automatically Record Microsoft Teams Meetings?
Quite recently, Microsoft integrated a new feature to the Teams app that allows the organizers to automatically record all the meeting sessions that take place. The recording starts automatically as soon as the first participant joins a meeting. This automatic recording function can be easily turned off if the organizer wants to.
You can learn how to record a Teams meeting automatically by following the instructions that are given below:
Step 1: Get to the Meeting with Box
Launch Microsoft Teams on your computer, and use the method explained earlier to get to the Meeting with box by initiating a new meeting.
Step 2: Get to the Meeting options Page
When on the Meeting with box, click Join now to start a new meeting, click the Show participants icon from the upper-right area, and when the Participants box comes up, click Manage permissions.
Step 3: Enable Automatic Recording
On the Meeting options page, turn on the Record automatically switch. Once this is done, you can safely share the invitation link with the people you want to attend the meeting, and Teams will start the recording as soon as the first participant joins in.
Part 3: How to Find Recorded Meetings in Teams?
The recorded files of the Teams meetings are saved to SharePoint in case of a channel meeting, or to the ‘Recordings’ folder on OneDrive if it was any other type of meeting. The processes of locating the Teams meeting files are given below:
For Channel Meetings
- Launch Microsoft Teams
- Click to select the Files option from the left pane
- Click to select Microsoft Teams from the Files pane
- Locate the recorded meeting from the window on the right
For Other Meeting Types
- Get to the Files pane using the method explained in the previous section
- Click to select OneDrive from the Cloud storage section
- Locate the recorded meeting file from the right window
Part 4: How to Share Recorded Teams Meetings?
Sharing the recorded meetings is as easy as sharing any other file. The process to share the recording of a meeting file saved on OneDrive is given below:
- Click to select OneDrive from the Cloud storage section of the Files pane as explained earlier
- Locate and right-click the meeting file that you want to share
- Click Share from the context menu
- Use the Share box that opens next to add the participants you want to access the recorded file
- Click Send to start sharing
Part 5: How to Record Teams Meeting Secretly?
Although Microsoft made Teams quite transparent by sending notifications to all the attendees as soon as you start recording a meeting, sometimes you may not want this to happen. In such a case, you must rely on a third-party app that can record your computer screen behind the scenes.
One such program is Filmora by Wondershare. Although Wondershare Filmora is primarily used for industry-standard post-product tasks such as video editing, apply effects and filters to the motion clips, etc., it offers the option to record computer screen , webcam, and audio as additional features so you don’t have to depend on any other software for screencasting.
Download Mac Version ](https://tools.techidaily.com/wondershare/filmora/download/ )
With that said, the steps that are given below teach how to record Teams meeting secretly with Wondershare Filmora:
Step 1: Get to the Wondershare Screen Recorder Panel
Launch Wondershare Filmora on your PC (a Windows 10 computer is used here for illustration), click the Record menu from the top of the Media window, and click Record PC Screen from the menu that comes down.

Step 2: Configure Recording Preferences
On the Wondershare Screen Recorder panel, expand the advanced options by clicking Settings from the lower section. Next, use the available menus and boxes to set up the recording preferences such as full screen, audio, save location, framerate, recording quality, etc.
Step 3: Start Recording Teams Meeting Secretly
After the recording preferences are set, click the Record button to start the screen recording. After this, use the method explained earlier to join or start a new Microsoft Teams meeting.
Step 4: Stop the Recording and Export
Once the meeting session is over, press F9, or right-click the Screen Recorder icon from the notification area, click Open recorder, and then click the Stop button from the panel that appears next to stop the recording.
Now, you can drag the recorded footage from the Media box to the Filmora timeline at the bottom to start editing the clip, and then can click EXPORT from the top of the interface to save the final version of the video that can be shared on your preferred platform or with your colleagues, team members, managers, etc.
Find out more solutions to record Teams video meeting .
FAQs About Microsoft Teams Meeting Recording
Q1) Can I record a meeting in Microsoft Teams on mobile?
A1) Yes. As long as you are using the correct license that comes along with the recording feature, you can record Microsoft Teams meetings on both Android and iOS devices. The licenses that allow recording are Office 365 Enterprise E1, E3, E5, F3, A1, A3, A5, M365 Business, Business Essentials, or Business Premium.
Q2) Who can start or stop a recording of a Teams meeting?
A2) The organizer of the meeting or a person from the same organization can start or stop the recording.
Q3) Will people know if I start a recording on Teams meeting?
A3) Yes. If you are using the Teams’ built-in recording feature to record a meeting, all the attendees will be notified about it. If you don’t want anyone to know that you are recording a session, you can use an efficient third-party app like Wondershare Filmora, and follow the steps explained earlier to learn how to record Teams meeting behind the scenes.
Richard Bennett
Richard Bennett is a writer and a lover of all things video.
Follow @Richard Bennett
Richard Bennett
Mar 27, 2024• Proven solutions
If you are hosting a Microsoft Teams meeting or are an important attendee, you may want to record the entire video session for official records. Therefore, the following sections explain how to record Teams meeting on a desktop/laptop computer and a mobile device with ease. In addition, here you will also get to know how to record a Teams meeting automatically, locate the recorded files, and share them conveniently.
Now, because Microsoft Teams notifies all the attendees when you start recording a meeting, one of the sections will also teach how to record Teams meeting secretly, i.e., without letting anyone know that you’re capturing the footage behind the scenes, just in case you want so.
- Part 1: Record Microsoft Teams Meetings on Desktop and Mobile
- Part 2: Automatically Record Microsoft Teams Meetings
- Part 3: Find Recorded Meetings in Teams
- Part 4: Share Recorded Teams Meetings
- Part 5: Record Teams Meeting Secretly
Part 1: How to Record Microsoft Teams Meetings on Desktop and Mobile?
The methods that are given below explain how to record Teams meeting on a PC, an iOS device (typically an iPhone), and Android.
Prerequisites to Record Teams Video Meeting
In order to record a Teams meeting, you:
- Must be a meeting organizer
- Must be using Office 365 Enterprise with an E1, E3, E5, F3, A1, A3, A5, M365 Business, Business Essentials, or Business Premium license
- Must have the recording feature turned on by the IT administrator of the organization
- Must not be a guest or attendee from another organization
1. Record Teams Meeting on Desktop/Laptop
Once you are sure that all the prerequisites that are listed above are met, you can go through the following instructions to learn how to record a Teams meeting on a computer:
Step 1: Start a Teams Video Call
Launch Microsoft Teams on your PC (a Windows 10 laptop here). On the main interface, make sure that the Chat option is selected in the pane on the left. Then, click Video Call (the Camcorder icon) from the top-right area of the Chat pane.
Step 2: Start the Recording
During an ongoing meeting session, click the More actions icon from the top-right area of the Meeting with box, and click Start recording from the menu that comes down next to start the recording.
Step 3: Stop the Recording
Once the meeting session is over, you can open the More actions menu again, and click Stop recording this time to stop the recording.
2. Record Teams Video Meeting on Smartphones
There are a couple of things that you must ensure before a Teams meeting can be recorded on smartphones. The list is given below:
- The correct licenses for Office 365 Enterprise as listed earlier
- The IT administrator has NOT disabled the recording feature
- The Teams data is NOT set to be stored in-country
- You are using the latest version of Teams
- The recording is NOT set in any private team channel
Once all the requirements listed above are met, you can safely continue with the following methods to learn how to record a Teams meeting on a smartphone.
2.1 Record Teams Meeting on iPhone
You can learn how to record Teams meeting on an iPhone with the help of the following instructions:
Step 1: Start a New Meeting on iPhone
Launch Microsoft Teams on your iPhone. Make sure that Chat is selected from the options available at the bottom, tap Instant meeting (the Camcorder icon) from the top-right area of the screen, and tap Start meeting from the Instant meeting box that pops at the lower section to start a new Microsoft Teams meeting.
Step 2: Start the Recording
During the meeting session, tap More actions from the bottom, and tap Start recording to start the recording.
Step 3: Stop the Recording
After the meeting session, tap More actions again, and tap Stop recording this time to stop the recording.
Step 4: Record Meeting on iPhone Externally
Before starting the meeting session, swipe the screen from top-right to bottom (in iPhone X and later) to get to the Control Center screen, and tap the Record button to start the recording secretly. Next, start a new meeting normally. To stop the recording, get to Control Panel again, and tap Stop Recording.
2.2 Record Teams Meeting on Android
The steps that are given below teach how to record a Teams meeting on an Android smartphone:
Step 1: Start a New Meeting
Launch Microsoft Teams on your Android smartphone, make sure that the Chat option is selected from the bottom, tap the Instant meeting icon from the top-right area of the screen, and tap Start meeting from the Instant meeting box. On the next screen, tap Join now to start or join a meeting.
Step 2: Start the Recording
While in the meeting session, tap the More actions icon from the bottom, and tap Start recording from the menu that comes up.
Step 3: Stop the Recording
After the meeting session, tap the More actions icon again, and tap Stop recording from the menu to stop recording the meeting.
Part 2: How to Automatically Record Microsoft Teams Meetings?
Quite recently, Microsoft integrated a new feature to the Teams app that allows the organizers to automatically record all the meeting sessions that take place. The recording starts automatically as soon as the first participant joins a meeting. This automatic recording function can be easily turned off if the organizer wants to.
You can learn how to record a Teams meeting automatically by following the instructions that are given below:
Step 1: Get to the Meeting with Box
Launch Microsoft Teams on your computer, and use the method explained earlier to get to the Meeting with box by initiating a new meeting.
Step 2: Get to the Meeting options Page
When on the Meeting with box, click Join now to start a new meeting, click the Show participants icon from the upper-right area, and when the Participants box comes up, click Manage permissions.
Step 3: Enable Automatic Recording
On the Meeting options page, turn on the Record automatically switch. Once this is done, you can safely share the invitation link with the people you want to attend the meeting, and Teams will start the recording as soon as the first participant joins in.
Part 3: How to Find Recorded Meetings in Teams?
The recorded files of the Teams meetings are saved to SharePoint in case of a channel meeting, or to the ‘Recordings’ folder on OneDrive if it was any other type of meeting. The processes of locating the Teams meeting files are given below:
For Channel Meetings
- Launch Microsoft Teams
- Click to select the Files option from the left pane
- Click to select Microsoft Teams from the Files pane
- Locate the recorded meeting from the window on the right
For Other Meeting Types
- Get to the Files pane using the method explained in the previous section
- Click to select OneDrive from the Cloud storage section
- Locate the recorded meeting file from the right window
Part 4: How to Share Recorded Teams Meetings?
Sharing the recorded meetings is as easy as sharing any other file. The process to share the recording of a meeting file saved on OneDrive is given below:
- Click to select OneDrive from the Cloud storage section of the Files pane as explained earlier
- Locate and right-click the meeting file that you want to share
- Click Share from the context menu
- Use the Share box that opens next to add the participants you want to access the recorded file
- Click Send to start sharing
Part 5: How to Record Teams Meeting Secretly?
Although Microsoft made Teams quite transparent by sending notifications to all the attendees as soon as you start recording a meeting, sometimes you may not want this to happen. In such a case, you must rely on a third-party app that can record your computer screen behind the scenes.
One such program is Filmora by Wondershare. Although Wondershare Filmora is primarily used for industry-standard post-product tasks such as video editing, apply effects and filters to the motion clips, etc., it offers the option to record computer screen , webcam, and audio as additional features so you don’t have to depend on any other software for screencasting.

Download Mac Version ](https://tools.techidaily.com/wondershare/filmora/download/ )
With that said, the steps that are given below teach how to record Teams meeting secretly with Wondershare Filmora:
Step 1: Get to the Wondershare Screen Recorder Panel
Launch Wondershare Filmora on your PC (a Windows 10 computer is used here for illustration), click the Record menu from the top of the Media window, and click Record PC Screen from the menu that comes down.
Step 2: Configure Recording Preferences
On the Wondershare Screen Recorder panel, expand the advanced options by clicking Settings from the lower section. Next, use the available menus and boxes to set up the recording preferences such as full screen, audio, save location, framerate, recording quality, etc.
Step 3: Start Recording Teams Meeting Secretly
After the recording preferences are set, click the Record button to start the screen recording. After this, use the method explained earlier to join or start a new Microsoft Teams meeting.
Step 4: Stop the Recording and Export
Once the meeting session is over, press F9, or right-click the Screen Recorder icon from the notification area, click Open recorder, and then click the Stop button from the panel that appears next to stop the recording.
Now, you can drag the recorded footage from the Media box to the Filmora timeline at the bottom to start editing the clip, and then can click EXPORT from the top of the interface to save the final version of the video that can be shared on your preferred platform or with your colleagues, team members, managers, etc.
Find out more solutions to record Teams video meeting .

WPS Office Premium ( File Recovery, Photo Scanning, Convert PDF)–Yearly
FAQs About Microsoft Teams Meeting Recording
Q1) Can I record a meeting in Microsoft Teams on mobile?
A1) Yes. As long as you are using the correct license that comes along with the recording feature, you can record Microsoft Teams meetings on both Android and iOS devices. The licenses that allow recording are Office 365 Enterprise E1, E3, E5, F3, A1, A3, A5, M365 Business, Business Essentials, or Business Premium.
Q2) Who can start or stop a recording of a Teams meeting?
A2) The organizer of the meeting or a person from the same organization can start or stop the recording.
Q3) Will people know if I start a recording on Teams meeting?
A3) Yes. If you are using the Teams’ built-in recording feature to record a meeting, all the attendees will be notified about it. If you don’t want anyone to know that you are recording a session, you can use an efficient third-party app like Wondershare Filmora, and follow the steps explained earlier to learn how to record Teams meeting behind the scenes.
Richard Bennett
Richard Bennett is a writer and a lover of all things video.
Follow @Richard Bennett
Richard Bennett
Mar 27, 2024• Proven solutions
If you are hosting a Microsoft Teams meeting or are an important attendee, you may want to record the entire video session for official records. Therefore, the following sections explain how to record Teams meeting on a desktop/laptop computer and a mobile device with ease. In addition, here you will also get to know how to record a Teams meeting automatically, locate the recorded files, and share them conveniently.
Now, because Microsoft Teams notifies all the attendees when you start recording a meeting, one of the sections will also teach how to record Teams meeting secretly, i.e., without letting anyone know that you’re capturing the footage behind the scenes, just in case you want so.
- Part 1: Record Microsoft Teams Meetings on Desktop and Mobile
- Part 2: Automatically Record Microsoft Teams Meetings
- Part 3: Find Recorded Meetings in Teams
- Part 4: Share Recorded Teams Meetings
- Part 5: Record Teams Meeting Secretly
Part 1: How to Record Microsoft Teams Meetings on Desktop and Mobile?
The methods that are given below explain how to record Teams meeting on a PC, an iOS device (typically an iPhone), and Android.
Prerequisites to Record Teams Video Meeting
In order to record a Teams meeting, you:
- Must be a meeting organizer
- Must be using Office 365 Enterprise with an E1, E3, E5, F3, A1, A3, A5, M365 Business, Business Essentials, or Business Premium license
- Must have the recording feature turned on by the IT administrator of the organization
- Must not be a guest or attendee from another organization
1. Record Teams Meeting on Desktop/Laptop
Once you are sure that all the prerequisites that are listed above are met, you can go through the following instructions to learn how to record a Teams meeting on a computer:
Step 1: Start a Teams Video Call
Launch Microsoft Teams on your PC (a Windows 10 laptop here). On the main interface, make sure that the Chat option is selected in the pane on the left. Then, click Video Call (the Camcorder icon) from the top-right area of the Chat pane.
Step 2: Start the Recording
During an ongoing meeting session, click the More actions icon from the top-right area of the Meeting with box, and click Start recording from the menu that comes down next to start the recording.
Step 3: Stop the Recording
Once the meeting session is over, you can open the More actions menu again, and click Stop recording this time to stop the recording.
 Allavsoft Batch Download Online Videos, Music Offline to MP4, MP3, MOV, etc format
2. Record Teams Video Meeting on Smartphones
There are a couple of things that you must ensure before a Teams meeting can be recorded on smartphones. The list is given below:
- The correct licenses for Office 365 Enterprise as listed earlier
- The IT administrator has NOT disabled the recording feature
- The Teams data is NOT set to be stored in-country
- You are using the latest version of Teams
- The recording is NOT set in any private team channel
Once all the requirements listed above are met, you can safely continue with the following methods to learn how to record a Teams meeting on a smartphone.
2.1 Record Teams Meeting on iPhone
You can learn how to record Teams meeting on an iPhone with the help of the following instructions:
Step 1: Start a New Meeting on iPhone
Launch Microsoft Teams on your iPhone. Make sure that Chat is selected from the options available at the bottom, tap Instant meeting (the Camcorder icon) from the top-right area of the screen, and tap Start meeting from the Instant meeting box that pops at the lower section to start a new Microsoft Teams meeting.
Step 2: Start the Recording
During the meeting session, tap More actions from the bottom, and tap Start recording to start the recording.
Step 3: Stop the Recording
After the meeting session, tap More actions again, and tap Stop recording this time to stop the recording.
Step 4: Record Meeting on iPhone Externally
Before starting the meeting session, swipe the screen from top-right to bottom (in iPhone X and later) to get to the Control Center screen, and tap the Record button to start the recording secretly. Next, start a new meeting normally. To stop the recording, get to Control Panel again, and tap Stop Recording.
2.2 Record Teams Meeting on Android
The steps that are given below teach how to record a Teams meeting on an Android smartphone:
Step 1: Start a New Meeting
Launch Microsoft Teams on your Android smartphone, make sure that the Chat option is selected from the bottom, tap the Instant meeting icon from the top-right area of the screen, and tap Start meeting from the Instant meeting box. On the next screen, tap Join now to start or join a meeting.
Step 2: Start the Recording
While in the meeting session, tap the More actions icon from the bottom, and tap Start recording from the menu that comes up.
Step 3: Stop the Recording
After the meeting session, tap the More actions icon again, and tap Stop recording from the menu to stop recording the meeting.
Parental Control Software
## Part 2: How to Automatically Record Microsoft Teams Meetings?Quite recently, Microsoft integrated a new feature to the Teams app that allows the organizers to automatically record all the meeting sessions that take place. The recording starts automatically as soon as the first participant joins a meeting. This automatic recording function can be easily turned off if the organizer wants to.
You can learn how to record a Teams meeting automatically by following the instructions that are given below:
Step 1: Get to the Meeting with Box
Launch Microsoft Teams on your computer, and use the method explained earlier to get to the Meeting with box by initiating a new meeting.
Step 2: Get to the Meeting options Page
When on the Meeting with box, click Join now to start a new meeting, click the Show participants icon from the upper-right area, and when the Participants box comes up, click Manage permissions.
Step 3: Enable Automatic Recording
On the Meeting options page, turn on the Record automatically switch. Once this is done, you can safely share the invitation link with the people you want to attend the meeting, and Teams will start the recording as soon as the first participant joins in.

Part 3: How to Find Recorded Meetings in Teams?
The recorded files of the Teams meetings are saved to SharePoint in case of a channel meeting, or to the ‘Recordings’ folder on OneDrive if it was any other type of meeting. The processes of locating the Teams meeting files are given below:
For Channel Meetings
- Launch Microsoft Teams
- Click to select the Files option from the left pane
- Click to select Microsoft Teams from the Files pane
- Locate the recorded meeting from the window on the right
For Other Meeting Types
- Get to the Files pane using the method explained in the previous section
- Click to select OneDrive from the Cloud storage section
- Locate the recorded meeting file from the right window
Part 4: How to Share Recorded Teams Meetings?
Sharing the recorded meetings is as easy as sharing any other file. The process to share the recording of a meeting file saved on OneDrive is given below:
- Click to select OneDrive from the Cloud storage section of the Files pane as explained earlier
- Locate and right-click the meeting file that you want to share
- Click Share from the context menu
- Use the Share box that opens next to add the participants you want to access the recorded file
- Click Send to start sharing
Part 5: How to Record Teams Meeting Secretly?
Although Microsoft made Teams quite transparent by sending notifications to all the attendees as soon as you start recording a meeting, sometimes you may not want this to happen. In such a case, you must rely on a third-party app that can record your computer screen behind the scenes.
One such program is Filmora by Wondershare. Although Wondershare Filmora is primarily used for industry-standard post-product tasks such as video editing, apply effects and filters to the motion clips, etc., it offers the option to record computer screen , webcam, and audio as additional features so you don’t have to depend on any other software for screencasting.
Download Mac Version ](https://tools.techidaily.com/wondershare/filmora/download/ )
With that said, the steps that are given below teach how to record Teams meeting secretly with Wondershare Filmora:
Step 1: Get to the Wondershare Screen Recorder Panel
Launch Wondershare Filmora on your PC (a Windows 10 computer is used here for illustration), click the Record menu from the top of the Media window, and click Record PC Screen from the menu that comes down.
Step 2: Configure Recording Preferences
On the Wondershare Screen Recorder panel, expand the advanced options by clicking Settings from the lower section. Next, use the available menus and boxes to set up the recording preferences such as full screen, audio, save location, framerate, recording quality, etc.
Step 3: Start Recording Teams Meeting Secretly
After the recording preferences are set, click the Record button to start the screen recording. After this, use the method explained earlier to join or start a new Microsoft Teams meeting.
Step 4: Stop the Recording and Export
Once the meeting session is over, press F9, or right-click the Screen Recorder icon from the notification area, click Open recorder, and then click the Stop button from the panel that appears next to stop the recording.
Now, you can drag the recorded footage from the Media box to the Filmora timeline at the bottom to start editing the clip, and then can click EXPORT from the top of the interface to save the final version of the video that can be shared on your preferred platform or with your colleagues, team members, managers, etc.

Find out more solutions to record Teams video meeting .
FAQs About Microsoft Teams Meeting Recording
Q1) Can I record a meeting in Microsoft Teams on mobile?
A1) Yes. As long as you are using the correct license that comes along with the recording feature, you can record Microsoft Teams meetings on both Android and iOS devices. The licenses that allow recording are Office 365 Enterprise E1, E3, E5, F3, A1, A3, A5, M365 Business, Business Essentials, or Business Premium.
Q2) Who can start or stop a recording of a Teams meeting?
A2) The organizer of the meeting or a person from the same organization can start or stop the recording.
Q3) Will people know if I start a recording on Teams meeting?
A3) Yes. If you are using the Teams’ built-in recording feature to record a meeting, all the attendees will be notified about it. If you don’t want anyone to know that you are recording a session, you can use an efficient third-party app like Wondershare Filmora, and follow the steps explained earlier to learn how to record Teams meeting behind the scenes.

Richard Bennett
Richard Bennett is a writer and a lover of all things video.
Follow @Richard Bennett
- Title: [Updated] Virtual Room Recordings Desktop & Mobile Tips
- Author: Queen
- Created at : 2024-07-20 08:46:59
- Updated at : 2024-07-21 08:46:59
- Link: https://screen-mirroring-recording.techidaily.com/updated-virtual-room-recordings-desktop-and-mobile-tips/
- License: This work is licensed under CC BY-NC-SA 4.0.