![[Updated] In 2024, Securely Sharing Visuals Learn the Art of Screencast with Ezvid](https://thmb.techidaily.com/be42a9800526c31b5bfdef3ed18cce59bd7b3192524b647f6f87b51df7e044d8.png)
"[Updated] In 2024, Securely Sharing Visuals Learn the Art of Screencast with Ezvid"
Securely Sharing Visuals: Learn the Art of Screencast with Ezvid
Ezvid is a popular screen recording and video editing software. With the emergence of video streaming and social media platforms, there has been an exponential rise in the number of video creators. Every video creator needs a professional video editing and screen recording software so that their video is of top-notch quality to get the attention of the viewers instantly. That is exactly why Ezvid is popular, as it provides a perfect for recording and editing. Ezvid comes with a user-friendly interface unlike many professional video editing and recording software.
You can capture anything on your screen such as games, browser activities as well as desktop activities. You can also record Facecam and add voiceover. Starting from adding instant effects and drawing on the screen to control video speed control and adding free music, there is no dearth of features and options. However, is Ezvid screen recorder the best software available or is there a better alternative you can opt for? In this article, we will explain the features of Ezvid and how to use Ezvid recorder. Thereafter, we will recommend a better alternative tool for screen recording.
Part 1. Key Features of Ezvid
Part 2. How to Use Ezvid Screen Recorder
Part 3. Alternative Tool to Record Screen
1. Key Features of Ezvid
Ezvid video maker is a great screen recording software and here are the features that the software has to offer to satisfy all the requirements of the video creators.
Record Screen and Facecam
Ezvid is an incredible screen recorder to capture your desktop screen as well as browser screen. The user interface is clean and there is a direct option available to start recording the entire screen. Moreover, there are advanced options available such as capturing a region of the screen instead of the entire screen.
Besides, you can record Facecam which is extremely important for video creators who show the screen as well as their face on the same video simultaneously. This makes the video more relatable and professional. Therefore, apart from recording the entire or part of the screen, you can record from the webcam and both the capturing is put together in the same video.
Instant Screen Drawing
Instead of waiting for the screen recording to get over and editing the recorded video to add drawings, you can add the required drawings live while recording the screen with Ezvid screen recorder. This simple feature is going to save you a lot of time as there is no further editing required. There are ample drawings available to illustrate on the screen and draw the attention of the viewers in the highlighted areas.
Gameplay Recording
Apart from recording desktop screen as well as browser screen, there is a special and dedicated feature to capture the screen while playing games. The software comes with guided instructions on how to record gameplay for complete user convenience. Professional gamers may not get all the customization options but Ezvid gets the job done perfectly. After recording the game screen, you can edit the video and upload it on social media and video streaming platforms.
Free Music Addition
One of the main reasons why a good-quality video stands out from a basic video is the background music. You will find only a few screen recorders and video editors to add free music in the background of the video as per your preference and requirements. This makes the video soothing and pleasant to the ears rather than just being pleasant to the eyes. There is no need to search online for free music to add to your screen recordings as you can find suitable music for your video from Ezvid library.
Control Video Speed
You know how important it is to regulate video speed so that the crucial moments are recorded at a slow speed while not so important parts can be at a high speed. There are only a few screen recorders available that allow users to control video speed. This is a necessary feature professional video creators always look for in a screen recording and video editing software.
Instant Slideshow Maker -
Instead of making and editing videos all the time, you can also use Ezvid to make slideshows using screenshots and photos. There are beautiful transitions and effects available and you can add texts and drawings. You can make the slideshows instantly and share them with anyone on any platform. Therefore, Ezvid video maker can be used as a screen recorder as well as slideshow maker.
Besides, you can add voice over to the recorded video to make it more professional and interesting.

2. How to Use Ezvid Screen Recorder
Ezvid screen recorder is easy to use and it is perfect for beginners as well. It is important to note that Ezvid is available only for Windows users. If you are using Mac, you can check out the best alternative in the next section. Ezvid for Windows is compatible with Windows XP to Windows 10. Here are the steps to follow to record the screen with Ezvid.
Step 1: Download and Install Ezvid from the official website of Ezvid for Windows.
Step 2: Launch Ezvid and click on Capture Screen option (monitor icon) located at the bottom-right corner as you can see on the screenshot.
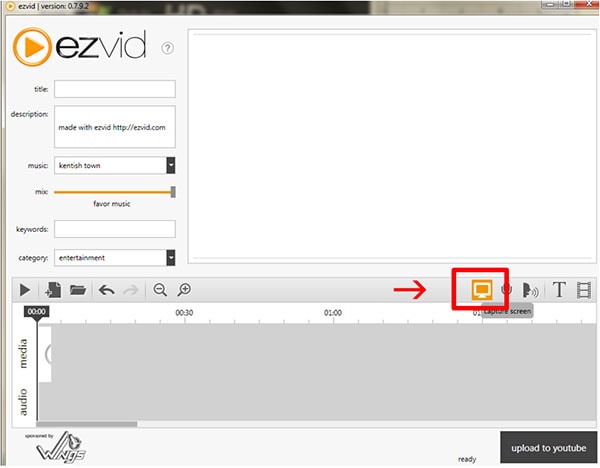
Step 3: This will start recording the entire screen. If you want to stop recording, you have to click on Stop button. You can also cancel the recording by clicking on “X” icon.
Note: You can also drag and dump any video on Ezvid for editing purposes.
Step 4: Once you stop the recording, the recorded video will show up with its timeline. If you want to add voiceover, you have to click on Record Voice button (mic icon).

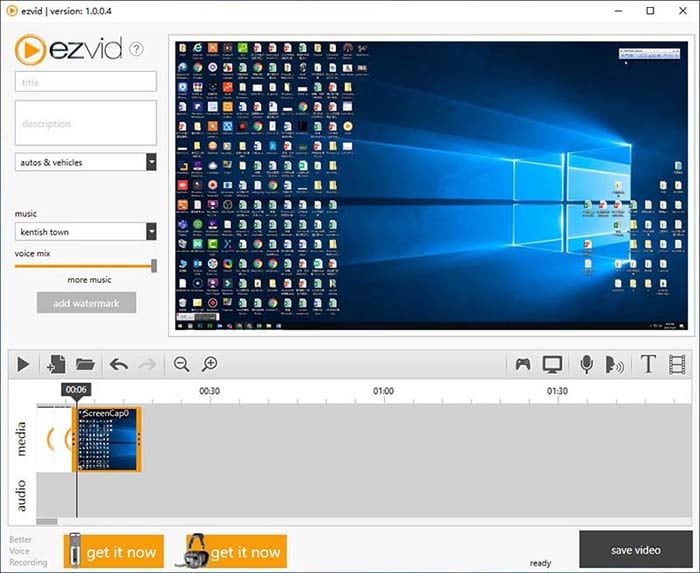
Step 5: If you want to trim the video in terms of duration, you can do it directly on its timeline. Not just that, you can crop video as well as add texts and images as required while editing.
Step 6: On the left side of the screen, you can add a title, a proper description, a perfect category as well as keywords to the video file.
Step 7: You can click on the Play button to get a preview before saving the file and uploading it on social media and video streaming platforms.
3. Alternative Tool to Record Screen
While Ezvid screen recorder is good enough, Wondershare Filmora is simply better. You can record screen up to HD resolution while Filmora Screen Recorder lets you record up to 4K resolution. Naturally, the video quality is going to be stunning and it is crucial in gameplay recording. Ezvid has no option to record only a specific part of the screen that Filmora comes with. There are simply better filters, effects, and transitions available on Filmora.
Apart from giving voiceover, you can record your audio live with a microphone and use green screen technology using Filmora. Moreover, Filmora not just allows inserting of drawings but also captions and stickers. To sum it all up, Filmora is literally more professional for all perspectives, and therefore, Wondershare Filmora is the best alternative to Ezvid video maker.
Step 1: Download and install Wondershare Filmora on your PC. Launch Wondershare Filmora.
For Win 7 or later (64-bit)
For macOS 10.12 or later
Step 2: Click on New Project and this will take up the entire screen space for recording. Therefore, you should have the application running in the background if you want to record it.


Step 3: Go to Record menu option.
Step 4: Click on Record PC Screen option.
Step 5: From the pop-up box, you need to select the option to record the entire screen or only a specific screen part.
Step 6: Finally, click on the Record button.
Step 7: Now, Filmora will give you a few seconds of buffer time so that you can go to the application or game whichever you want to record.

Lastly, click on Stop button by hovering on to the top bar. The recorded video file will get saved to Filmora folder.
The Bottom Line
You can go for Ezvid download as well as Wondershare Filmora download to see for yourself which is truly the best one. We prefer Wondershare Filmora as the features simply outshine the features of Ezvid. If you are looking for casual screen recording, Ezvid will suffice. However, if you want pro-level screen recording and video editing, Wondershare Filmora should be your priority.
Part 2. How to Use Ezvid Screen Recorder
Part 3. Alternative Tool to Record Screen
1. Key Features of Ezvid
Ezvid video maker is a great screen recording software and here are the features that the software has to offer to satisfy all the requirements of the video creators.
Record Screen and Facecam
Ezvid is an incredible screen recorder to capture your desktop screen as well as browser screen. The user interface is clean and there is a direct option available to start recording the entire screen. Moreover, there are advanced options available such as capturing a region of the screen instead of the entire screen.
Besides, you can record Facecam which is extremely important for video creators who show the screen as well as their face on the same video simultaneously. This makes the video more relatable and professional. Therefore, apart from recording the entire or part of the screen, you can record from the webcam and both the capturing is put together in the same video.
Instant Screen Drawing
Instead of waiting for the screen recording to get over and editing the recorded video to add drawings, you can add the required drawings live while recording the screen with Ezvid screen recorder. This simple feature is going to save you a lot of time as there is no further editing required. There are ample drawings available to illustrate on the screen and draw the attention of the viewers in the highlighted areas.
Gameplay Recording
Apart from recording desktop screen as well as browser screen, there is a special and dedicated feature to capture the screen while playing games. The software comes with guided instructions on how to record gameplay for complete user convenience. Professional gamers may not get all the customization options but Ezvid gets the job done perfectly. After recording the game screen, you can edit the video and upload it on social media and video streaming platforms.
Free Music Addition
One of the main reasons why a good-quality video stands out from a basic video is the background music. You will find only a few screen recorders and video editors to add free music in the background of the video as per your preference and requirements. This makes the video soothing and pleasant to the ears rather than just being pleasant to the eyes. There is no need to search online for free music to add to your screen recordings as you can find suitable music for your video from Ezvid library.
Control Video Speed
You know how important it is to regulate video speed so that the crucial moments are recorded at a slow speed while not so important parts can be at a high speed. There are only a few screen recorders available that allow users to control video speed. This is a necessary feature professional video creators always look for in a screen recording and video editing software.
Instant Slideshow Maker -
Instead of making and editing videos all the time, you can also use Ezvid to make slideshows using screenshots and photos. There are beautiful transitions and effects available and you can add texts and drawings. You can make the slideshows instantly and share them with anyone on any platform. Therefore, Ezvid video maker can be used as a screen recorder as well as slideshow maker.
Besides, you can add voice over to the recorded video to make it more professional and interesting.
2. How to Use Ezvid Screen Recorder
Ezvid screen recorder is easy to use and it is perfect for beginners as well. It is important to note that Ezvid is available only for Windows users. If you are using Mac, you can check out the best alternative in the next section. Ezvid for Windows is compatible with Windows XP to Windows 10. Here are the steps to follow to record the screen with Ezvid.
Step 1: Download and Install Ezvid from the official website of Ezvid for Windows.
Step 2: Launch Ezvid and click on Capture Screen option (monitor icon) located at the bottom-right corner as you can see on the screenshot.
Step 3: This will start recording the entire screen. If you want to stop recording, you have to click on Stop button. You can also cancel the recording by clicking on “X” icon.
Note: You can also drag and dump any video on Ezvid for editing purposes.
Step 4: Once you stop the recording, the recorded video will show up with its timeline. If you want to add voiceover, you have to click on Record Voice button (mic icon).
Step 5: If you want to trim the video in terms of duration, you can do it directly on its timeline. Not just that, you can crop video as well as add texts and images as required while editing.
Step 6: On the left side of the screen, you can add a title, a proper description, a perfect category as well as keywords to the video file.
Step 7: You can click on the Play button to get a preview before saving the file and uploading it on social media and video streaming platforms.
3. Alternative Tool to Record Screen
While Ezvid screen recorder is good enough, Wondershare Filmora is simply better. You can record screen up to HD resolution while Filmora Screen Recorder lets you record up to 4K resolution. Naturally, the video quality is going to be stunning and it is crucial in gameplay recording. Ezvid has no option to record only a specific part of the screen that Filmora comes with. There are simply better filters, effects, and transitions available on Filmora.
Apart from giving voiceover, you can record your audio live with a microphone and use green screen technology using Filmora. Moreover, Filmora not just allows inserting of drawings but also captions and stickers. To sum it all up, Filmora is literally more professional for all perspectives, and therefore, Wondershare Filmora is the best alternative to Ezvid video maker.
Step 1: Download and install Wondershare Filmora on your PC. Launch Wondershare Filmora.
For Win 7 or later (64-bit)
For macOS 10.12 or later
Step 2: Click on New Project and this will take up the entire screen space for recording. Therefore, you should have the application running in the background if you want to record it.
Step 3: Go to Record menu option.
Step 4: Click on Record PC Screen option.
Step 5: From the pop-up box, you need to select the option to record the entire screen or only a specific screen part.
 Easy GIF Animator is a powerful animated GIF editor and the top tool for creating animated pictures, banners, buttons and GIF videos. You get extensive animation editing features, animation effects, unmatched image quality and optimization for the web. No other GIF animation software matches our features and ease of use, that’s why Easy GIF Animator is so popular.
Step 6: Finally, click on the Record button.
Step 7: Now, Filmora will give you a few seconds of buffer time so that you can go to the application or game whichever you want to record.
Lastly, click on Stop button by hovering on to the top bar. The recorded video file will get saved to Filmora folder.
The Bottom Line
You can go for Ezvid download as well as Wondershare Filmora download to see for yourself which is truly the best one. We prefer Wondershare Filmora as the features simply outshine the features of Ezvid. If you are looking for casual screen recording, Ezvid will suffice. However, if you want pro-level screen recording and video editing, Wondershare Filmora should be your priority.
Part 2. How to Use Ezvid Screen Recorder
Part 3. Alternative Tool to Record Screen
1. Key Features of Ezvid
Ezvid video maker is a great screen recording software and here are the features that the software has to offer to satisfy all the requirements of the video creators.
Record Screen and Facecam
Ezvid is an incredible screen recorder to capture your desktop screen as well as browser screen. The user interface is clean and there is a direct option available to start recording the entire screen. Moreover, there are advanced options available such as capturing a region of the screen instead of the entire screen.
Besides, you can record Facecam which is extremely important for video creators who show the screen as well as their face on the same video simultaneously. This makes the video more relatable and professional. Therefore, apart from recording the entire or part of the screen, you can record from the webcam and both the capturing is put together in the same video.
Instant Screen Drawing
Instead of waiting for the screen recording to get over and editing the recorded video to add drawings, you can add the required drawings live while recording the screen with Ezvid screen recorder. This simple feature is going to save you a lot of time as there is no further editing required. There are ample drawings available to illustrate on the screen and draw the attention of the viewers in the highlighted areas.
Gameplay Recording
Apart from recording desktop screen as well as browser screen, there is a special and dedicated feature to capture the screen while playing games. The software comes with guided instructions on how to record gameplay for complete user convenience. Professional gamers may not get all the customization options but Ezvid gets the job done perfectly. After recording the game screen, you can edit the video and upload it on social media and video streaming platforms.
Free Music Addition
One of the main reasons why a good-quality video stands out from a basic video is the background music. You will find only a few screen recorders and video editors to add free music in the background of the video as per your preference and requirements. This makes the video soothing and pleasant to the ears rather than just being pleasant to the eyes. There is no need to search online for free music to add to your screen recordings as you can find suitable music for your video from Ezvid library.
Control Video Speed
You know how important it is to regulate video speed so that the crucial moments are recorded at a slow speed while not so important parts can be at a high speed. There are only a few screen recorders available that allow users to control video speed. This is a necessary feature professional video creators always look for in a screen recording and video editing software.
Instant Slideshow Maker -
Instead of making and editing videos all the time, you can also use Ezvid to make slideshows using screenshots and photos. There are beautiful transitions and effects available and you can add texts and drawings. You can make the slideshows instantly and share them with anyone on any platform. Therefore, Ezvid video maker can be used as a screen recorder as well as slideshow maker.
Besides, you can add voice over to the recorded video to make it more professional and interesting.
2. How to Use Ezvid Screen Recorder
Ezvid screen recorder is easy to use and it is perfect for beginners as well. It is important to note that Ezvid is available only for Windows users. If you are using Mac, you can check out the best alternative in the next section. Ezvid for Windows is compatible with Windows XP to Windows 10. Here are the steps to follow to record the screen with Ezvid.
Step 1: Download and Install Ezvid from the official website of Ezvid for Windows.
Step 2: Launch Ezvid and click on Capture Screen option (monitor icon) located at the bottom-right corner as you can see on the screenshot.
Step 3: This will start recording the entire screen. If you want to stop recording, you have to click on Stop button. You can also cancel the recording by clicking on “X” icon.
Note: You can also drag and dump any video on Ezvid for editing purposes.
Step 4: Once you stop the recording, the recorded video will show up with its timeline. If you want to add voiceover, you have to click on Record Voice button (mic icon).
Step 5: If you want to trim the video in terms of duration, you can do it directly on its timeline. Not just that, you can crop video as well as add texts and images as required while editing.
Step 6: On the left side of the screen, you can add a title, a proper description, a perfect category as well as keywords to the video file.
Step 7: You can click on the Play button to get a preview before saving the file and uploading it on social media and video streaming platforms.
3. Alternative Tool to Record Screen
While Ezvid screen recorder is good enough, Wondershare Filmora is simply better. You can record screen up to HD resolution while Filmora Screen Recorder lets you record up to 4K resolution. Naturally, the video quality is going to be stunning and it is crucial in gameplay recording. Ezvid has no option to record only a specific part of the screen that Filmora comes with. There are simply better filters, effects, and transitions available on Filmora.
Apart from giving voiceover, you can record your audio live with a microphone and use green screen technology using Filmora. Moreover, Filmora not just allows inserting of drawings but also captions and stickers. To sum it all up, Filmora is literally more professional for all perspectives, and therefore, Wondershare Filmora is the best alternative to Ezvid video maker.
Step 1: Download and install Wondershare Filmora on your PC. Launch Wondershare Filmora.
For Win 7 or later (64-bit)
For macOS 10.12 or later
Step 2: Click on New Project and this will take up the entire screen space for recording. Therefore, you should have the application running in the background if you want to record it.
Step 3: Go to Record menu option.
Step 4: Click on Record PC Screen option.
Step 5: From the pop-up box, you need to select the option to record the entire screen or only a specific screen part.
Step 6: Finally, click on the Record button.
Step 7: Now, Filmora will give you a few seconds of buffer time so that you can go to the application or game whichever you want to record.
Lastly, click on Stop button by hovering on to the top bar. The recorded video file will get saved to Filmora folder.
 ZoneAlarm Extreme Security NextGen
The Bottom Line
You can go for Ezvid download as well as Wondershare Filmora download to see for yourself which is truly the best one. We prefer Wondershare Filmora as the features simply outshine the features of Ezvid. If you are looking for casual screen recording, Ezvid will suffice. However, if you want pro-level screen recording and video editing, Wondershare Filmora should be your priority.
Part 2. How to Use Ezvid Screen Recorder
Part 3. Alternative Tool to Record Screen
1. Key Features of Ezvid
Ezvid video maker is a great screen recording software and here are the features that the software has to offer to satisfy all the requirements of the video creators.
Record Screen and Facecam
Ezvid is an incredible screen recorder to capture your desktop screen as well as browser screen. The user interface is clean and there is a direct option available to start recording the entire screen. Moreover, there are advanced options available such as capturing a region of the screen instead of the entire screen.
Besides, you can record Facecam which is extremely important for video creators who show the screen as well as their face on the same video simultaneously. This makes the video more relatable and professional. Therefore, apart from recording the entire or part of the screen, you can record from the webcam and both the capturing is put together in the same video.
Instant Screen Drawing
Instead of waiting for the screen recording to get over and editing the recorded video to add drawings, you can add the required drawings live while recording the screen with Ezvid screen recorder. This simple feature is going to save you a lot of time as there is no further editing required. There are ample drawings available to illustrate on the screen and draw the attention of the viewers in the highlighted areas.
Gameplay Recording
Apart from recording desktop screen as well as browser screen, there is a special and dedicated feature to capture the screen while playing games. The software comes with guided instructions on how to record gameplay for complete user convenience. Professional gamers may not get all the customization options but Ezvid gets the job done perfectly. After recording the game screen, you can edit the video and upload it on social media and video streaming platforms.
Free Music Addition
One of the main reasons why a good-quality video stands out from a basic video is the background music. You will find only a few screen recorders and video editors to add free music in the background of the video as per your preference and requirements. This makes the video soothing and pleasant to the ears rather than just being pleasant to the eyes. There is no need to search online for free music to add to your screen recordings as you can find suitable music for your video from Ezvid library.
Control Video Speed
You know how important it is to regulate video speed so that the crucial moments are recorded at a slow speed while not so important parts can be at a high speed. There are only a few screen recorders available that allow users to control video speed. This is a necessary feature professional video creators always look for in a screen recording and video editing software.
Instant Slideshow Maker -
Instead of making and editing videos all the time, you can also use Ezvid to make slideshows using screenshots and photos. There are beautiful transitions and effects available and you can add texts and drawings. You can make the slideshows instantly and share them with anyone on any platform. Therefore, Ezvid video maker can be used as a screen recorder as well as slideshow maker.
Besides, you can add voice over to the recorded video to make it more professional and interesting.

2. How to Use Ezvid Screen Recorder
Ezvid screen recorder is easy to use and it is perfect for beginners as well. It is important to note that Ezvid is available only for Windows users. If you are using Mac, you can check out the best alternative in the next section. Ezvid for Windows is compatible with Windows XP to Windows 10. Here are the steps to follow to record the screen with Ezvid.
Step 1: Download and Install Ezvid from the official website of Ezvid for Windows.
Step 2: Launch Ezvid and click on Capture Screen option (monitor icon) located at the bottom-right corner as you can see on the screenshot.
Step 3: This will start recording the entire screen. If you want to stop recording, you have to click on Stop button. You can also cancel the recording by clicking on “X” icon.
Note: You can also drag and dump any video on Ezvid for editing purposes.
Step 4: Once you stop the recording, the recorded video will show up with its timeline. If you want to add voiceover, you have to click on Record Voice button (mic icon).
Step 5: If you want to trim the video in terms of duration, you can do it directly on its timeline. Not just that, you can crop video as well as add texts and images as required while editing.
Step 6: On the left side of the screen, you can add a title, a proper description, a perfect category as well as keywords to the video file.
Step 7: You can click on the Play button to get a preview before saving the file and uploading it on social media and video streaming platforms.
3. Alternative Tool to Record Screen
While Ezvid screen recorder is good enough, Wondershare Filmora is simply better. You can record screen up to HD resolution while Filmora Screen Recorder lets you record up to 4K resolution. Naturally, the video quality is going to be stunning and it is crucial in gameplay recording. Ezvid has no option to record only a specific part of the screen that Filmora comes with. There are simply better filters, effects, and transitions available on Filmora.
Apart from giving voiceover, you can record your audio live with a microphone and use green screen technology using Filmora. Moreover, Filmora not just allows inserting of drawings but also captions and stickers. To sum it all up, Filmora is literally more professional for all perspectives, and therefore, Wondershare Filmora is the best alternative to Ezvid video maker.
Step 1: Download and install Wondershare Filmora on your PC. Launch Wondershare Filmora.
For Win 7 or later (64-bit)
For macOS 10.12 or later
Step 2: Click on New Project and this will take up the entire screen space for recording. Therefore, you should have the application running in the background if you want to record it.
Step 3: Go to Record menu option.
Step 4: Click on Record PC Screen option.
Step 5: From the pop-up box, you need to select the option to record the entire screen or only a specific screen part.
Step 6: Finally, click on the Record button.
Step 7: Now, Filmora will give you a few seconds of buffer time so that you can go to the application or game whichever you want to record.
 PDF application, powered by AI-based OCR, for unified workflows with both digital and scanned documents.
Lastly, click on Stop button by hovering on to the top bar. The recorded video file will get saved to Filmora folder.

The Bottom Line
You can go for Ezvid download as well as Wondershare Filmora download to see for yourself which is truly the best one. We prefer Wondershare Filmora as the features simply outshine the features of Ezvid. If you are looking for casual screen recording, Ezvid will suffice. However, if you want pro-level screen recording and video editing, Wondershare Filmora should be your priority.
- Title: [Updated] In 2024, Securely Sharing Visuals Learn the Art of Screencast with Ezvid
- Author: Queen
- Created at : 2024-07-20 07:54:26
- Updated at : 2024-07-21 07:54:26
- Link: https://screen-mirroring-recording.techidaily.com/updated-in-2024-securely-sharing-visuals-learn-the-art-of-screencast-with-ezvid/
- License: This work is licensed under CC BY-NC-SA 4.0.