
!["[Updated] 2024 Approved Merge PPT Deck with Cinematic Capabilities"](https://www.lifewire.com/thmb/CJ67ETb2O4uuEo78S2gUHwX4efQ=/400x300/filters:no_upscale():max_bytes(150000):strip_icc():format(webp)/TheWolfAmongUsBigby-793544cded2749488ae1d20113d8d73a.jpg)
"[Updated] 2024 Approved Merge PPT Deck with Cinematic Capabilities"
Merge PPT Deck with Cinematic Capabilities
How to Save PowerPoint Presentation as Video on Windows and Mac OS

Max Wales
Mar 27, 2024• Proven solutions
Organizing information in a presentable way was the task Microsoft PowerPoint has performed brilliantly since the early 1990’s. However, sometimes it is not enough to arrange slides in a PowerPoint presentation, because PPT files this iconic software produces are not easily shared on social media. What’s more, saving your presentations as video files will enable you to protect them from unauthorized use and it will allow you to include them in your eLearning courses or online marketing campaigns.
That’s the reason why we decided to show you how you can save your PowerPoint presentations on 2016, 2013, 2010 and 2007 versions of PowerPoint on both Windows and Mac OS.
- Part 1:Save PowerPoint 2007 Presentations as Video on Windows OS
- Part 2: Saving a PowerPoint 2010 Presentation as a Video
- Part 3: How to Save a PowerPoint 2013 or 2016 Presentation as a video on Windows OS
- Part 4: Saving PowerPoint Presentation as video on Mac OS
![]()

The All-in-One Screen Recorder & Video Editor
- Record desktop screen, voiceover, and webcam simultaneously
- Edit recorded clips quickly with a wide range of professional tools
- Built-in plentiful templates and effects
- Export to MP4, MOV, MKV, GIF and multiple formats
For Win 7 or later (64-bit)
For macOS 10.12 or later
 Secure Download
Part 1:How to Save a PowerPoint 2007 Presentation as a Video on Windows OS
All versions of the PowerPoint that were released since 2010 allow its users to save their presentations as videos, but older versions of the software are still frequently used. The process of converting a PPT file into a video file in PowerPoint 2007 may not be as simple as on the latest version of the software, but it is far from being complicated. Please note that if you have a 2013 PowerPoint and you want to save a PPT file created on the 2007 version of the software you can do so by clicking on the Create a Video option. Here’s how you can convert a PowerPoint presentation to video if you are still using PowerPoint 2007.
Before you proceed any further you’ll have to make sure that you have Windows Movie Maker installed on your PC. Afterward, you should save each slide you included in your presentation as an image file, preferably in the JPG file format. You can do this by clicking on the File menu. then opening the Save As submenu and choosing the Other Formats option.

When all the slides are saved as images, you should launch the Windows Movie Maker and import all images you previously created in PowerPoint. If you want to include narration in your PowerPoint video, you can import the audio file directly into the Windows Movie Maker and add it to your project.
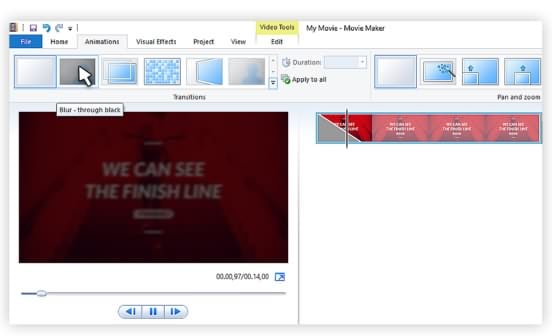
This method of saving a PowerPoint presentation as a video doesn’t allow you to keep animations, transitions or multimedia files, because you have to convert all slides into image files.
Part 2: Saving PowerPoint 2010 Presentation as Video
Unlike the previous version of the software, PowerPoint 2010 actually features an option that enables you to convert the PPT file into a video file format. Unfortunately, you can only save videos as WMV files, that have some major downsides. Be it as it may, the process of saving a PowerPoint presentation as a video on this version of the software won’t take too much of your time.
After you create a presentation, save it as you normally would. You should then proceed to insert timings or record narration if you want to add a voiceover to your PowerPoint video. Click on the File menu and locate the Save and Send feature.
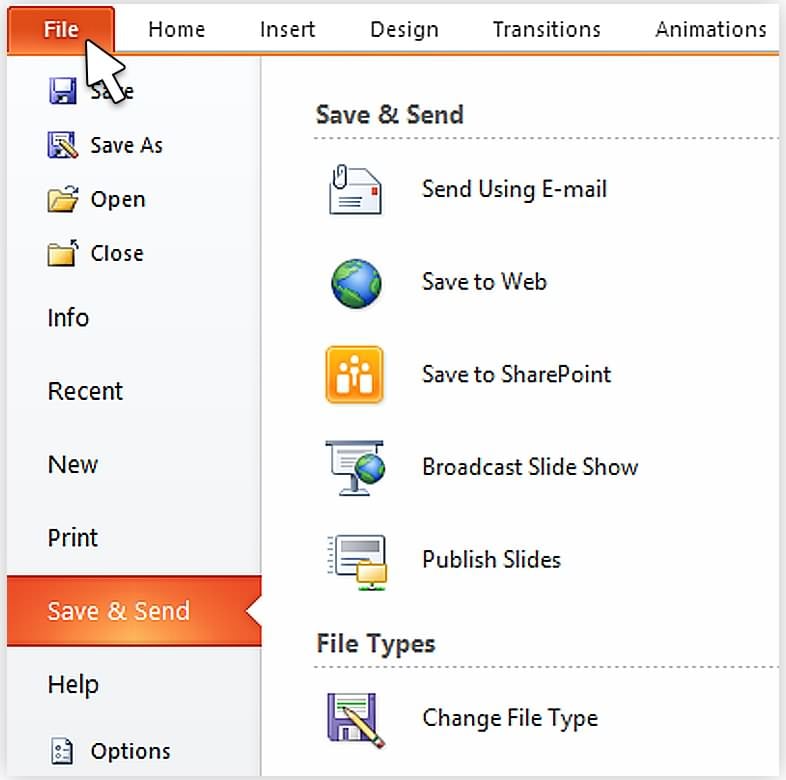
When the Save and Send menu appears on the screen you should find the Create a Video option and click on it.

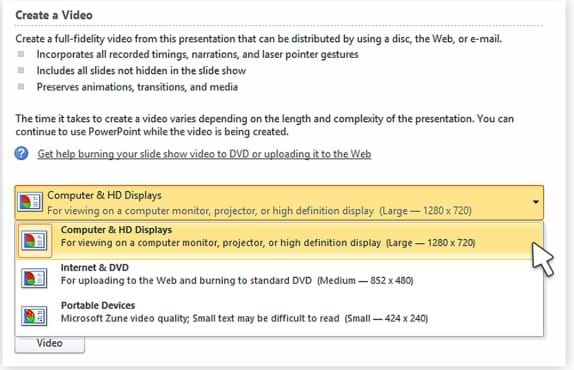
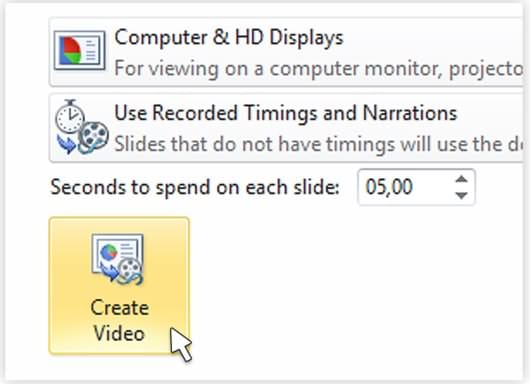
Create a Video box that contains video settings will pop up on the screen and you should click on the Computer&HD Displays option in order to adjust the size and the quality of your video.
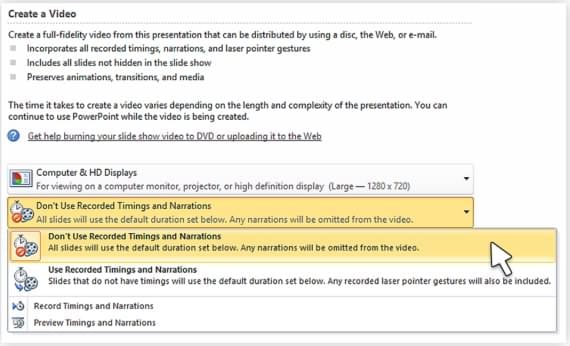
In the next step, you can switch off the default timings and narration by clicking on the Don’t Use Recorded Timings and Narration. Keep in mind that this step is only necessary if you want to adjust timings manually and use narration you recorded.
Click on the Create Video icon once you’ve made all adjustments and go ahead to select the destination on your hard drive where the video file will be saved and to insert a file name.
The conversion process will take a while, but after it is over, you’ll be able to share the PowerPoint presentation video on video sharing platforms or social media networks.
Part 3: How to Save a PowerPoint 2013 or 2016 Presentation as a video on Windows OS
The steps you’ll need to take in order to save your PPT 2013 or 2016 as a video are nearly identical to those on PowerPoint 2010. The only difference is that on recent versions of the software you can save the video in MP4 file format that is better suited for online distribution than the WMV file format. Here’s how you can convert PPT to video in PowerPoint 2013.
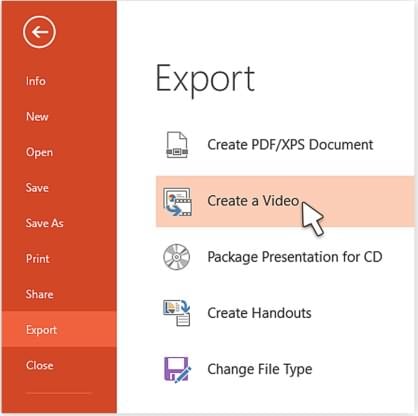
Collapse the File menu and select the Export option, then click on the Create a Video feature.
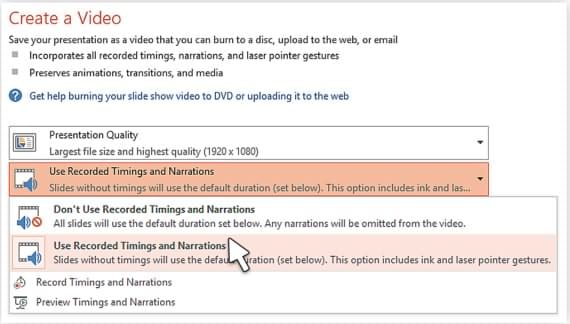
Once the Create a Video window emerges on the screen, you should click on the Computer and HD Displays option, so you can adjust the video quality and size settings.

After fine-tuning the video settings, you can proceed to click on the Use Recorded Timings and Narrations menu. If you don’t want to include narration or recorded timings in your video, you can set the duration of each slide individually with the Timings feature that is located at the bottom of the screen.
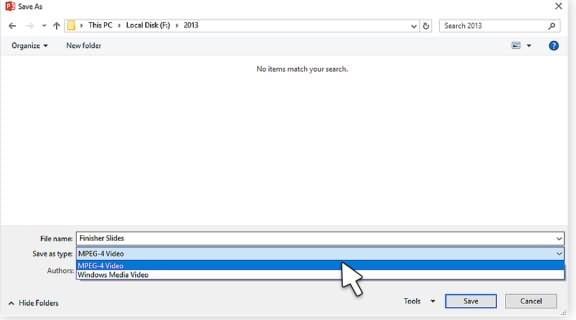
Hitting the Create a Video button will bring up the Save As window that will enable you to name the video file, select the location of the folder where the video file will be saved and choose the file format to which you want to convert the PPT file. When ready, click on the Save button to start the conversion, and that’s it, you’ve successfully turned a PPT file into a video.
Part 4: Saving PowerPoint Presentation as video on Mac OS
Mac users who want to save PPT files as videos can easily do so, but the videos they create can only be saved as .mov files that are compatible with QuickTime player and file conversion software. The Mac version of PowerPoint doesn’t allow you to include multimedia, transitions or animations in your videos, and for that reason, it is important to remove all such content from the presentation before you start the conversion process. The following steps are applicable in 2008 and 2011 PowerPoint for Mac
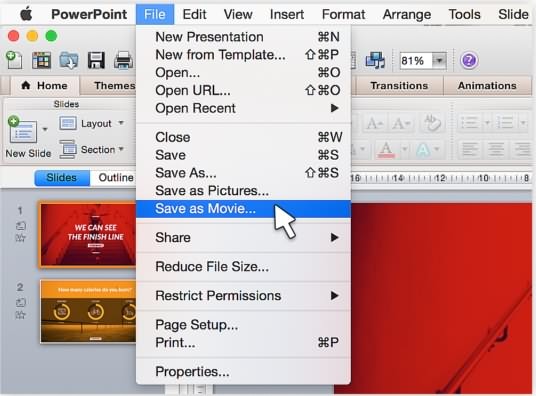
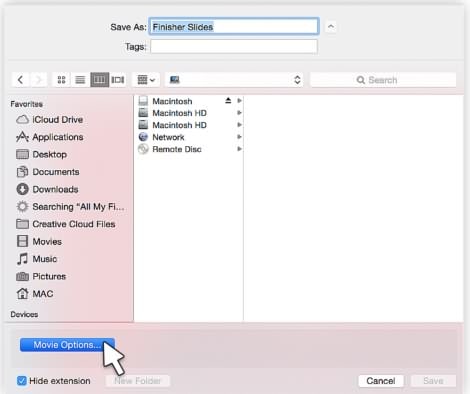
Click on the File menu and select the Save as Movie option. After the new window appears on the screen you should click on the Movie Options button, located near the bottom of the screen.
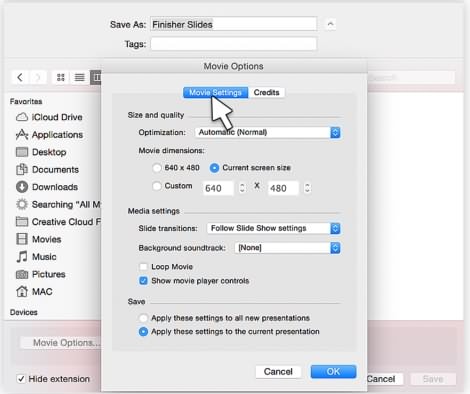
The Movie Options dialogue box will pop up, and you should click on the Movie Options icon to set slide durations, add transitions between slides, create a video loop or choose the size of the video and its quality.
Hit OK to close the Movie Options, and then click Save to convert the PPT into a video file.
Conclusion
Converting PPT files into videos is a simple process on both Mac and Windows operating systems that can help your PowerPoint presentations reach a wider audience. The limited output formats PowerPoint currently provides remain the main reason to use third-party apps such as Wondershare PPT to Video Pro that let you choose the video file format that best suits the demands of the project you’re working on.
Which method of converting PPT to video files do you like to use the most? Would you use some PPT to Video Converters to save ppt files as videos? Let us know in the comments below.
Max Wales
Max Wales is a writer and a lover of all things video.
Follow @Max Wales
Max Wales
Mar 27, 2024• Proven solutions
Organizing information in a presentable way was the task Microsoft PowerPoint has performed brilliantly since the early 1990’s. However, sometimes it is not enough to arrange slides in a PowerPoint presentation, because PPT files this iconic software produces are not easily shared on social media. What’s more, saving your presentations as video files will enable you to protect them from unauthorized use and it will allow you to include them in your eLearning courses or online marketing campaigns.
That’s the reason why we decided to show you how you can save your PowerPoint presentations on 2016, 2013, 2010 and 2007 versions of PowerPoint on both Windows and Mac OS.
- Part 1:Save PowerPoint 2007 Presentations as Video on Windows OS
- Part 2: Saving a PowerPoint 2010 Presentation as a Video
- Part 3: How to Save a PowerPoint 2013 or 2016 Presentation as a video on Windows OS
- Part 4: Saving PowerPoint Presentation as video on Mac OS
![]()
The All-in-One Screen Recorder & Video Editor
- Record desktop screen, voiceover, and webcam simultaneously
- Edit recorded clips quickly with a wide range of professional tools
- Built-in plentiful templates and effects
- Export to MP4, MOV, MKV, GIF and multiple formats
For Win 7 or later (64-bit)
For macOS 10.12 or later
Secure Download
Part 1:How to Save a PowerPoint 2007 Presentation as a Video on Windows OS
All versions of the PowerPoint that were released since 2010 allow its users to save their presentations as videos, but older versions of the software are still frequently used. The process of converting a PPT file into a video file in PowerPoint 2007 may not be as simple as on the latest version of the software, but it is far from being complicated. Please note that if you have a 2013 PowerPoint and you want to save a PPT file created on the 2007 version of the software you can do so by clicking on the Create a Video option. Here’s how you can convert a PowerPoint presentation to video if you are still using PowerPoint 2007.
Before you proceed any further you’ll have to make sure that you have Windows Movie Maker installed on your PC. Afterward, you should save each slide you included in your presentation as an image file, preferably in the JPG file format. You can do this by clicking on the File menu. then opening the Save As submenu and choosing the Other Formats option.
When all the slides are saved as images, you should launch the Windows Movie Maker and import all images you previously created in PowerPoint. If you want to include narration in your PowerPoint video, you can import the audio file directly into the Windows Movie Maker and add it to your project.
This method of saving a PowerPoint presentation as a video doesn’t allow you to keep animations, transitions or multimedia files, because you have to convert all slides into image files.
Part 2: Saving PowerPoint 2010 Presentation as Video
Unlike the previous version of the software, PowerPoint 2010 actually features an option that enables you to convert the PPT file into a video file format. Unfortunately, you can only save videos as WMV files, that have some major downsides. Be it as it may, the process of saving a PowerPoint presentation as a video on this version of the software won’t take too much of your time.
After you create a presentation, save it as you normally would. You should then proceed to insert timings or record narration if you want to add a voiceover to your PowerPoint video. Click on the File menu and locate the Save and Send feature.
When the Save and Send menu appears on the screen you should find the Create a Video option and click on it.
Create a Video box that contains video settings will pop up on the screen and you should click on the Computer&HD Displays option in order to adjust the size and the quality of your video.
In the next step, you can switch off the default timings and narration by clicking on the Don’t Use Recorded Timings and Narration. Keep in mind that this step is only necessary if you want to adjust timings manually and use narration you recorded.
Click on the Create Video icon once you’ve made all adjustments and go ahead to select the destination on your hard drive where the video file will be saved and to insert a file name.
The conversion process will take a while, but after it is over, you’ll be able to share the PowerPoint presentation video on video sharing platforms or social media networks.
Part 3: How to Save a PowerPoint 2013 or 2016 Presentation as a video on Windows OS
The steps you’ll need to take in order to save your PPT 2013 or 2016 as a video are nearly identical to those on PowerPoint 2010. The only difference is that on recent versions of the software you can save the video in MP4 file format that is better suited for online distribution than the WMV file format. Here’s how you can convert PPT to video in PowerPoint 2013.
Collapse the File menu and select the Export option, then click on the Create a Video feature.
Once the Create a Video window emerges on the screen, you should click on the Computer and HD Displays option, so you can adjust the video quality and size settings.
After fine-tuning the video settings, you can proceed to click on the Use Recorded Timings and Narrations menu. If you don’t want to include narration or recorded timings in your video, you can set the duration of each slide individually with the Timings feature that is located at the bottom of the screen.
Hitting the Create a Video button will bring up the Save As window that will enable you to name the video file, select the location of the folder where the video file will be saved and choose the file format to which you want to convert the PPT file. When ready, click on the Save button to start the conversion, and that’s it, you’ve successfully turned a PPT file into a video.
Part 4: Saving PowerPoint Presentation as video on Mac OS
Mac users who want to save PPT files as videos can easily do so, but the videos they create can only be saved as .mov files that are compatible with QuickTime player and file conversion software. The Mac version of PowerPoint doesn’t allow you to include multimedia, transitions or animations in your videos, and for that reason, it is important to remove all such content from the presentation before you start the conversion process. The following steps are applicable in 2008 and 2011 PowerPoint for Mac
Click on the File menu and select the Save as Movie option. After the new window appears on the screen you should click on the Movie Options button, located near the bottom of the screen.
The Movie Options dialogue box will pop up, and you should click on the Movie Options icon to set slide durations, add transitions between slides, create a video loop or choose the size of the video and its quality.
Hit OK to close the Movie Options, and then click Save to convert the PPT into a video file.
Conclusion
Converting PPT files into videos is a simple process on both Mac and Windows operating systems that can help your PowerPoint presentations reach a wider audience. The limited output formats PowerPoint currently provides remain the main reason to use third-party apps such as Wondershare PPT to Video Pro that let you choose the video file format that best suits the demands of the project you’re working on.
Which method of converting PPT to video files do you like to use the most? Would you use some PPT to Video Converters to save ppt files as videos? Let us know in the comments below.
Max Wales
Max Wales is a writer and a lover of all things video.
Follow @Max Wales
Also read:
- "\"2024 Approved Leading Nintendo Switch Combat Arcade Games (Max 156)\""
- "\"In 2024, Stepping Up Advanced Techniques for W11 Gamers\""
- "\"[New] In 2024, Capture Your Screen on Chromebook Methods 4 You\""
- "\"[New] 2024 Approved Voice Transcription Appraisal\""
- "[Updated] Voice Memos Inspector's Handbook"
- "\"[New] In 2024, Essential Pick for Retro Gaming Top 5 Android Tools for PS2 Titles\""
- "\"Expert's Companion Navigating the Nuances of Mobizen Screen Recording\""
- "\"[Updated] Adding Time-Bound Elements to Your OBS Productions for 2024\""
- "[Updated] Explore Google Meet's Full Potential (Free Edition)"
- "\"2024 Approved Graphical Glimpse Radeon's Resurgence\""
- "\"[New] In 2024, Cutting-Edge Approaches for iPhone/iPad Screen Capture\""
- "\"[Updated] Boosting Productivity How to Proficiently Use a Virtual Whiteboard in Zoom\""
- "\"[New] Comparative Study Single Vs. Multi-Camera Tech Today\""
- "\"[New] 2024 Approved Fast Fingers for Capturing Chat Transcripts\""
- "\"[New] 2024 Approved Universal Method for Screen Recording Across Systems\""
- "[New] In 2024, Professional Tips to Diminish Ambient Sound in Videos"
- "\"[Updated] 2024 Approved Premium Video Collaboration Software Guides\""
- "\"Pro Tips for High-Quality Webcam Videos with Your Mac for 2024\""
- "\"[New] In 2024, Unleash Creativity The Best 9 GIF Recorders to Preserve Windows Animation\""
- "\"[Updated] 2024 Approved Nightscape Notables Tips for Capturing Starlit Portraits\""
- "\"[New] 2024 Approved Enhance Your File Management Six Tips for Win 11'S MOV Files\""
- "Ace 6 Tools to Effortlessly Grab Videos on Mac for 2024"
- "[New] Simple Guides for Recording Vimeo Content for 2024"
- "Essential Techniques for Smartphone Video Capture for 2024"
- "[Updated] In 2024, Scrutinizing Free2X Tech for Optimal Webcam Use"
- "\"[New] Premium Multi-Device Video Talks Solutions for 2024\""
- "\"[New] 2024 Approved Insider Tips for Documenting Your Favorite Games on PS4\""
- "[Updated] In 2024, 5 Superior Recording Gear Options for iPad & Mac Owners"
- "[New] In 2024, Top Free Video Recorders, Including Apowersoft"
- "[Updated] Fundamentals of Archiving Webcam Conversations"
- "\"2024 Approved The Ultimate iOS Guide to Superior PSP Emulators\""
- "[New] In 2024, Recording Titans Collide"
- "\"2024 Approved PeekCapture Review of Low-Res Screen Grabs\""
- "\"[New] In 2024, Unleash Your Potential Navigating the World of Switch Pro in Steam\""
- "Top Methods to Enhance Facecam Footage Quality for 2024"
- "[Updated] In 2024, Optimizing Color Depth and Gradients for OBS"
- "[New] Unlock the Full Capability of Your Mac Webcam for Videography for 2024"
- "\"[New] 2024 Approved 9 Best Online Mic Recorders 2023\""
- "In 2024, Immortal Gameplay Highlights of Android Samsungs"
- "[Updated] Essential ScreenCapture Strategies for Effective Image Capturing"
- "\"[Updated] In 2024, Pro-Level 5 Digital Media Recorders Online\""
- "[New] Ultimate Steps for Transforming Your PPTs Into Video Magic"
- "\"[New] Video Sequencing Synergy Mastering Blend Modes\""
- "\"[Updated] Top 10 Must-Have Terraria Extensions\""
- "\"2024 Approved Mastering Mac Basic Sound Recording in Audacity\""
- "[Updated] In 2024, Quick Techniques for Documenting YouTube Videos"
- "[Updated] Expertly Curated List of Premier Linux Screenshots for 2024"
- "[Updated] Unlocking Powerful Storytelling Through Screencasts for 2024"
- "[New] Unwind with These Favorite PC Games"
- "\"[Updated] 2024 Approved High Definition Capturing for Switch Gamers\""
- Comprehensive Vimeo Video Breakdown Including Aspect Ratio for 2024
- How PGSharp Save You from Ban While Spoofing Pokemon Go On Apple iPhone 6 Plus? | Dr.fone
- In 2024, How to Check Distance and Radius on Google Maps For your Oppo Reno 11F 5G | Dr.fone
- New In 2024, Transform Your Videos in Minutes The Best Way to Resize for Social Media
- How to Add Audio to Video in Magix Movie Edit Pro for 2024
- New 2024 Approved Top 6 Online Audio Archives for High-Quality Whoosh Sounds
- How To Unlock Apple iPhone X Without Swiping Up? 6 Ways | Dr.fone
- Updated In 2024, Camtasia Vs Captivate - Which to Choose?
- Updated 2024 Approved Make an Impression Top Video Invitation Apps for Mobile Phones
- New 2024 Approved Need a Quick Way of Converting a FLAC Audio File Into Something More Versatile? Read This Article to Learn More
- Change Location on Yik Yak For your Oppo A78 5G to Enjoy More Fun | Dr.fone
- In 2024, Additional Tips About Sinnoh Stone For Oppo Reno 8T | Dr.fone
- In 2024, The Ultimate Guide How to Bypass Swipe Screen to Unlock on Vivo S18 Pro Device
- Updated Top 10 Free Emoji Websites to Download Emojis Online for 2024
- In 2024, Here are Some of the Best Pokemon Discord Servers to Join On Motorola Edge 40 Pro | Dr.fone
- In 2024, Easily Unlock Your Samsung Galaxy S23 Tactical Edition Device SIM
- New 2024 Approved This Article Will Recommend You with 3 Best DVD Burning Tools to Let You Easily Burn Video to DVD
- 9 Solutions to Fix Process System Isnt Responding Error on Poco C65 | Dr.fone
- In 2024, How to Access Your iPhone 12 Pro Max When You Forget the Passcode? | Dr.fone
- How to Use Pokémon Emerald Master Ball Cheat On Tecno Spark 20 Pro+ | Dr.fone
- Updated How to Make A Fantastic Café Vlog
- Full Guide to Hard Reset Your Oppo Reno 11 Pro 5G | Dr.fone
- Top 7 Phone Number Locators To Track Oppo K11x Location | Dr.fone
- Updated In 2024, Clear the Clutter A Comprehensive Guide to Freeing Up Space on Your FCPX Mac
- In 2024, Fake Android Location without Rooting For Your Motorola G24 Power | Dr.fone
- 2024 Approved Top Video Reversal Tools Online and Free
- In 2024, How to Unlock Apple iPhone 11 without Passcode or Face ID | Dr.fone
- In 2024, How to Factory Reset iPad or iPhone 7 without iCloud Password or Apple ID?
- New 2024 Approved Get VN Video Editor for Mac or Get Alternatives to Edit on Mac
- Updated 2024 Approved Maximize Views The Ultimate YouTube Thumbnail Template and Tips
- 2024 Approved Make Unforgettable Videos Top 10 iPhone and iPad Collage Apps 2023
- Updated All About Kapwing Video Translation
- Updated The Leading Sources for Easy Access to Whoosh Soundscapes and Their Uses
- Updated In 2024, Master Video Storytelling with Adobe Premiere Pro on Mac
- Bypassing Google Account With vnROM Bypass For Samsung Galaxy A23 5G
- In 2024, Where to Locate High-Quality Recorded Bird Calls on the Web
- In 2024, How to Detect and Stop mSpy from Spying on Your Oppo F25 Pro 5G | Dr.fone
- Device unlock Spark 20C
- Updated Premiere Pro on Your Computer A Comprehensive System Requirement Guide
- Universal Unlock Pattern for Vivo Y200e 5G
- Updated 2024 Approved Get Ready to Record 3 Effortless Options for Video Game Capture
- Updated In 2024, Top-Rated AVCHD Editors Expert Recommendations
- Wondering the Best Alternative to Hola On Vivo Y200? Here Is the Answer | Dr.fone
- New Top Sites to Download Lofi Background Music and Wallpapers
- 4 Solutions to Fix Unfortunately Your App Has Stopped Error on OnePlus Ace 2 | Dr.fone
- 9 Mind-Blowing Tricks to Hatch Eggs in Pokemon Go Without Walking On Apple iPhone 14 Pro | Dr.fone
- Title: "[Updated] 2024 Approved Merge PPT Deck with Cinematic Capabilities"
- Author: Queen
- Created at : 2024-05-19 22:30:57
- Updated at : 2024-05-20 22:30:57
- Link: https://screen-mirroring-recording.techidaily.com/updated-2024-approved-merge-ppt-deck-with-cinematic-capabilities/
- License: This work is licensed under CC BY-NC-SA 4.0.
