![[New] In 2024, Vidmore Screen Recorder - How to Use It](https://thmb.techidaily.com/ad574335e648a7deda4261a3d60c02e5050876ad97d3a8d2551786ec91da20e4.jpg)
"[New] In 2024, Vidmore Screen Recorder - How to Use It"
Vidmore Screen Recorder - How to Use It
Vidmore Screen Recorder is a great screen recording software available for both Windows and Mac users. You can capture your screen, record gameplay and live meetings, as well as capture your webcam. Along with recording video from various sources, you can record audio from your computer as well as your microphone.
Besides, you can always take quick screenshots and make instant GIFs. Here is the complete review of Vidmore Screen Recorder and learn how to use the software to capture anything on the screen.
Part 1. Features of Vidmore Recorder
Part 2. How to Record Screen with Vidmore Recorder
Part 3. Pros and Cons of Vidmore Recorder
Part 4. Best Alternative to Vidmore Recorder
Part 1. Features of Vidmore Recorder
Here are the key features of Vidmore Screen Recorder that make it stand out in the crowd.
Record Anything On The Screen: You can record your computer entirely as well as selectively in specific areas. You can also capture video games on your screen as well as online games. Moreover, the software lets you record live meetings on apps like Zoom, Google Meet, Teams and likewise.
Capture Webcam and Audio: You can record content from your webcam and capture your voice from your microphone. The software is also capable of capturing audio from the computer which is useful in making demonstrations and tutorials.
Screenshots and GIFs: You can capture a screenshot from the entire screen or any specific window instantly. Similarly, you can make GIFs from your recorded video to share on social media. This is useful for gamers and YouTubers.
Schedule Recording: You can set starting and ending time and fix the screen so that the software records the screen automatically even without your presence in front of the screen.
Real-Time Drawing: For professional tutorials and demonstrations, adding texts and drawings on the screen is essential. Vidmore Recorder lets users add texts, shapes, and arrows in real-time while the recording is going on. Besides, there is an option to highlight the mouse area.
 The BootIt Collection covers multi-booting, partitioning, and disk imaging on traditional PC’s using the standard BIOS and newer PC’s using UEFI. The collection includes BootIt Bare Metal (BIBM) for standard BIOS systems and BootIt UEFI (BIU) for UEFI system.
Part 2. How to Record Screen with Vidmore Recorder?
Vidmore Screen Recorder is available for free with limited features. If you find the software good enough to meet all your requirements, you can opt for its subscription plan. The free version allows 3 minutes of screen recording but there will be no watermark. Therefore, to start recording the screen, you should first download and install the software of the official website of Vidmore as per your operating system. Thereafter, follow the following steps to capture the screen.
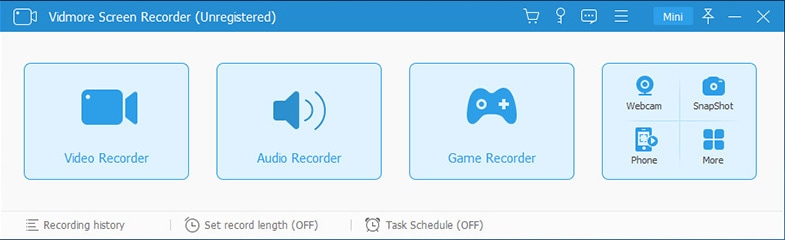
Step 1: Launch Vidmore Screen Recorder and prepare the screen in the background that you want to record.
Step 2: First, you can select the screen size that you want to record by toggling on Display section. You can select full screen or custom screen. If you choose custom screen, you have to mark a selection on the screen.
Step 3: Then you can toggle on Webcam, System Sound and Microphone as per your recording requirements.
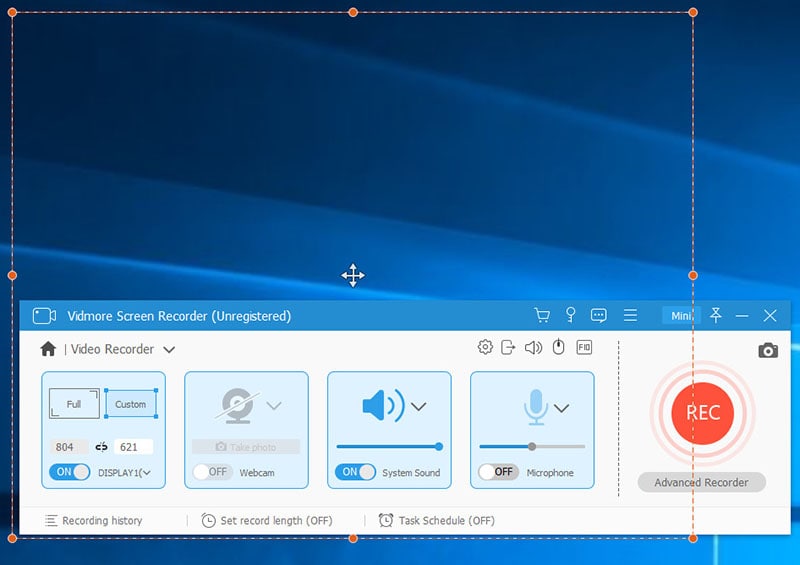
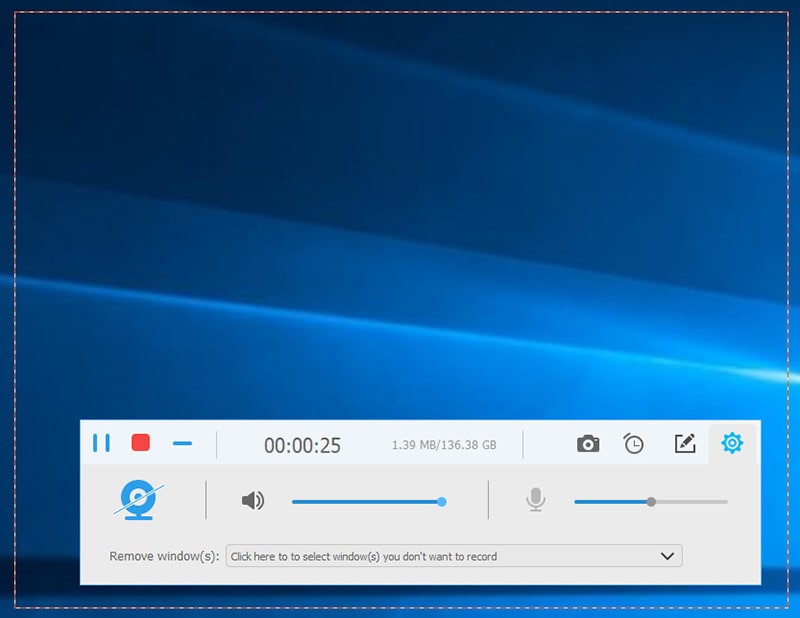
Step 4: Finally, click on REC button to start recording the screen. You will see a Camera icon just above the REC button which you can use to take screenshots.
Please note that the software is compatible Windows 7 to 11 and MacOS X 10.10 and above.

Part 3. Pros and Cons of Vidmore Recorder
Overall, Vidmore Recorder is a simple yet superior screen recorder. The features are ample to satisfy the requirements of the users. However, there are certain negatives for which some professional video creators look for a better alternative. Here is the list of the pros and cons of Vidmore Recorder.
Pros
- Record your screen, gameplay, as well as online meetings.
- Capture your webcam and audio from mic and system.
- Mic sound enhancement and noise cancellation available.
- Schedule automatic recording in your absence.
- Insert real-time drawings and texts into your recording.
- Highlight mouse area and capture mouse clicks.
- Capture screenshots and get GIFs of important moments.
- User-friendly and simple user interface.
Cons
- There are hardly some video editing options available.
- The plans are relatively expensive.
Part 4. Best Alternative to Vidmore Recorder
Vidmore Screen Recorder is one of the best screen recording software for regular users. However, advanced users who make software demonstrations and professional-quality tutorials, they always look for a better alternative to Vidmore Recorder. This is because they want some built-in video editing options so that they can publish the recorded video perfectly from all perspectives. That is why we recommend Filmora Screen Recorder Software over Vidmore Recorder. The reason is that Filmora is not just a great screen recorder but also a professional video editor.
You get all the features of Vidmore Recorder in Filmora. Additionally, you can edit your video by adding special video and audio effects, transitions, and filters. Besides, you can insert a voiceover if you need to. The recording quality is up 4K resolution and you can go for picture-in-picture mode of recording. Here are the steps to record the screen with Wondershare Filmora.
Step 1: Download and install Wondershare Filmora from the official website.
For Win 7 or later (64-bit)
For macOS 10.12 or later
Step 2: Open the application and go to New Project.

Step 3: Go on Record and click on Record PC Screen option.
Step 4: Select the screen size and the audio source. Filmora can record any screen including gameplay. Similarly, you can record any audio from mic or system sound or both.
Step 5: Click on the Record button to start recording.

You get a few seconds to prepare the screen for recording. Once the recording is done, click on Stop button.
Conclusion
Vidmore Screen Recorder is a great choice for recording any screen with minimum effort. You can schedule recording so that the software automatically records in your absence. If you are comfortable with the software, you can opt for its premium subscription plans as per your suitability. If you are not satisfied with the software, you should definitely switch to Wondershare Filmora for more features and functionalities.
Part 2. How to Record Screen with Vidmore Recorder
Part 3. Pros and Cons of Vidmore Recorder
Part 4. Best Alternative to Vidmore Recorder

Part 1. Features of Vidmore Recorder
Here are the key features of Vidmore Screen Recorder that make it stand out in the crowd.
Record Anything On The Screen: You can record your computer entirely as well as selectively in specific areas. You can also capture video games on your screen as well as online games. Moreover, the software lets you record live meetings on apps like Zoom, Google Meet, Teams and likewise.
Capture Webcam and Audio: You can record content from your webcam and capture your voice from your microphone. The software is also capable of capturing audio from the computer which is useful in making demonstrations and tutorials.
Screenshots and GIFs: You can capture a screenshot from the entire screen or any specific window instantly. Similarly, you can make GIFs from your recorded video to share on social media. This is useful for gamers and YouTubers.
Schedule Recording: You can set starting and ending time and fix the screen so that the software records the screen automatically even without your presence in front of the screen.
Real-Time Drawing: For professional tutorials and demonstrations, adding texts and drawings on the screen is essential. Vidmore Recorder lets users add texts, shapes, and arrows in real-time while the recording is going on. Besides, there is an option to highlight the mouse area.
Part 2. How to Record Screen with Vidmore Recorder?
Vidmore Screen Recorder is available for free with limited features. If you find the software good enough to meet all your requirements, you can opt for its subscription plan. The free version allows 3 minutes of screen recording but there will be no watermark. Therefore, to start recording the screen, you should first download and install the software of the official website of Vidmore as per your operating system. Thereafter, follow the following steps to capture the screen.
Step 1: Launch Vidmore Screen Recorder and prepare the screen in the background that you want to record.
Step 2: First, you can select the screen size that you want to record by toggling on Display section. You can select full screen or custom screen. If you choose custom screen, you have to mark a selection on the screen.
Step 3: Then you can toggle on Webcam, System Sound and Microphone as per your recording requirements.
Step 4: Finally, click on REC button to start recording the screen. You will see a Camera icon just above the REC button which you can use to take screenshots.
Please note that the software is compatible Windows 7 to 11 and MacOS X 10.10 and above.
Part 3. Pros and Cons of Vidmore Recorder
Overall, Vidmore Recorder is a simple yet superior screen recorder. The features are ample to satisfy the requirements of the users. However, there are certain negatives for which some professional video creators look for a better alternative. Here is the list of the pros and cons of Vidmore Recorder.
Pros
- Record your screen, gameplay, as well as online meetings.
- Capture your webcam and audio from mic and system.
- Mic sound enhancement and noise cancellation available.
- Schedule automatic recording in your absence.
- Insert real-time drawings and texts into your recording.
- Highlight mouse area and capture mouse clicks.
- Capture screenshots and get GIFs of important moments.
- User-friendly and simple user interface.
Cons
- There are hardly some video editing options available.
- The plans are relatively expensive.
 SwifDoo PDF 2-Year Plan
Part 4. Best Alternative to Vidmore Recorder
Vidmore Screen Recorder is one of the best screen recording software for regular users. However, advanced users who make software demonstrations and professional-quality tutorials, they always look for a better alternative to Vidmore Recorder. This is because they want some built-in video editing options so that they can publish the recorded video perfectly from all perspectives. That is why we recommend Filmora Screen Recorder Software over Vidmore Recorder. The reason is that Filmora is not just a great screen recorder but also a professional video editor.
You get all the features of Vidmore Recorder in Filmora. Additionally, you can edit your video by adding special video and audio effects, transitions, and filters. Besides, you can insert a voiceover if you need to. The recording quality is up 4K resolution and you can go for picture-in-picture mode of recording. Here are the steps to record the screen with Wondershare Filmora.
Step 1: Download and install Wondershare Filmora from the official website.
For Win 7 or later (64-bit)
For macOS 10.12 or later
Step 2: Open the application and go to New Project.
Step 3: Go on Record and click on Record PC Screen option.
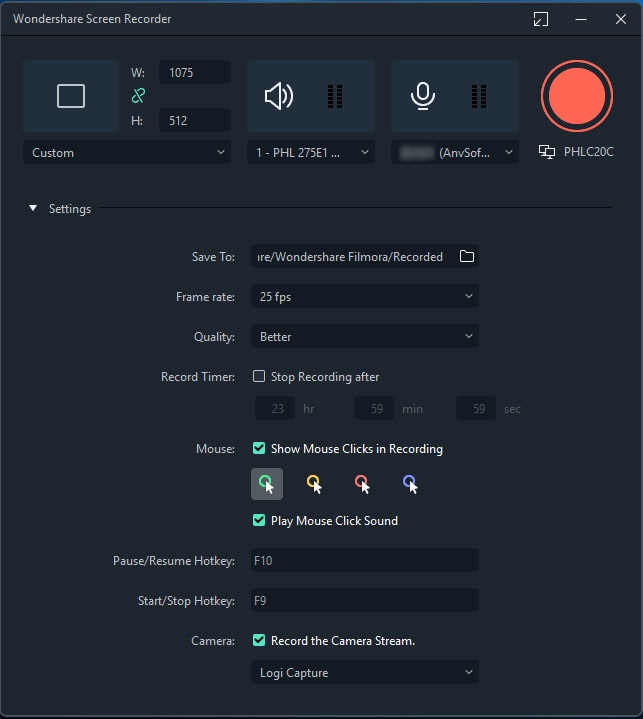
Step 4: Select the screen size and the audio source. Filmora can record any screen including gameplay. Similarly, you can record any audio from mic or system sound or both.
Step 5: Click on the Record button to start recording.
You get a few seconds to prepare the screen for recording. Once the recording is done, click on Stop button.
 CollageIt Pro
Conclusion
Vidmore Screen Recorder is a great choice for recording any screen with minimum effort. You can schedule recording so that the software automatically records in your absence. If you are comfortable with the software, you can opt for its premium subscription plans as per your suitability. If you are not satisfied with the software, you should definitely switch to Wondershare Filmora for more features and functionalities.
Part 2. How to Record Screen with Vidmore Recorder
Part 3. Pros and Cons of Vidmore Recorder
Part 4. Best Alternative to Vidmore Recorder
Part 1. Features of Vidmore Recorder
Here are the key features of Vidmore Screen Recorder that make it stand out in the crowd.
Record Anything On The Screen: You can record your computer entirely as well as selectively in specific areas. You can also capture video games on your screen as well as online games. Moreover, the software lets you record live meetings on apps like Zoom, Google Meet, Teams and likewise.
Capture Webcam and Audio: You can record content from your webcam and capture your voice from your microphone. The software is also capable of capturing audio from the computer which is useful in making demonstrations and tutorials.
Screenshots and GIFs: You can capture a screenshot from the entire screen or any specific window instantly. Similarly, you can make GIFs from your recorded video to share on social media. This is useful for gamers and YouTubers.
Schedule Recording: You can set starting and ending time and fix the screen so that the software records the screen automatically even without your presence in front of the screen.
Real-Time Drawing: For professional tutorials and demonstrations, adding texts and drawings on the screen is essential. Vidmore Recorder lets users add texts, shapes, and arrows in real-time while the recording is going on. Besides, there is an option to highlight the mouse area.
Part 2. How to Record Screen with Vidmore Recorder?
Vidmore Screen Recorder is available for free with limited features. If you find the software good enough to meet all your requirements, you can opt for its subscription plan. The free version allows 3 minutes of screen recording but there will be no watermark. Therefore, to start recording the screen, you should first download and install the software of the official website of Vidmore as per your operating system. Thereafter, follow the following steps to capture the screen.
Step 1: Launch Vidmore Screen Recorder and prepare the screen in the background that you want to record.
Step 2: First, you can select the screen size that you want to record by toggling on Display section. You can select full screen or custom screen. If you choose custom screen, you have to mark a selection on the screen.

Step 3: Then you can toggle on Webcam, System Sound and Microphone as per your recording requirements.
Step 4: Finally, click on REC button to start recording the screen. You will see a Camera icon just above the REC button which you can use to take screenshots.
Please note that the software is compatible Windows 7 to 11 and MacOS X 10.10 and above.
Part 3. Pros and Cons of Vidmore Recorder
Overall, Vidmore Recorder is a simple yet superior screen recorder. The features are ample to satisfy the requirements of the users. However, there are certain negatives for which some professional video creators look for a better alternative. Here is the list of the pros and cons of Vidmore Recorder.
Pros
- Record your screen, gameplay, as well as online meetings.
- Capture your webcam and audio from mic and system.
- Mic sound enhancement and noise cancellation available.
- Schedule automatic recording in your absence.
- Insert real-time drawings and texts into your recording.
- Highlight mouse area and capture mouse clicks.
- Capture screenshots and get GIFs of important moments.
- User-friendly and simple user interface.
Cons
- There are hardly some video editing options available.
- The plans are relatively expensive.
Part 4. Best Alternative to Vidmore Recorder
Vidmore Screen Recorder is one of the best screen recording software for regular users. However, advanced users who make software demonstrations and professional-quality tutorials, they always look for a better alternative to Vidmore Recorder. This is because they want some built-in video editing options so that they can publish the recorded video perfectly from all perspectives. That is why we recommend Filmora Screen Recorder Software over Vidmore Recorder. The reason is that Filmora is not just a great screen recorder but also a professional video editor.
You get all the features of Vidmore Recorder in Filmora. Additionally, you can edit your video by adding special video and audio effects, transitions, and filters. Besides, you can insert a voiceover if you need to. The recording quality is up 4K resolution and you can go for picture-in-picture mode of recording. Here are the steps to record the screen with Wondershare Filmora.
Step 1: Download and install Wondershare Filmora from the official website.
For Win 7 or later (64-bit)
For macOS 10.12 or later
Step 2: Open the application and go to New Project.
Step 3: Go on Record and click on Record PC Screen option.
Step 4: Select the screen size and the audio source. Filmora can record any screen including gameplay. Similarly, you can record any audio from mic or system sound or both.
Step 5: Click on the Record button to start recording.
You get a few seconds to prepare the screen for recording. Once the recording is done, click on Stop button.
Conclusion
Vidmore Screen Recorder is a great choice for recording any screen with minimum effort. You can schedule recording so that the software automatically records in your absence. If you are comfortable with the software, you can opt for its premium subscription plans as per your suitability. If you are not satisfied with the software, you should definitely switch to Wondershare Filmora for more features and functionalities.
Part 2. How to Record Screen with Vidmore Recorder
Part 3. Pros and Cons of Vidmore Recorder
Part 4. Best Alternative to Vidmore Recorder
Part 1. Features of Vidmore Recorder
Here are the key features of Vidmore Screen Recorder that make it stand out in the crowd.
Record Anything On The Screen: You can record your computer entirely as well as selectively in specific areas. You can also capture video games on your screen as well as online games. Moreover, the software lets you record live meetings on apps like Zoom, Google Meet, Teams and likewise.
Capture Webcam and Audio: You can record content from your webcam and capture your voice from your microphone. The software is also capable of capturing audio from the computer which is useful in making demonstrations and tutorials.
Screenshots and GIFs: You can capture a screenshot from the entire screen or any specific window instantly. Similarly, you can make GIFs from your recorded video to share on social media. This is useful for gamers and YouTubers.
Schedule Recording: You can set starting and ending time and fix the screen so that the software records the screen automatically even without your presence in front of the screen.
Real-Time Drawing: For professional tutorials and demonstrations, adding texts and drawings on the screen is essential. Vidmore Recorder lets users add texts, shapes, and arrows in real-time while the recording is going on. Besides, there is an option to highlight the mouse area.
Part 2. How to Record Screen with Vidmore Recorder?
Vidmore Screen Recorder is available for free with limited features. If you find the software good enough to meet all your requirements, you can opt for its subscription plan. The free version allows 3 minutes of screen recording but there will be no watermark. Therefore, to start recording the screen, you should first download and install the software of the official website of Vidmore as per your operating system. Thereafter, follow the following steps to capture the screen.
Step 1: Launch Vidmore Screen Recorder and prepare the screen in the background that you want to record.
Step 2: First, you can select the screen size that you want to record by toggling on Display section. You can select full screen or custom screen. If you choose custom screen, you have to mark a selection on the screen.
Step 3: Then you can toggle on Webcam, System Sound and Microphone as per your recording requirements.
Step 4: Finally, click on REC button to start recording the screen. You will see a Camera icon just above the REC button which you can use to take screenshots.
Please note that the software is compatible Windows 7 to 11 and MacOS X 10.10 and above.
 Video Converter Factory Pro
Part 3. Pros and Cons of Vidmore Recorder
Overall, Vidmore Recorder is a simple yet superior screen recorder. The features are ample to satisfy the requirements of the users. However, there are certain negatives for which some professional video creators look for a better alternative. Here is the list of the pros and cons of Vidmore Recorder.
Pros
- Record your screen, gameplay, as well as online meetings.
- Capture your webcam and audio from mic and system.
- Mic sound enhancement and noise cancellation available.
- Schedule automatic recording in your absence.
- Insert real-time drawings and texts into your recording.
- Highlight mouse area and capture mouse clicks.
- Capture screenshots and get GIFs of important moments.
- User-friendly and simple user interface.
Cons
- There are hardly some video editing options available.
- The plans are relatively expensive.
Part 4. Best Alternative to Vidmore Recorder
Vidmore Screen Recorder is one of the best screen recording software for regular users. However, advanced users who make software demonstrations and professional-quality tutorials, they always look for a better alternative to Vidmore Recorder. This is because they want some built-in video editing options so that they can publish the recorded video perfectly from all perspectives. That is why we recommend Filmora Screen Recorder Software over Vidmore Recorder. The reason is that Filmora is not just a great screen recorder but also a professional video editor.
You get all the features of Vidmore Recorder in Filmora. Additionally, you can edit your video by adding special video and audio effects, transitions, and filters. Besides, you can insert a voiceover if you need to. The recording quality is up 4K resolution and you can go for picture-in-picture mode of recording. Here are the steps to record the screen with Wondershare Filmora.
Step 1: Download and install Wondershare Filmora from the official website.
For Win 7 or later (64-bit)
For macOS 10.12 or later
Step 2: Open the application and go to New Project.
Step 3: Go on Record and click on Record PC Screen option.
Step 4: Select the screen size and the audio source. Filmora can record any screen including gameplay. Similarly, you can record any audio from mic or system sound or both.
Step 5: Click on the Record button to start recording.
You get a few seconds to prepare the screen for recording. Once the recording is done, click on Stop button.
Conclusion
Vidmore Screen Recorder is a great choice for recording any screen with minimum effort. You can schedule recording so that the software automatically records in your absence. If you are comfortable with the software, you can opt for its premium subscription plans as per your suitability. If you are not satisfied with the software, you should definitely switch to Wondershare Filmora for more features and functionalities.
- Title: [New] In 2024, Vidmore Screen Recorder - How to Use It
- Author: Queen
- Created at : 2024-07-20 08:48:27
- Updated at : 2024-07-21 08:48:27
- Link: https://screen-mirroring-recording.techidaily.com/new-in-2024-vidmore-screen-recorder-how-to-use-it/
- License: This work is licensed under CC BY-NC-SA 4.0.