![[New] In 2024, Becoming Proficient in EZ Grabber Technology](https://thmb.techidaily.com/e05f2d33f2fefb8dc7c06028c76750542668dde0166f66e5a57d5c818d2809aa.jpg)
[New] In 2024, Becoming Proficient in EZ Grabber Technology
Becoming Proficient in EZ Grabber Technology
Are you a full-time gamer or like to rewatch some spectacular scenes from the movies or videos you see on your computer later? But are unable to record those moments separately and at that instant and later need to go back to that point of the scene to record the same. It might get a bit time-consuming and frustrating to do so. For this situation, the ideal problem solver would be installing the EZ grabber software on your computer.
The EZ grabber software is a piece of capturing equipment designed to capture MPEG that converts the images on screen into videos. You can easily record the videos on screen by clicking the rec button and connecting your device using an S-video connector or an AV. The resolution of the videos can touch the heights of 720p, which you can also edit and upload on the internet.

Part 1. How to download and install EZ Grabber?
After knowing about the EZ grabber windows 10 software, you might wonder how to download the software correctly on your computer. And install the same through following specific steps for it. That is why here in this article, we will direct you through the steps which, if you follow unconditionally, will let you enjoy the software: -
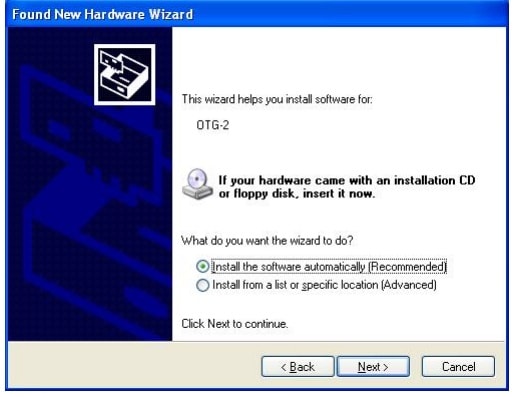
Step 1
When you have successfully downloaded EZ grabber software on your computer, the operating system will send you a new message that a new hardware device has been found on your device. Please click on the option cancel once you see that.
Step 2
Once you insert the CD, the operating system automatically asks you to click on the driver install option and run the setup.
Step 3
Click on the next button and then install. After installation, a finish option will appear, indicating the devices have been successfully installed.

Step 4
Ensure that DirectX9.0 has been installed before, or else the system will automatically prompt you to install the same.
Step 5
Then, click on the next button in front of you and continue installing the components until it’s done.
Step 6
Once the components are installed, prepare for the EZ grabber to get started and click on the next button.
Step 7
A box containing windows media format9 will appear when you click the yes option. Clicking on the yes will continue the installation of the Windows media format9.
Step 8
For the last step, the system will ask you to restart the device and click on the finish option. An icon representing the EZ grabber will appear on your device, indicating the application has been installed successfully.


Part 2. How to Use EZ Grabber?
Once you have downloaded and installed the EZ grabber 2 software application on your device, the next bit of information you might lack would be how to use the application properly. If you are new to any application, you might need some guidance that would help you open it and use the same conveniently without any problem. Let us look at various steps of using the EZ grabber software: -
Step 1 Recording
The application of EZ grabber mac‘s primary purpose would be using it for recording the content displayed on your screen. It saves the content in the form of MPEG to save space. Press the record button to start the recording and press the same to stop it. It would save the file by default.
Also, there are a few set-up options you may opt for:


Step 2 Screenshot
When you are watching something on the screen, press the snapshot button to capture the picture and save it in the form of .bmp format. The image will be saved automatically.
Step 3 Video Playing
Click on the screen recorder and choose to record your favorite scene of yours. Double-clicking on the same will display you where the video is saved.
Part 3. EZ Grabber Alternative to Record PC Screen
Suppose you still have problems using EZ grabber 2 or might not be satisfied by its functionality or quality. Then, there are many other options out there that could provide you with the same features in a more enhanced way. However, if you find choosing from all the different options challenging, then Filmora could be the perfect screencasting software.
Through Filmora, you can easily record all the activities on your desktop and share them with others. But you might not know how to use this software to record PC screen . That is why we have made a listicle of the steps by which you can easily use Filmora to record.

First of all, there are three ways through which you can record the computer screen by Filmora.
- **Method 1:**First, you can select the record on the PC screen button in the start-up window.
- Method 2: You can choose the following method: entering the player panel and clicking on the file option. Choose the record option available there and select from any Webcam, Record from the PC screen, and voiceover record.
- Method 3: The last way or method you can choose would be recording by combining all three methods from webcam, through the screen, and also voiceover.
Let us now look at the various steps through which you can record in Filmora: -
Free Download For Win 7 or later(64-bit)
Free Download For macOS 10.14 or later
Step 1
For the first step, you will see a rectangle icon on the left side of the Filmora screen recorder window. By clicking on it, you can start recording. There would be three options: Full screen, custom, and Target window; choose any one.

After that, click upon the microphone option and select the mic through which you start narrating your voice. Additionally, you will be able to disable the speaker option of the computer while in the recording session.
Step 2
- After the first step, you will see the settings option on the right lower corner of the screen recorder window. Click upon that option to know more.
- You can choose where you want the recording to be saved on your computer’s hard drive. You can also adjust the quality and frame rate per your preference through the Quality menu at the drop-down window.

Step 3
For the 3rd step, mark on the mouse checkbox that would offer you the option if you want to keep the mouse cursor on your video or not. Moreover, you can also expand the time or set the timing of the screen recording duration and put it into the record timer box.
Step 4
After completing all these steps, click on the recording button and initiate the new screen recording session. Once you do this, the recording will start after a three-second delay.
If you want to stop the recording in between or end the screencasting, press the F9 button. The file would be automatically saved on the Filmora folder, and you can edit the same after completing it.
Conclusion
Where you were facing problems recording videos on your screen and could not choose the right software to do it? Then hopefully, after reading the article, you can now choose to use EZ grabber software by downloading it from the internet, following the steps mentioned above. However, if you see that EZ grabber is not the one for you, we have also recommended Filmora. It might be the perfect one as it offers way more options to screen record and edit the same through your preferences.
Free Download For macOS 10.14 or later
Step 1
For the first step, you will see a rectangle icon on the left side of the Filmora screen recorder window. By clicking on it, you can start recording. There would be three options: Full screen, custom, and Target window; choose any one.

After that, click upon the microphone option and select the mic through which you start narrating your voice. Additionally, you will be able to disable the speaker option of the computer while in the recording session.
Step 2
- After the first step, you will see the settings option on the right lower corner of the screen recorder window. Click upon that option to know more.
- You can choose where you want the recording to be saved on your computer’s hard drive. You can also adjust the quality and frame rate per your preference through the Quality menu at the drop-down window.
Step 3
For the 3rd step, mark on the mouse checkbox that would offer you the option if you want to keep the mouse cursor on your video or not. Moreover, you can also expand the time or set the timing of the screen recording duration and put it into the record timer box.
Step 4
After completing all these steps, click on the recording button and initiate the new screen recording session. Once you do this, the recording will start after a three-second delay.
If you want to stop the recording in between or end the screencasting, press the F9 button. The file would be automatically saved on the Filmora folder, and you can edit the same after completing it.
Conclusion
Where you were facing problems recording videos on your screen and could not choose the right software to do it? Then hopefully, after reading the article, you can now choose to use EZ grabber software by downloading it from the internet, following the steps mentioned above. However, if you see that EZ grabber is not the one for you, we have also recommended Filmora. It might be the perfect one as it offers way more options to screen record and edit the same through your preferences.
- Title: [New] In 2024, Becoming Proficient in EZ Grabber Technology
- Author: Queen
- Created at : 2024-07-20 06:09:48
- Updated at : 2024-07-21 06:09:48
- Link: https://screen-mirroring-recording.techidaily.com/new-in-2024-becoming-proficient-in-ez-grabber-technology/
- License: This work is licensed under CC BY-NC-SA 4.0.