
!["[New] 2024 Approved Unlocking Potential Crafting Dynamic Images with Your iPad"](https://www.lifewire.com/thmb/5TQ2qNutxP1-2d0Nqc32lnx5qyc=/400x300/filters:no_upscale():max_bytes(150000):strip_icc():format(webp)/001_the-16-best-shows-to-watch-on-discovery-plus-right-now-5116795-b17411d87cfd4bd690fda5be50ea188c.jpg)
"[New] 2024 Approved Unlocking Potential Crafting Dynamic Images with Your iPad"
Unlocking Potential: Crafting Dynamic Images with Your iPad
A timelapse video is where you record an event for a long duration at a regular interval. Due to the low frame rate, the captured long-duration video plays in a very short time. Suppose you want to capture the moving clouds for an hour. When you capture in timelapse mode, the hour-long event will be captured in a few minutes of video.
If you own an iPad, you can create stunning timelapse videos easily. All the modern iPad variants have the timelapse feature. You can create short timelapse videos of any event and put them on social media platforms. Besides, adding a timelapse video to a regular video enhances the content. We will illustrate how to record iPad time lapse in simple steps.
Part 1. Steps to Record Timelapse Video on iPad
You can find the timelapse video option on all modern iOS devices. The timelapse feature is available on all iPads. You can find the timelapse feature on iPad Pro, iPad Air, iPad, and iPad Mini. You will need a tripod to fix your iPad to capture timelapse video. The iPad should stay still in its position during the entire timelapse capturing session. Here are the steps on how to time lapse on iPhone and iPad.
Step 1: On your iPad, tap on Camera app from the home screen.
Step 2: On the camera app, you will notice camera modes like Photo, Video, and Slow-Mo. Swipe right until Time-Lapse is selected as the camera mode.
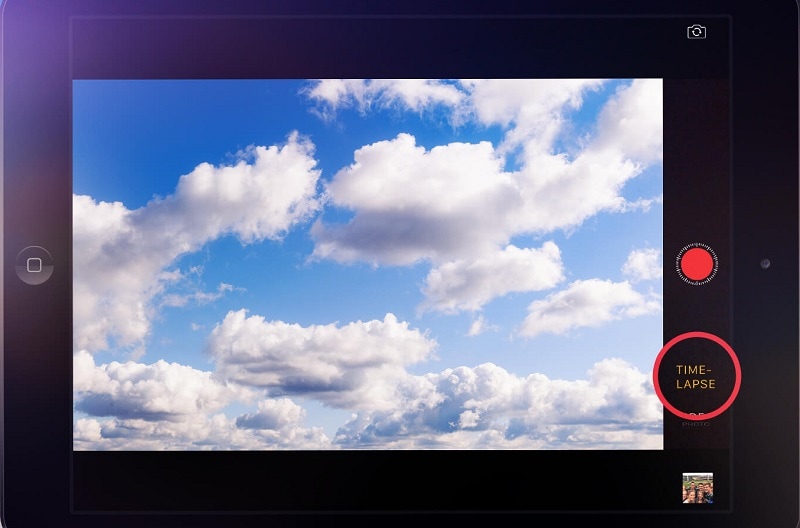
Step 3: Fix your iPad on the tripod and set the video frame perfectly. Tap on the Shutter button below Time-Lapse and the recording will start.
Step 4: When you want to stop recording the timelapse video, press the Shutter or Stop button again.
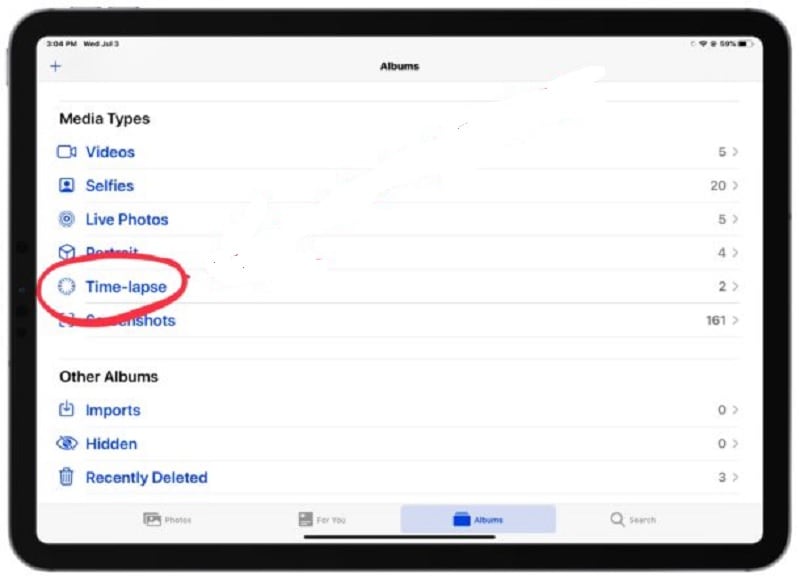
Step 5: You can go to Photos app to check out the timelapse video you have captured. Open Photos app and go to Time-lapse option under Media section.
The frame rate is automatically lowered when you select the timelapse mode. However, if you want to change iPad time lapse settings, you have to install a time lapse app. Osnap is the top-rated iOS timelapse app that you can use to customize timelapse settings. Please note that the iOS time lapse has been made available on iOS devices from iOS 8 onwards.
Part 2. Related FAQs of iPad Timelapse
How long can iPad record time-lapse?
Apple claims that iPad can record 30 hours of time-lapse video. You have to consider the battery charge and the storage space on your iPad. These important factors can limit the recording duration of your time-lapse video. The longer the duration of the time-lapse, the lower will be the frame rate.
How do you time a video on iPad?
You cannot set a fixed time duration for capturing a video on iPad. You have to manually start and stop recording a video on iPad. However, you can always trim the video duration as per your requirements. You can use iMovie app to trim the video duration and time your video accordingly.
Can you turn a regular video into a timelapse?
Yes, you can turn a regular video into a timelapse video easily on iPhone and iPad. You can use iMovie app that comes pre-installed. Otherwise, you can install it from App Store. Besides, you can use any timelapse app such as Lapse-It and SpeedPro to turn your regular video into a timelapse video.
How long is a 1 hour time lapse on iPhone?
When the recording duration is one hour in timelapse mode, iPhone frame capture rate is 1 frame per second. This means a 1-hour time lapse on iPhone will be 4 minutes. The calculation is that you have to divide the recording duration in seconds by one frame capture duration in seconds. In this case, you need to divide 3600 seconds by 4 seconds. This comes to 240 seconds which is 4 minutes.
The Bottom Line
There is no doubt that taking a timelapse video with iPhone is a cakewalk However, if you own an iPad, you can capture stunning timelapse videos as well. All you need to do is place the iPad on a firm tripod. Make sure it does not get disturbed during the timelapse capturing session. You can capture timelapse video on your iPad directly from the Camera app. If you want to customize the timelapse settings, you can install a timelapse app on your iPad.
A timelapse video is where you record an event for a long duration at a regular interval. Due to the low frame rate, the captured long-duration video plays in a very short time. Suppose you want to capture the moving clouds for an hour. When you capture in timelapse mode, the hour-long event will be captured in a few minutes of video.
If you own an iPad, you can create stunning timelapse videos easily. All the modern iPad variants have the timelapse feature. You can create short timelapse videos of any event and put them on social media platforms. Besides, adding a timelapse video to a regular video enhances the content. We will illustrate how to record iPad time lapse in simple steps.
Part 1. Steps to Record Timelapse Video on iPad
You can find the timelapse video option on all modern iOS devices. The timelapse feature is available on all iPads. You can find the timelapse feature on iPad Pro, iPad Air, iPad, and iPad Mini. You will need a tripod to fix your iPad to capture timelapse video. The iPad should stay still in its position during the entire timelapse capturing session. Here are the steps on how to time lapse on iPhone and iPad.
Step 1: On your iPad, tap on Camera app from the home screen.
Step 2: On the camera app, you will notice camera modes like Photo, Video, and Slow-Mo. Swipe right until Time-Lapse is selected as the camera mode.
Step 3: Fix your iPad on the tripod and set the video frame perfectly. Tap on the Shutter button below Time-Lapse and the recording will start.
Step 4: When you want to stop recording the timelapse video, press the Shutter or Stop button again.
Step 5: You can go to Photos app to check out the timelapse video you have captured. Open Photos app and go to Time-lapse option under Media section.
The frame rate is automatically lowered when you select the timelapse mode. However, if you want to change iPad time lapse settings, you have to install a time lapse app. Osnap is the top-rated iOS timelapse app that you can use to customize timelapse settings. Please note that the iOS time lapse has been made available on iOS devices from iOS 8 onwards.
Part 2. Related FAQs of iPad Timelapse
How long can iPad record time-lapse?
Apple claims that iPad can record 30 hours of time-lapse video. You have to consider the battery charge and the storage space on your iPad. These important factors can limit the recording duration of your time-lapse video. The longer the duration of the time-lapse, the lower will be the frame rate.
How do you time a video on iPad?
You cannot set a fixed time duration for capturing a video on iPad. You have to manually start and stop recording a video on iPad. However, you can always trim the video duration as per your requirements. You can use iMovie app to trim the video duration and time your video accordingly.
Can you turn a regular video into a timelapse?
Yes, you can turn a regular video into a timelapse video easily on iPhone and iPad. You can use iMovie app that comes pre-installed. Otherwise, you can install it from App Store. Besides, you can use any timelapse app such as Lapse-It and SpeedPro to turn your regular video into a timelapse video.
How long is a 1 hour time lapse on iPhone?
When the recording duration is one hour in timelapse mode, iPhone frame capture rate is 1 frame per second. This means a 1-hour time lapse on iPhone will be 4 minutes. The calculation is that you have to divide the recording duration in seconds by one frame capture duration in seconds. In this case, you need to divide 3600 seconds by 4 seconds. This comes to 240 seconds which is 4 minutes.
The Bottom Line
There is no doubt that taking a timelapse video with iPhone is a cakewalk However, if you own an iPad, you can capture stunning timelapse videos as well. All you need to do is place the iPad on a firm tripod. Make sure it does not get disturbed during the timelapse capturing session. You can capture timelapse video on your iPad directly from the Camera app. If you want to customize the timelapse settings, you can install a timelapse app on your iPad.
Also read:
- "\"[New] 2024 Approved Screen Shutter Tips Free Windows Edition\""
- "Innovative Methods for Mac Screenshot Format Change"
- "\"[Updated] VCS VidCapture Review Full Examination for 2024\""
- "\"Narratives of the Bravest Our Favorites in Adventure Games for 2024\""
- "Simplifying Video Sharing on the Cloud by Microsoft for 2024"
- "[New] In 2024, Ideal Steps for Silent Screen Imaging"
- "[New] The Art of Extended Frame Videos on iPhone"
- "[Updated] PartedLens Overview"
- "\"[New] Automating Meeting Times A Google Meet Essential for 2024\""
- "\"In 2024, Top 8 Choices Affordable, Open Source Videoconferencing Apps\""
- "\"[Updated] 2024 Approved Hold Whole Page Snapshot Image\""
- "\"[New] Yearly Showcase Superior Business Simulations for Mobile/PC\""
- "[Updated] In 2024, The Comprehensive List of Top Screen Recording Tools"
- "[New] Exclusive Guide to Priceless Cam Screen Recorders for 2024"
- "\"[Updated] 2024 Approved Top Five Protocols for Documenting YouTube LIVE Broadcasts\""
- "\"[Updated] Windows' Best Calling Solutions, #7-#1 Ranked\""
- "\"StreamMasters OBS Edition\""
- "Secrets to Perfectly Lit Evening Portraits"
- "[Updated] Efficient Techniques to Record and Store Facebook Calls"
- "In 2024, Seamless Transition to Professional Screen Captures via Aiseesoft"
- "Capture Every Day in the Life of Your Sims with Pro Tips for Gameplay Recordings for 2024"
- "\"[New] Step-Wise Process of Integrating Voice Over Into Videos for 2024\""
- "\"2024 Approved SwiftClick RetroRecall Video\""
- "\"In 2024, Mastery of Digital Recording - Step-by-Step Insight\""
- "Effortless Game Captures with NVIDIA"
- "[New] Seamless Transition to Professional Screen Captures via Aiseesoft"
- "Essential Knowledge for Effective Screensaver Use in Mobile Applications"
- "\"Premier Video Communication Tools The Top 10 for iOS & Android\""
- "[Updated] Speedy Recording Tool + Guided Sound Guide Integration for 2024"
- "\"[New] Android's Screen Capture 4 Easy Techniques\""
- "[Updated] Fashioning Small Homes with Eastern Aesthetics for 2024"
- "\"2024 Approved Secrets of Successful Recording 3 Approaches for Disco's Broadcast\""
- "Mastering the Art of Capturing Live Hulu Content Across Platforms for 2024"
- "\"In 2024, A Comprehensive Review of Next-Gen Camera Systems\""
- "In 2024, Avoiding Lost Frames During Video Capture in OBS"
- "\"In 2024, FrameMaster Top Screen Recorder Reviews of the Year\""
- "\"[Updated] 2024 Approved Uncover the Best 6 Screen Recording Software on Mac\""
- "[New] Top 8 Easy and Safe Video Call Options for Enterprises for 2024"
- "\"Seamless Storytelling with On-Screen Annotations & Timestamps\""
- "\"[New] Scrutinized Screen Recording Tools Top 8 Picks for 2024\""
- "\"2024 Approved Investigating the Top 10 Cost-Effective Video Collaboration Tools in Corporate/Edu Settings\""
- How To Fix Auto Lock Greyed Out on iPhone 14
- Apple ID Locked or Disabled On Apple iPhone 14 Pro? 7 Mehtods You Cant-Miss
- Forgot Apple iPhone XR Backup Password? Heres What to Do
- How to Unlock iCloud Activation Lock and iCloud Account On Apple iPhone 8 Plus?
- In 2024, 5 Ways To Teach You To Transfer Files from Honor 100 to Other Android Devices Easily | Dr.fone
- In 2024, Easiest Guide How to Clone Xiaomi Redmi Note 12R Phone? | Dr.fone
- Recommended Best Applications for Mirroring Your OnePlus Nord CE 3 5G Screen | Dr.fone
- New Discover the Best Ways to Convert YouTube Videos to MP3 Files for 2024
- Top Video Creation Tools for Everyone
- Preparation to Beat Giovani in Pokemon Go For Apple iPhone 12 mini | Dr.fone
- Complete guide for recovering photos files on Honor 90.
- Easily Unlock Your Motorola Moto E13 Device SIM
- In 2024, How to Add & Edit Background Music to Video with Filmora
- What To Do When Honor 80 Pro Straight Screen Edition Has Black Screen of Death? | Dr.fone
- In 2024, 8 Best Apps for Screen Mirroring Honor X9b PC | Dr.fone
- How To Fix Part of the Touch Screen Not Working on Samsung Galaxy M14 5G | Dr.fone
- Best Methods for Tecno Pop 7 Pro Wont Turn On | Dr.fone
- 2024 Approved Song Selection Spectrum Discovering the Perfect Soundtrack for Every Montage Visionary Project
- Top 10 Password Cracking Tools For Vivo S17e
- New Soundtrack Savings How to Enjoy Free Audio Tracks with Ease for 2024
- How to Find iSpoofer Pro Activation Key On Meizu 21 Pro? | Dr.fone
- Does Xiaomi Redmi Note 12 Pro 5G Have Find My Friends? | Dr.fone
- In 2024, The Quick and Simple Way to Mirror Video in Premiere Pro
- How To Transfer WhatsApp From iPhone 6 Plus to other iPhone 13 Pro devices? | Dr.fone
- How to Quickly Fix Bluetooth Not Working on Vivo Y78t | Dr.fone
- Factory Reset Apple iPhone 11 Pro | Dr.fone
- New 2024 Approved Color Consistency in Final Cut Pro The Ultimate Guide
- Updated 2024 Approved Separating Audio From Video in DaVinci Resolve Step by Step
- In 2024, How To Delete iCloud Account Remove Your Apple ID Permanently From iPhone 15
- In 2024, How to Fix iPad or iPhone 13 Pro Stuck On Activation Lock?
- Title: "[New] 2024 Approved Unlocking Potential Crafting Dynamic Images with Your iPad"
- Author: Queen
- Created at : 2024-05-19 22:30:49
- Updated at : 2024-05-20 22:30:49
- Link: https://screen-mirroring-recording.techidaily.com/new-2024-approved-unlocking-potential-crafting-dynamic-images-with-your-ipad/
- License: This work is licensed under CC BY-NC-SA 4.0.
