![[New] 2024 Approved Seamless Integration of Snap Camera in Video Conferencing Tools](https://thmb.techidaily.com/502b1cdc938497dc65859bd4dea7388cbc83b5388aae8627911832c708fd7626.jpg)
"[New] 2024 Approved Seamless Integration of Snap Camera in Video Conferencing Tools"
Seamless Integration of Snap Camera in Video Conferencing Tools
How to Use Snap Camera on Google Meet?

Richard Bennett
Mar 27, 2024• Proven solutions
This past year, many of us have been forced to go through long, fastidious video meetings via platforms such as Zoom , Skype, or Google Meet. Though it has proven to be an efficient and useful way of connecting with a team or with loved ones, maybe you’re sick and tired of enduring long hours of tasteless video calls and want to spice things up. One of the ways to do so is to use Snap Camera with Google Meet, in order to have access to the multitude of filters available on Snapchat. Let’s talk about how to do so.
If you’re using the Zoom app to have a video conference, you can also use Snap Camera on it. Check this article to find how to use Snap Camera on Zoom meetings .
- Part 1: How to Download and Set up Snap Camera with Google Meet?
- Part 2: How to Use Snap Camera on Google Meet
- Part 3: How to Use Snap Cam with Google Meet using Third-Party Inputs
- Part 4: Add Filters to Google Meet Without Snap Camera on Mobile
- Part 5: Adds Video Filters and AR Stickers on Google Meet
Part 1: How to Download and Set up Snap Camera with Google Meet?
The first thing you’ll need to do is download and install the Snap Camera. It’s a very easy process. Visit the Snap Camera website and click the Download button to start. Please note you’ll need a Windows 10 (64 bit) or newer; or a macOS 10.13 or newer to be able to download and install the Snap Camera.
Once downloaded, find the file on your desktop and double click to install. On the mac, you’ll need to drag the icon to the applications file (when you click the downloaded file it usually automatically shows you what to do).
Open the snap camera and you’ll be able to see your face on the screen. That’s it, you’ve downloaded the Snap Camera. Select the preferred filters and lens from the below list and check the result in the video stream window. Now onto the next step, which is configuring the Snap Camera to work with Google Meet.
Part 2: How to Use Snap Camera on Google Meet?
There are two different ways of using the snap camera on Google Meet - the first method is to log in via Gmail and the second is to access Google Meet directly from the website.
Method 1: Gmail login
Step 1: Log in to your Gmail account and on the left-hand side of your Gmail landing page, you will see two options under Meet: New meeting and Join a meeting.

Step 3: Select “New Meeting” and then choose to send an invitation link or start right now. Here, let’s click on Start now and a Google Meet pop-up will tell you what the default video source is.

Step 4: Click on the three dots on the preview screen and click on settings.
Step 5: Inside the settings option, switch to the Video option and then you will see the first option that you get is “Camera”.

Step 6: Click on the options under the camera selection and select the Snap Camera.
Step 7: Set the resolution to 720p or whatever the highest option is for the sending resolution and the receiving resolution accordingly.
That’s it! Now you’ll be able to use Snap Camera for your Google Meet communications! Let’s look at the other way of logging in to Google Meet: directly from the website.
Method 2: Access Google Meet from the Website
Step 1: Open the Google Meet website .
Step 2: If you are logged in, you’ll be able to see the homepage which shows two options: New meeting, which allows you to create a new meeting , or join an existing one which says enter a code or link. So, to create a new meeting, click on “New meeting”, and then select Start an instant meeting to create. You can also create a meeting for later or schedule a meeting in Google Calendar. If you don’t see these two options, log in first, and then you’ll be able to access the two buttons.

Step 3: To set up your Snap Camera and use it as a part of your Google Meet session, follow the steps below.
- Float your mouse over the bottom of the window to make the menu appear (find the microphone, hang up, and camera button), then click the three dotes positioned on the far right of the screen.
- Inside the settings option, Select the Settings button from the menu, open the Video tab by clicking on Video. As soon as you do this, the first option that you get is “Camera”.
- Click on the options under the camera selection and select the Snap Camera.
- Set the resolution to 720p or whatever the highest option is.
Part 3: How to Use Snap Cam with Google Meet using Third-Party Inputs
It is also possible to use Google Meet and Snap Camera with third-party inputs such as the Canon EOS webcam utility or other applications such as IRUin camera of Epoc Cam. Here is how:
Step 1: Open the Snap camera app and find the default camera input that it shows you.
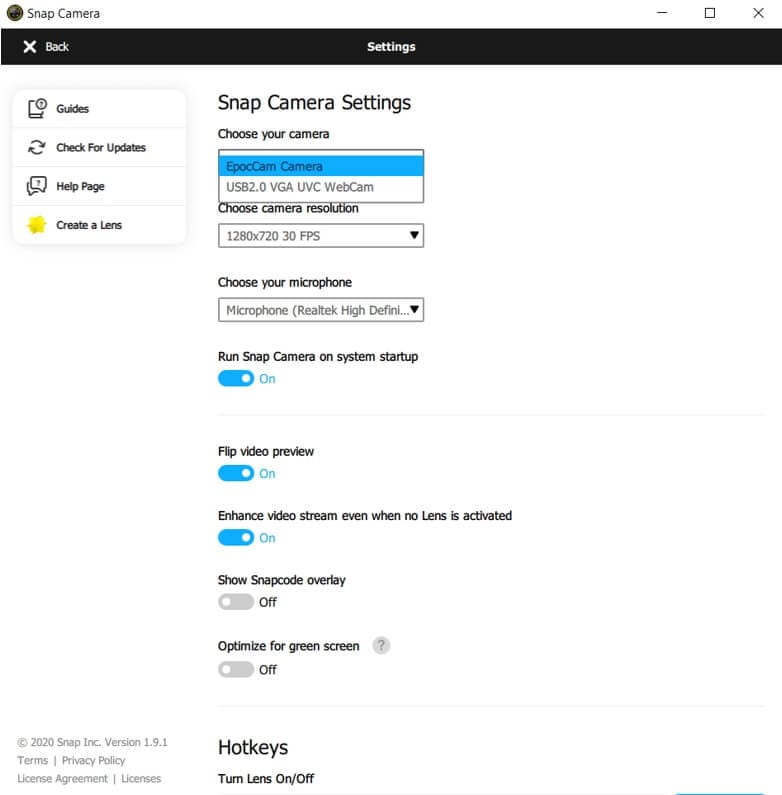
Step 2: Find the Gear icon on the top right of the screen and click on it to open the Snap Camera settings.
Step 3: Inside the Snap Camera settings, you will be able to see the “Choose Your Camera” option, which should be the first option available. Just below, find the drop-down menu with all the available camera inputs.
Step 4: Select your desired camera input and change it to that. You’ll now be able to use ut with Snap Camera.
To use third-party inputs like Iruin webcam, Epic cam, or Canon Webcam Utility, you’ll need to select the Snap Cam as the input in the meet settings. Your input will be passed through Snap Cam via webcam utility or another application using your phone or your DSLR, then passed through to Google Meet. You’ll be able to use the filters with far better resolution on Google Meet.
Part 4: How to Add Filters to Google Meet Without Snap Camera on Mobile
Currently, Snap Camera is available for Windows and Mac computers, which means you can’t install it on your iPhone or Android phone. If you want to add filters to Google Meet on mobile, you can follow the steps below to use the on-platform integrated filters:
Step 1: Open Google Meet on your Android device or iPhone .
Step 2: Follow the usual steps: start a meeting or join an existing one.
Step 3: As soon as you access your meeting, tap on the “Effects” icon situated near the bottom of your face on the screen.
Step 4: You’ll be able to access different options under the Effects icon, such as Blur, Backgrounds, Style. At the very end, you’ll find “Filters”.
Step 5: Tap on the filters option and see all the filters available. Choose any filter you want, and it will be automatically added to your video input.
Part 5: Google Meet Adds Video Filters and AR Stickers for Personal Call
Google Meet recently added new filters, effects, and AR (augmented reality) masks for calls on iOS and Android. On July 7th, Google tweeted that the new features would be available: “cats, astronauts, jellyfish and more”… Sounds exciting! Here’s how to add them to your Google Meet calls.

Step 1: If you haven’t yet, download Google Meet for Android or iOS and then open it.
Step 2: Select a meeting to enter - you can either open a new one or join an existing one.
Step 3: Once you’ve entered the meeting, click the “Sparkle” icon at the bottom right of the video screen.
Step 4: Select the fun new video effect you’d like and it will automatically add to your video input screen, AKA to your face.
Video Calls can be Fun!
As you can see, there are many different ways of implementing filters into your Google Meet video communications, to make your calls a little less boring. You can use these filters on your computer, whether it be a Windows or Mac device, by downloading Snap Camera; or you can use the Google Meet app to use the brand new filters Google has introduced. Don’t let physical distance be an obstacle to having fun with your loved ones - the infinite possibilities of filters on Google Meet will assure lots of laughs!
Richard Bennett
Richard Bennett is a writer and a lover of all things video.
Follow @Richard Bennett
Richard Bennett
Mar 27, 2024• Proven solutions
This past year, many of us have been forced to go through long, fastidious video meetings via platforms such as Zoom , Skype, or Google Meet. Though it has proven to be an efficient and useful way of connecting with a team or with loved ones, maybe you’re sick and tired of enduring long hours of tasteless video calls and want to spice things up. One of the ways to do so is to use Snap Camera with Google Meet, in order to have access to the multitude of filters available on Snapchat. Let’s talk about how to do so.
If you’re using the Zoom app to have a video conference, you can also use Snap Camera on it. Check this article to find how to use Snap Camera on Zoom meetings .
- Part 1: How to Download and Set up Snap Camera with Google Meet?
- Part 2: How to Use Snap Camera on Google Meet
- Part 3: How to Use Snap Cam with Google Meet using Third-Party Inputs
- Part 4: Add Filters to Google Meet Without Snap Camera on Mobile
- Part 5: Adds Video Filters and AR Stickers on Google Meet
Part 1: How to Download and Set up Snap Camera with Google Meet?
The first thing you’ll need to do is download and install the Snap Camera. It’s a very easy process. Visit the Snap Camera website and click the Download button to start. Please note you’ll need a Windows 10 (64 bit) or newer; or a macOS 10.13 or newer to be able to download and install the Snap Camera.
Once downloaded, find the file on your desktop and double click to install. On the mac, you’ll need to drag the icon to the applications file (when you click the downloaded file it usually automatically shows you what to do).
Open the snap camera and you’ll be able to see your face on the screen. That’s it, you’ve downloaded the Snap Camera. Select the preferred filters and lens from the below list and check the result in the video stream window. Now onto the next step, which is configuring the Snap Camera to work with Google Meet.
Part 2: How to Use Snap Camera on Google Meet?
There are two different ways of using the snap camera on Google Meet - the first method is to log in via Gmail and the second is to access Google Meet directly from the website.
Method 1: Gmail login
Step 1: Log in to your Gmail account and on the left-hand side of your Gmail landing page, you will see two options under Meet: New meeting and Join a meeting.
Step 3: Select “New Meeting” and then choose to send an invitation link or start right now. Here, let’s click on Start now and a Google Meet pop-up will tell you what the default video source is.
Step 4: Click on the three dots on the preview screen and click on settings.
Step 5: Inside the settings option, switch to the Video option and then you will see the first option that you get is “Camera”.
Step 6: Click on the options under the camera selection and select the Snap Camera.
Step 7: Set the resolution to 720p or whatever the highest option is for the sending resolution and the receiving resolution accordingly.
That’s it! Now you’ll be able to use Snap Camera for your Google Meet communications! Let’s look at the other way of logging in to Google Meet: directly from the website.
Method 2: Access Google Meet from the Website
Step 1: Open the Google Meet website .
Step 2: If you are logged in, you’ll be able to see the homepage which shows two options: New meeting, which allows you to create a new meeting , or join an existing one which says enter a code or link. So, to create a new meeting, click on “New meeting”, and then select Start an instant meeting to create. You can also create a meeting for later or schedule a meeting in Google Calendar. If you don’t see these two options, log in first, and then you’ll be able to access the two buttons.
Step 3: To set up your Snap Camera and use it as a part of your Google Meet session, follow the steps below.
- Float your mouse over the bottom of the window to make the menu appear (find the microphone, hang up, and camera button), then click the three dotes positioned on the far right of the screen.
- Inside the settings option, Select the Settings button from the menu, open the Video tab by clicking on Video. As soon as you do this, the first option that you get is “Camera”.
- Click on the options under the camera selection and select the Snap Camera.
- Set the resolution to 720p or whatever the highest option is.
Part 3: How to Use Snap Cam with Google Meet using Third-Party Inputs
It is also possible to use Google Meet and Snap Camera with third-party inputs such as the Canon EOS webcam utility or other applications such as IRUin camera of Epoc Cam. Here is how:
Step 1: Open the Snap camera app and find the default camera input that it shows you.
Step 2: Find the Gear icon on the top right of the screen and click on it to open the Snap Camera settings.
Step 3: Inside the Snap Camera settings, you will be able to see the “Choose Your Camera” option, which should be the first option available. Just below, find the drop-down menu with all the available camera inputs.
Step 4: Select your desired camera input and change it to that. You’ll now be able to use ut with Snap Camera.
To use third-party inputs like Iruin webcam, Epic cam, or Canon Webcam Utility, you’ll need to select the Snap Cam as the input in the meet settings. Your input will be passed through Snap Cam via webcam utility or another application using your phone or your DSLR, then passed through to Google Meet. You’ll be able to use the filters with far better resolution on Google Meet.
Part 4: How to Add Filters to Google Meet Without Snap Camera on Mobile
Currently, Snap Camera is available for Windows and Mac computers, which means you can’t install it on your iPhone or Android phone. If you want to add filters to Google Meet on mobile, you can follow the steps below to use the on-platform integrated filters:
Step 1: Open Google Meet on your Android device or iPhone .
Step 2: Follow the usual steps: start a meeting or join an existing one.
Step 3: As soon as you access your meeting, tap on the “Effects” icon situated near the bottom of your face on the screen.
Step 4: You’ll be able to access different options under the Effects icon, such as Blur, Backgrounds, Style. At the very end, you’ll find “Filters”.
Step 5: Tap on the filters option and see all the filters available. Choose any filter you want, and it will be automatically added to your video input.
Part 5: Google Meet Adds Video Filters and AR Stickers for Personal Call
Google Meet recently added new filters, effects, and AR (augmented reality) masks for calls on iOS and Android. On July 7th, Google tweeted that the new features would be available: “cats, astronauts, jellyfish and more”… Sounds exciting! Here’s how to add them to your Google Meet calls.
Step 1: If you haven’t yet, download Google Meet for Android or iOS and then open it.
Step 2: Select a meeting to enter - you can either open a new one or join an existing one.
Step 3: Once you’ve entered the meeting, click the “Sparkle” icon at the bottom right of the video screen.
Step 4: Select the fun new video effect you’d like and it will automatically add to your video input screen, AKA to your face.
Video Calls can be Fun!
As you can see, there are many different ways of implementing filters into your Google Meet video communications, to make your calls a little less boring. You can use these filters on your computer, whether it be a Windows or Mac device, by downloading Snap Camera; or you can use the Google Meet app to use the brand new filters Google has introduced. Don’t let physical distance be an obstacle to having fun with your loved ones - the infinite possibilities of filters on Google Meet will assure lots of laughs!
Richard Bennett
Richard Bennett is a writer and a lover of all things video.
Follow @Richard Bennett
Also read:
- [New] 2024 Approved Massive Viewership Triumphs YouTube's Greatest Hits
- [New] In 2024, Loom Downloader - How to Loom Screen Record
- [Updated] 2024 Approved Essential Tools for Every Mac User – Free Screen Recorder Guide
- [Updated] 2024 Approved Maximize Reach The Top Ten Keywords Discovery Platforms for YouTubers
- [Updated] Branding Excellence Integrating Watermarks and Logos Into Video Media
- [Updated] Get YouTube Posters at Zero Price - Top Free Downloading Tool
- [Updated] How to Effectively Convert iPhone Photos (JPEG, PNG) Into PDFs for 2024
- [Updated] In 2024, Navigating the Rules of YouTube Video Documentation
- [Updated] In 2024, Seamless Screen Customization Timely Adjustments for Teams Calls
- [Updated] In 2024, Smooth Recording Techniques for Gears 5'S Battlegrounds
- 2024 Approved HarmonyHook Tracker Extracting Sound & Insights
- Accelerating Your Creative Process High-Quality 3D Models Tools for 2024
- DirectSnapRecorder Straightforward Windows 11 Capture
- In 2024, How to Change GPS Location on Oppo Find X6 Easily & Safely | Dr.fone
- In 2024, Save Your Gameplay Moments with Xbox Screen Recordings
- In 2024, What Does Enter PUK Code Mean And Why Did The Sim Get PUK Blocked On Vivo X100 Pro Device
- Optimize Your Workday with IO Screen Capture Expertise for 2024
- Social Media Music Rules and Regulations
- Vision Capture Expert Insights Into Video Tech
- Title: [New] 2024 Approved Seamless Integration of Snap Camera in Video Conferencing Tools
- Author: Queen
- Created at : 2025-01-06 17:22:18
- Updated at : 2025-01-07 16:45:37
- Link: https://screen-mirroring-recording.techidaily.com/new-2024-approved-seamless-integration-of-snap-camera-in-video-conferencing-tools/
- License: This work is licensed under CC BY-NC-SA 4.0.