![[New] 2024 Approved High-Definition Recorders Revealed 5 Devices to Watch](https://thmb.techidaily.com/805432a26a63c24a3ad7f94c306f1a1291a2364beb1c1710fc99d1f9d71ae26e.jpg)
"[New] 2024 Approved High-Definition Recorders Revealed 5 Devices to Watch"
High-Definition Recorders Revealed: 5 Devices to Watch
In today’s day and age, conference calls in the corporate world have become digital. Thanks to the emergence of virtual calling and conferencing apps, corporates are comfortable organizing live stream conferences and meetings. Everyone can join in from any part of the world, and the interaction is going to be immediate and effective. There are times when you need to record live stream video conference so that you can review the conference any time you want and save the recording for future reference.
Most live stream conference calls in the corporate world have guests joining in from their computers through webcams. You will need a live stream conference recorder to record the video conference easily. You can also use an online screen recorder to record live stream conference call from any device. In this article, we will illustrate the different ways to record live stream video conferences smoothly.
Way 1. Record Live Stream Meeting with Filmora
If you are attending live stream meetings from your computer, you can record them easily with Wondershare Filmora. Filmora is a user-friendly video screen recorder cum video editor. Therefore, you can not only record the entire meeting on your screen as well your webcam video but also edit out certain parts or extract important parts and share with colleagues and concerned persons. It is a premium software and it is available for Windows and Mac users. Here are the steps to record live stream conference call with Filmora.
For Win 7 or later (64-bit)
For macOS 10.12 or later
Step 1: Download and install Wondershare Filmora. Launch the software and click on PC Screen option.

Step 2: Choose the recording screen area which should be the same or greater than the live stream conference software area. Select the system audio to record everyone speaking.
If you want to add your voice, select external the mic audio source. If you want to capture your webcam video along with your screen, enable “Record Camera Stream” option.

Step 3: Once the conference begins, click on Record button on Filmora to start recording. When the conference gets over, press F9 key to stop recording. You can edit the recorded video and click on Export to save the video.


Way 2. Use Dacast
Dacast is an extremely popular platform for organizing live stream conference and meeting. Apart from live streaming, you can host your video on the platform as well as monetize your video to earn revenue. Most importantly, you can record your live stream video conference so that the audiences can re-watch them at any future instance. You can record video up to six hours at a time. Here are the steps to record your live stream video on Dacast.
Step 1: Create a live channel on Dacast and set the following settings so that recording works perfectly.
Video Codex –
Audio Codec – ACC
Live Channel Status - On
Step 2: Go to General section and turn on Live Stream Recording option. Once you turn it on, the recording will be automatic in the background once you start live streaming your video.

WPS Office Premium ( File Recovery, Photo Scanning, Convert PDF)–Yearly

The recording option stays activated for seven days. Thereafter, you have to activate it again from General section.
Step 3: The recording will stop automatically as soon as you stop your live stream. If you want to stop recording in between, you have to disable the recording option and save VOD file. You can find the recorded video under “Video on Demand” option.
It is important to note that you can record Dacast live stream video only if you are the creator of the video. It is not possible for a viewer to record with Dacast and the viewer needs to use a dedicated screen recorder.
Way 3. Record with Restream
Restream is another popular live streaming platform and you can live stream your video on almost all the popular online live streaming websites. If you are using Restream to live stream video, you can record your video as well. First of all, Restream Studio automatically records your live stream videos as soon as you go live.
When your live stream gets over, you will get to download in your hard drive as well as export the recording to cloud storage platforms. Apart from that, there is a Record-only Mode that also lets you record your video on Restream. Here are the steps to follow.
Step 1: Open Restream Studio.
Step 2: Click on Record Only option on the home screen.
 LYRX is an easy-to-use karaoke software with the professional features karaoke hosts need to perform with precision. LYRX is karaoke show hosting software that supports all standard karaoke file types as well as HD video formats, and it’s truly fun to use.
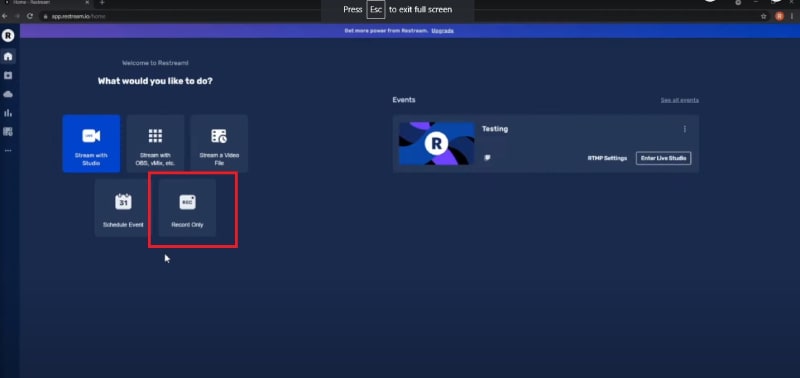
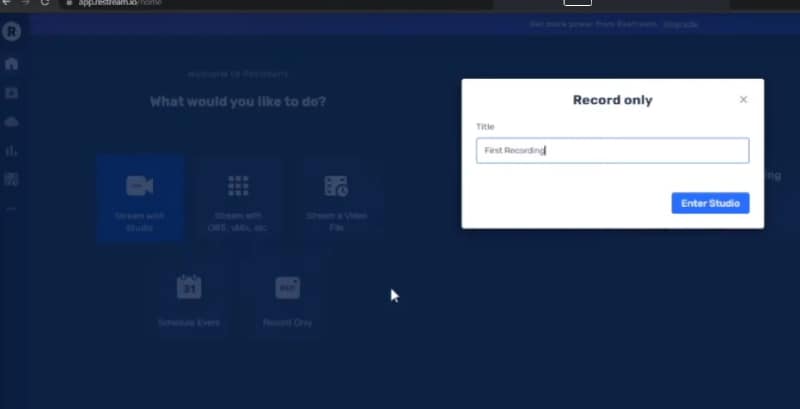
Step 3: Provide a label for the recording session so that you can find it easily. Click on Enter Studio button.

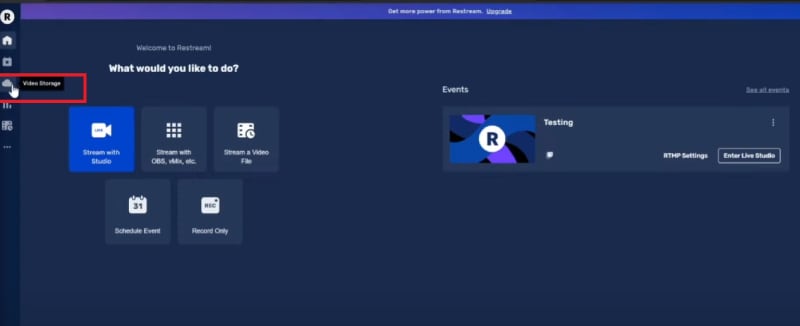
The recording will be available under Video Storage section.
Way 4. Use Screencast-O-Matic
If you prefer an online screen recorder to record live stream video conference, we recommend Screencast-O-Matic. You need to download the web launcher and thereafter, you can visit the official website of Screencast-O-Matic and launch the screen recorder any time you want. Therefore, if you have a low-end computer, it is the best option you have. In fact, Screencast-O-Matic can be used on any device including Android and iOS device. Here are the steps to record live stream conference call.
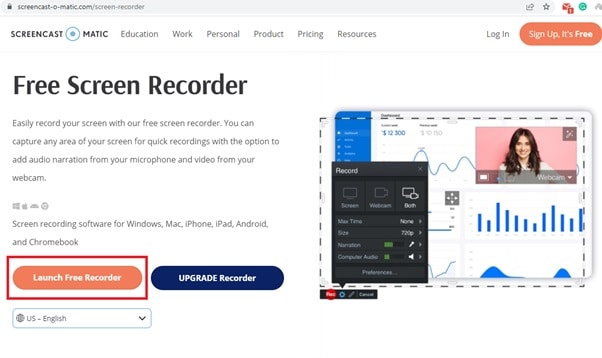
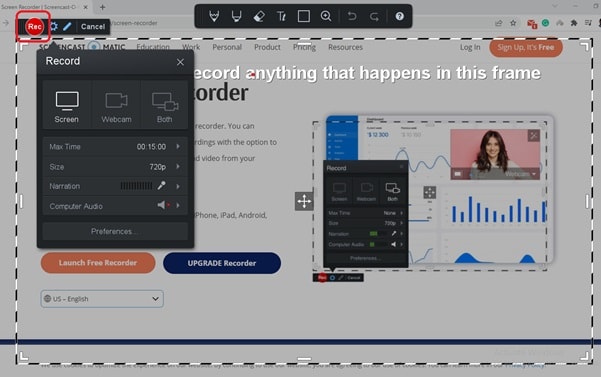
Step 1: Visit “screencast-o-matic.com/screen-recorder” on web browser. Click on Launch Free Recorder button and download and install the web launcher. Thereafter, click on Launch Free Recorder button to launch the screen recorder.
Step 2: Click on Size and select from Active Window, Full Screen, or Customize as per your requirements.
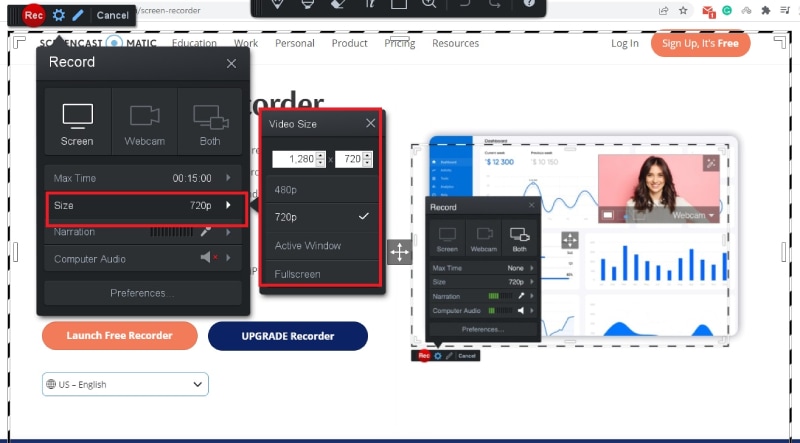
Step 3: Once the live stream conference starts, click on Rec button to start recording.
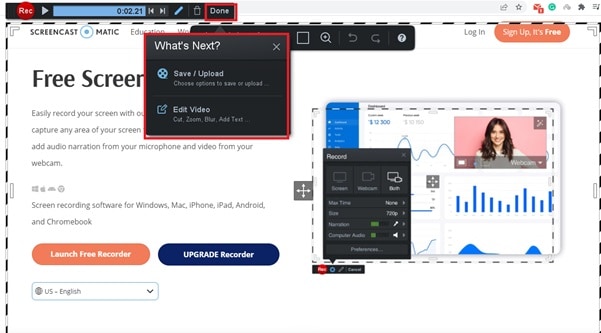
Step 4: To stop recording, click on Pause button and Done button. Thereafter, you can save the recorded video.
 EmEditor Professional (Lifetime License, non-store app)
Way 5. Use Screencastify
Screencastify is a Google Chrome extension and many users prefer it over an online tool. Even though it is free to use but the free version is limited to 5 minutes only. The premium version allows you to record any screen activity without any restriction. You can not only record live stream meeting as a viewer but also as a speaker. This is because you can record from webcam and external mic. There are also drawing tools available. Here are the steps to record from any live stream conference software and online platforms.
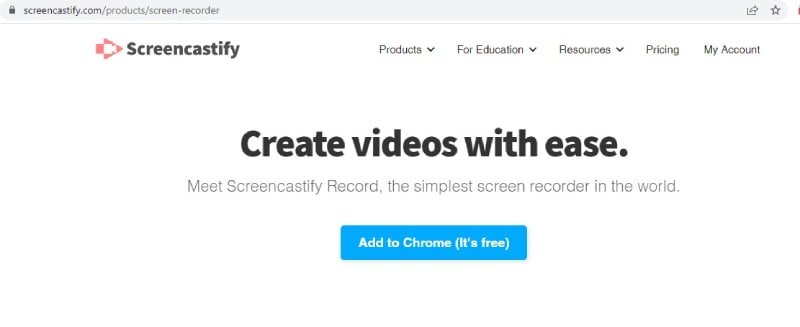
Step 1: Visit “www.screencastify.com/products/screen-recorder” and click on Add to Chrome button.
Step 2: You will be redirected to Chrome web store from where you need to install the extension on Chrome browser.
Step 3: Once the live stream live stream conference call starts, click on Screencastify extension icon.
Step 4: Set it up perfectly as per your requirements and click on Record button.
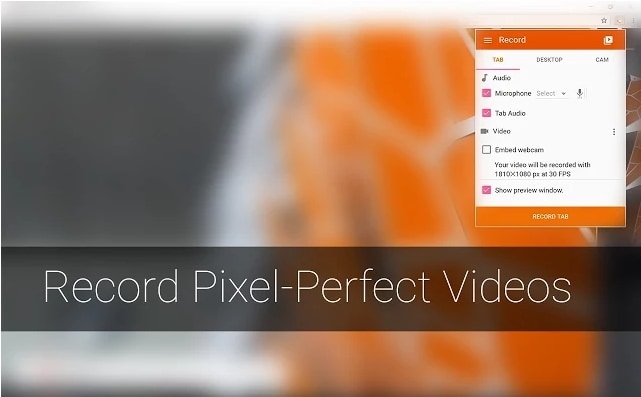
Step 5: Select the recording screen area and click on Share button.
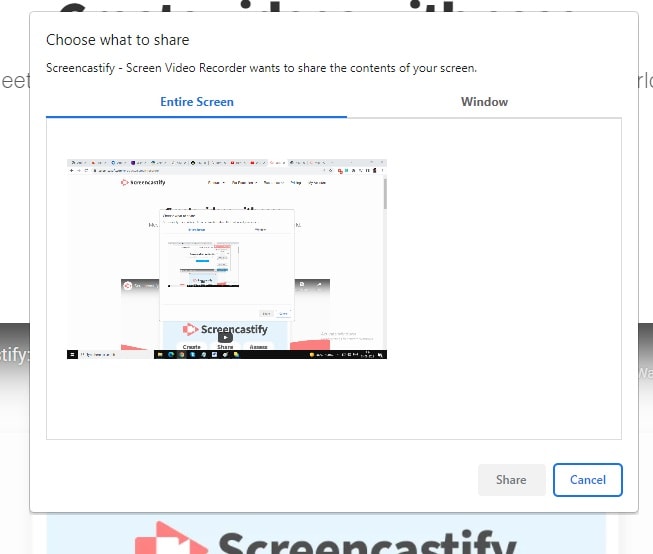
Step 6: To stop recording, click on Stop Sharing button. Thereafter, you can preview and save the video.
Conclusion
Recording a live stream video conference call or corporate meeting is no more an issue. You can use online screen recorder Screencast-O-Matic or Google extension Screencastify. If you are hosting the live stream session yourself through Dacast or Restream, we will illustrate how you can use the platforms to record your live sessions. But the best way to record any live stream video is by using Wondershare Filmora.
For macOS 10.12 or later
Step 1: Download and install Wondershare Filmora. Launch the software and click on PC Screen option.
 Lyric Video Creator Professional Version
Step 2: Choose the recording screen area which should be the same or greater than the live stream conference software area. Select the system audio to record everyone speaking.
If you want to add your voice, select external the mic audio source. If you want to capture your webcam video along with your screen, enable “Record Camera Stream” option.
Step 3: Once the conference begins, click on Record button on Filmora to start recording. When the conference gets over, press F9 key to stop recording. You can edit the recorded video and click on Export to save the video.
Way 2. Use Dacast
Dacast is an extremely popular platform for organizing live stream conference and meeting. Apart from live streaming, you can host your video on the platform as well as monetize your video to earn revenue. Most importantly, you can record your live stream video conference so that the audiences can re-watch them at any future instance. You can record video up to six hours at a time. Here are the steps to record your live stream video on Dacast.
Step 1: Create a live channel on Dacast and set the following settings so that recording works perfectly.
Video Codex –
Audio Codec – ACC
Live Channel Status - On
Step 2: Go to General section and turn on Live Stream Recording option. Once you turn it on, the recording will be automatic in the background once you start live streaming your video.
The recording option stays activated for seven days. Thereafter, you have to activate it again from General section.
Step 3: The recording will stop automatically as soon as you stop your live stream. If you want to stop recording in between, you have to disable the recording option and save VOD file. You can find the recorded video under “Video on Demand” option.
It is important to note that you can record Dacast live stream video only if you are the creator of the video. It is not possible for a viewer to record with Dacast and the viewer needs to use a dedicated screen recorder.
Way 3. Record with Restream
Restream is another popular live streaming platform and you can live stream your video on almost all the popular online live streaming websites. If you are using Restream to live stream video, you can record your video as well. First of all, Restream Studio automatically records your live stream videos as soon as you go live.
When your live stream gets over, you will get to download in your hard drive as well as export the recording to cloud storage platforms. Apart from that, there is a Record-only Mode that also lets you record your video on Restream. Here are the steps to follow.
Step 1: Open Restream Studio.
Step 2: Click on Record Only option on the home screen.
Step 3: Provide a label for the recording session so that you can find it easily. Click on Enter Studio button.
The recording will be available under Video Storage section.

Way 4. Use Screencast-O-Matic
If you prefer an online screen recorder to record live stream video conference, we recommend Screencast-O-Matic. You need to download the web launcher and thereafter, you can visit the official website of Screencast-O-Matic and launch the screen recorder any time you want. Therefore, if you have a low-end computer, it is the best option you have. In fact, Screencast-O-Matic can be used on any device including Android and iOS device. Here are the steps to record live stream conference call.
Step 1: Visit “screencast-o-matic.com/screen-recorder” on web browser. Click on Launch Free Recorder button and download and install the web launcher. Thereafter, click on Launch Free Recorder button to launch the screen recorder.
Step 2: Click on Size and select from Active Window, Full Screen, or Customize as per your requirements.
Step 3: Once the live stream conference starts, click on Rec button to start recording.
Step 4: To stop recording, click on Pause button and Done button. Thereafter, you can save the recorded video.

Way 5. Use Screencastify
Screencastify is a Google Chrome extension and many users prefer it over an online tool. Even though it is free to use but the free version is limited to 5 minutes only. The premium version allows you to record any screen activity without any restriction. You can not only record live stream meeting as a viewer but also as a speaker. This is because you can record from webcam and external mic. There are also drawing tools available. Here are the steps to record from any live stream conference software and online platforms.
Step 1: Visit “www.screencastify.com/products/screen-recorder” and click on Add to Chrome button.
Step 2: You will be redirected to Chrome web store from where you need to install the extension on Chrome browser.
Step 3: Once the live stream live stream conference call starts, click on Screencastify extension icon.
Step 4: Set it up perfectly as per your requirements and click on Record button.
Step 5: Select the recording screen area and click on Share button.
Step 6: To stop recording, click on Stop Sharing button. Thereafter, you can preview and save the video.
 Forex Robotron Basic Package
Conclusion
Recording a live stream video conference call or corporate meeting is no more an issue. You can use online screen recorder Screencast-O-Matic or Google extension Screencastify. If you are hosting the live stream session yourself through Dacast or Restream, we will illustrate how you can use the platforms to record your live sessions. But the best way to record any live stream video is by using Wondershare Filmora.
For macOS 10.12 or later
Step 1: Download and install Wondershare Filmora. Launch the software and click on PC Screen option.
Step 2: Choose the recording screen area which should be the same or greater than the live stream conference software area. Select the system audio to record everyone speaking.
If you want to add your voice, select external the mic audio source. If you want to capture your webcam video along with your screen, enable “Record Camera Stream” option.
Step 3: Once the conference begins, click on Record button on Filmora to start recording. When the conference gets over, press F9 key to stop recording. You can edit the recorded video and click on Export to save the video.
Way 2. Use Dacast
Dacast is an extremely popular platform for organizing live stream conference and meeting. Apart from live streaming, you can host your video on the platform as well as monetize your video to earn revenue. Most importantly, you can record your live stream video conference so that the audiences can re-watch them at any future instance. You can record video up to six hours at a time. Here are the steps to record your live stream video on Dacast.
Step 1: Create a live channel on Dacast and set the following settings so that recording works perfectly.
Video Codex –
Audio Codec – ACC
Live Channel Status - On
Step 2: Go to General section and turn on Live Stream Recording option. Once you turn it on, the recording will be automatic in the background once you start live streaming your video.
The recording option stays activated for seven days. Thereafter, you have to activate it again from General section.
Step 3: The recording will stop automatically as soon as you stop your live stream. If you want to stop recording in between, you have to disable the recording option and save VOD file. You can find the recorded video under “Video on Demand” option.
It is important to note that you can record Dacast live stream video only if you are the creator of the video. It is not possible for a viewer to record with Dacast and the viewer needs to use a dedicated screen recorder.
Way 3. Record with Restream
Restream is another popular live streaming platform and you can live stream your video on almost all the popular online live streaming websites. If you are using Restream to live stream video, you can record your video as well. First of all, Restream Studio automatically records your live stream videos as soon as you go live.
When your live stream gets over, you will get to download in your hard drive as well as export the recording to cloud storage platforms. Apart from that, there is a Record-only Mode that also lets you record your video on Restream. Here are the steps to follow.
Step 1: Open Restream Studio.
Step 2: Click on Record Only option on the home screen.
Step 3: Provide a label for the recording session so that you can find it easily. Click on Enter Studio button.
The recording will be available under Video Storage section.
 Power Tools add-on for Google Sheets, Lifetime subscription
Way 4. Use Screencast-O-Matic
If you prefer an online screen recorder to record live stream video conference, we recommend Screencast-O-Matic. You need to download the web launcher and thereafter, you can visit the official website of Screencast-O-Matic and launch the screen recorder any time you want. Therefore, if you have a low-end computer, it is the best option you have. In fact, Screencast-O-Matic can be used on any device including Android and iOS device. Here are the steps to record live stream conference call.
Step 1: Visit “screencast-o-matic.com/screen-recorder” on web browser. Click on Launch Free Recorder button and download and install the web launcher. Thereafter, click on Launch Free Recorder button to launch the screen recorder.
Step 2: Click on Size and select from Active Window, Full Screen, or Customize as per your requirements.
Step 3: Once the live stream conference starts, click on Rec button to start recording.
Step 4: To stop recording, click on Pause button and Done button. Thereafter, you can save the recorded video.
Way 5. Use Screencastify
Screencastify is a Google Chrome extension and many users prefer it over an online tool. Even though it is free to use but the free version is limited to 5 minutes only. The premium version allows you to record any screen activity without any restriction. You can not only record live stream meeting as a viewer but also as a speaker. This is because you can record from webcam and external mic. There are also drawing tools available. Here are the steps to record from any live stream conference software and online platforms.
Step 1: Visit “www.screencastify.com/products/screen-recorder” and click on Add to Chrome button.

Step 2: You will be redirected to Chrome web store from where you need to install the extension on Chrome browser.
Step 3: Once the live stream live stream conference call starts, click on Screencastify extension icon.
Step 4: Set it up perfectly as per your requirements and click on Record button.
Step 5: Select the recording screen area and click on Share button.
Step 6: To stop recording, click on Stop Sharing button. Thereafter, you can preview and save the video.
Conclusion
Recording a live stream video conference call or corporate meeting is no more an issue. You can use online screen recorder Screencast-O-Matic or Google extension Screencastify. If you are hosting the live stream session yourself through Dacast or Restream, we will illustrate how you can use the platforms to record your live sessions. But the best way to record any live stream video is by using Wondershare Filmora.
For macOS 10.12 or later
Step 1: Download and install Wondershare Filmora. Launch the software and click on PC Screen option.
Step 2: Choose the recording screen area which should be the same or greater than the live stream conference software area. Select the system audio to record everyone speaking.
If you want to add your voice, select external the mic audio source. If you want to capture your webcam video along with your screen, enable “Record Camera Stream” option.
Step 3: Once the conference begins, click on Record button on Filmora to start recording. When the conference gets over, press F9 key to stop recording. You can edit the recorded video and click on Export to save the video.

Way 2. Use Dacast
Dacast is an extremely popular platform for organizing live stream conference and meeting. Apart from live streaming, you can host your video on the platform as well as monetize your video to earn revenue. Most importantly, you can record your live stream video conference so that the audiences can re-watch them at any future instance. You can record video up to six hours at a time. Here are the steps to record your live stream video on Dacast.
Step 1: Create a live channel on Dacast and set the following settings so that recording works perfectly.
Video Codex –
Audio Codec – ACC
Live Channel Status - On
Step 2: Go to General section and turn on Live Stream Recording option. Once you turn it on, the recording will be automatic in the background once you start live streaming your video.
The recording option stays activated for seven days. Thereafter, you have to activate it again from General section.
Step 3: The recording will stop automatically as soon as you stop your live stream. If you want to stop recording in between, you have to disable the recording option and save VOD file. You can find the recorded video under “Video on Demand” option.
It is important to note that you can record Dacast live stream video only if you are the creator of the video. It is not possible for a viewer to record with Dacast and the viewer needs to use a dedicated screen recorder.
Way 3. Record with Restream
Restream is another popular live streaming platform and you can live stream your video on almost all the popular online live streaming websites. If you are using Restream to live stream video, you can record your video as well. First of all, Restream Studio automatically records your live stream videos as soon as you go live.
When your live stream gets over, you will get to download in your hard drive as well as export the recording to cloud storage platforms. Apart from that, there is a Record-only Mode that also lets you record your video on Restream. Here are the steps to follow.
Step 1: Open Restream Studio.
Step 2: Click on Record Only option on the home screen.
Step 3: Provide a label for the recording session so that you can find it easily. Click on Enter Studio button.
 PDF application, powered by AI-based OCR, for unified workflows with both digital and scanned documents.
The recording will be available under Video Storage section.
Way 4. Use Screencast-O-Matic
If you prefer an online screen recorder to record live stream video conference, we recommend Screencast-O-Matic. You need to download the web launcher and thereafter, you can visit the official website of Screencast-O-Matic and launch the screen recorder any time you want. Therefore, if you have a low-end computer, it is the best option you have. In fact, Screencast-O-Matic can be used on any device including Android and iOS device. Here are the steps to record live stream conference call.
Step 1: Visit “screencast-o-matic.com/screen-recorder” on web browser. Click on Launch Free Recorder button and download and install the web launcher. Thereafter, click on Launch Free Recorder button to launch the screen recorder.
Step 2: Click on Size and select from Active Window, Full Screen, or Customize as per your requirements.
Step 3: Once the live stream conference starts, click on Rec button to start recording.
Step 4: To stop recording, click on Pause button and Done button. Thereafter, you can save the recorded video.
Way 5. Use Screencastify
Screencastify is a Google Chrome extension and many users prefer it over an online tool. Even though it is free to use but the free version is limited to 5 minutes only. The premium version allows you to record any screen activity without any restriction. You can not only record live stream meeting as a viewer but also as a speaker. This is because you can record from webcam and external mic. There are also drawing tools available. Here are the steps to record from any live stream conference software and online platforms.
Step 1: Visit “www.screencastify.com/products/screen-recorder” and click on Add to Chrome button.
Step 2: You will be redirected to Chrome web store from where you need to install the extension on Chrome browser.
Step 3: Once the live stream live stream conference call starts, click on Screencastify extension icon.
Step 4: Set it up perfectly as per your requirements and click on Record button.
Step 5: Select the recording screen area and click on Share button.
Step 6: To stop recording, click on Stop Sharing button. Thereafter, you can preview and save the video.
Conclusion
Recording a live stream video conference call or corporate meeting is no more an issue. You can use online screen recorder Screencast-O-Matic or Google extension Screencastify. If you are hosting the live stream session yourself through Dacast or Restream, we will illustrate how you can use the platforms to record your live sessions. But the best way to record any live stream video is by using Wondershare Filmora.
- Title: [New] 2024 Approved High-Definition Recorders Revealed 5 Devices to Watch
- Author: Queen
- Created at : 2024-07-20 06:30:26
- Updated at : 2024-07-21 06:30:26
- Link: https://screen-mirroring-recording.techidaily.com/new-2024-approved-high-definition-recorders-revealed-5-devices-to-watch/
- License: This work is licensed under CC BY-NC-SA 4.0.