
"2024 Approved Uncomplicated Walkthrough of Easy iPhone Screen Capture"
Uncomplicated Walkthrough of Easy iPhone Screen Capture
In the social media era, every other person uses multiple platforms to entertain themselves. Every second of every day, new things are uploaded and shared on various platforms that might somehow intrigue us, impress us, facilitate us, etc. We wish to save those exciting things, but not all platforms offer you to save things or maybe download them to your device.
What could be a better option for such scenarios than doing screen recording. Screen recording means recording everything going on the screen to save someone that could not be saved. You can do screen recording on Android and also on iPhone by using different iPhone video recording apps. The article below will talk in detail regarding how to record your screen on iPhone.
In this article
01 How Do You Screen Record on iPhone?
02 5 Popular Screen Recorder for iPhone
03 Recommend Desktop Screen Recorder
Part 1. How Do You Screen Record on iPhone?
iOS devices have different features, functionality, and entirely different working. Unlike Android devices, iOS deals with things differently. Due to this reason, there is a slight difference in screen recording when it comes to iPhone. Not every iPhone user knows how to enable screen recording on iPhone but don’t worry; we got you. Let’s share the steps for enabling your iPhone’s settings.
Step 1: To enable screen recording in your iPhone, firstly head over to the ‘Settings’ app and then look for ‘Control Center.’ Tap on the ‘Customize Controls’ option from the Control Center screen.
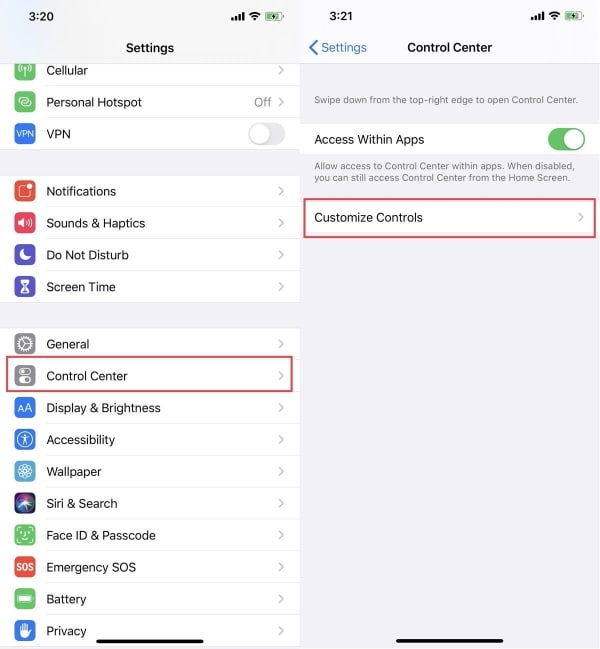
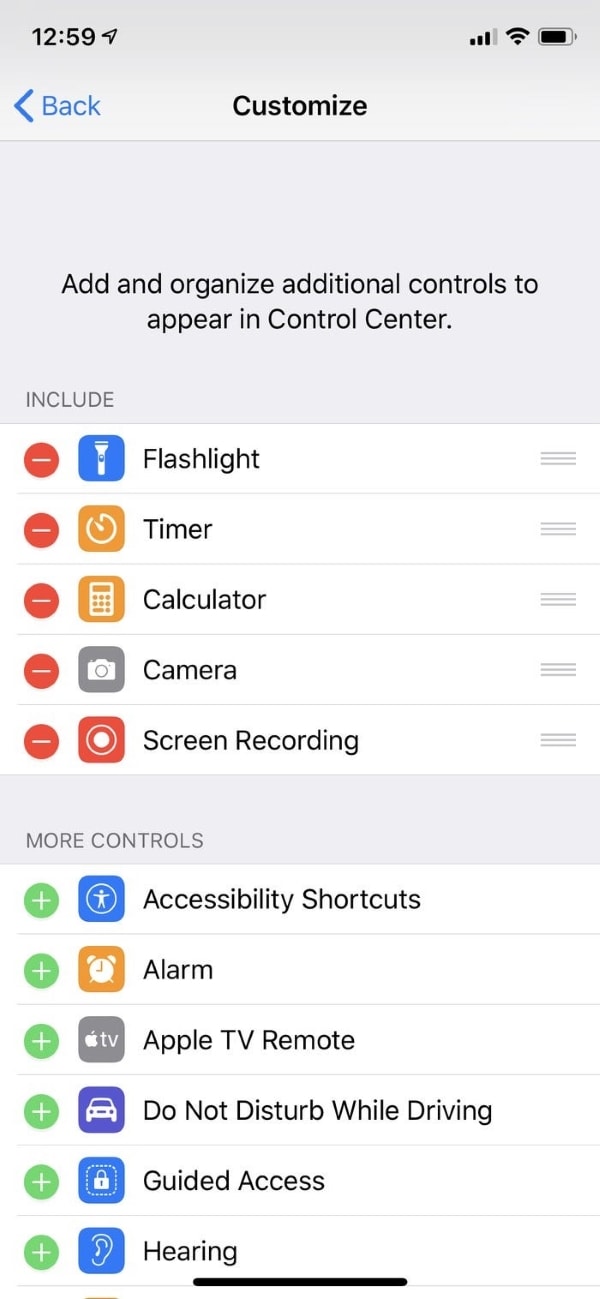
Step 2: Now, from the Customize Controls section, find the option of ‘Screen Recording.’ If the option is not available in the ‘Include’ section, hit the plus sign in green, and it will be moved to the ‘Include’ section.
These are the steps you should follow if you plan to enable the screen recording on your iPhone. Whereas the process for screen recorder iPhone is different and is still unrevealed. Follow the steps given below to record fun stuff from your iPhone screen.
Step 1: First of all, you should access the iPhone’s Control Center by swiping the screen down from the top right corner. Or else, people having the iPhone with a home button can simply swipe up from the bottom.
Step 2: Now, you have to tap on the ‘Record’ option, which appears as a bigger circle with a shaded smaller circle in it.
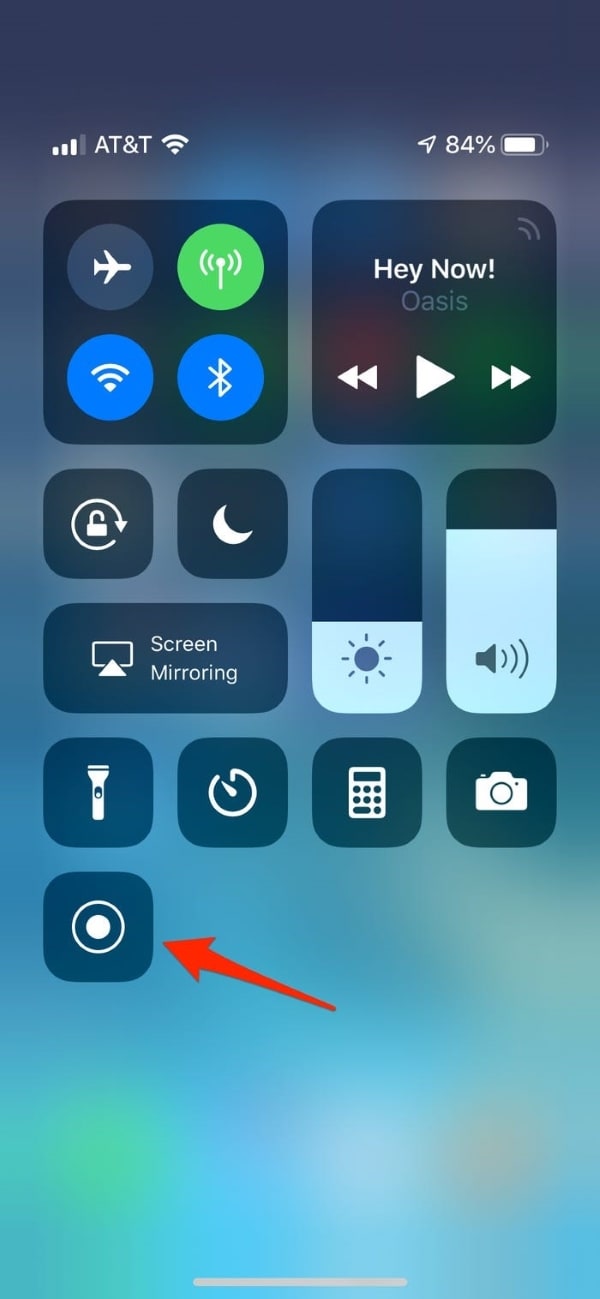
Step 3: After that, it will hardly take 3 seconds, and then the Record button will turn red, indicating that the recording has been started. Now you can close the Control Center, and it will record everything going on the screen. The recording time appears in red at the top left corner.
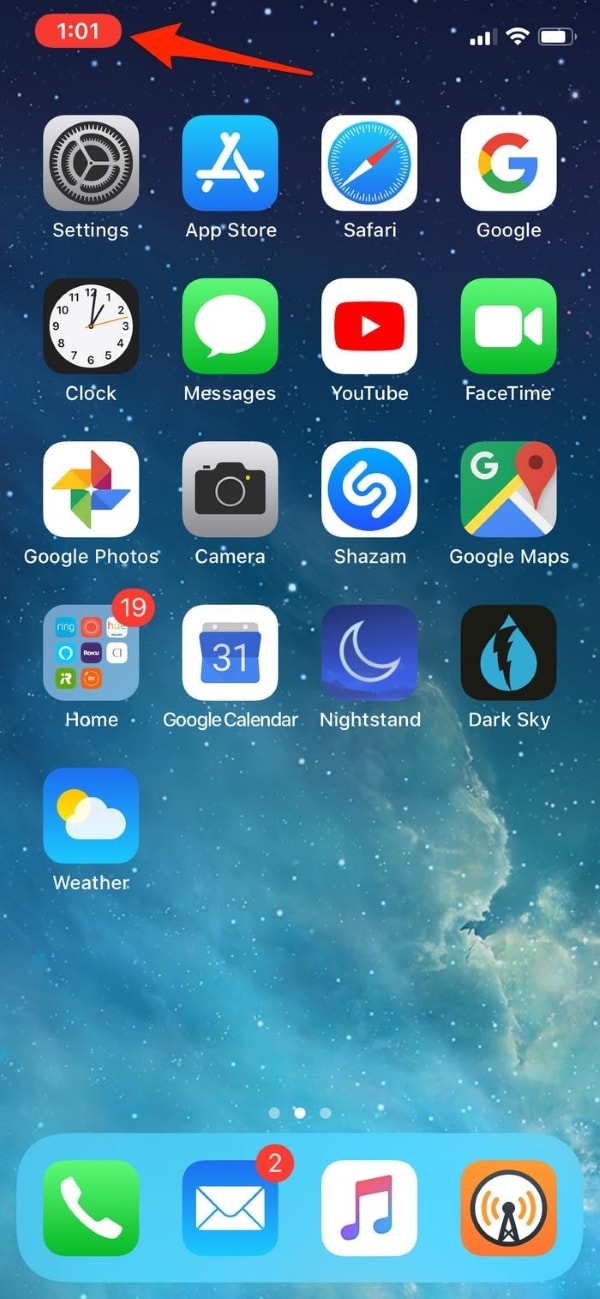
Step 4: Once you have recorded everything, you can either stop the recording by hitting the Record button from the Control Center. Or else, tap on the red time in the top left corner and click on ‘Stop.’
Part 2. 5 Popular Screen Recorder for iPhone
iPhones require different and yet special environments for various tasks. Some applications could be used to record screens on iPhone. Now that you have a fair knowledge about enabling screen recording in iPhone and its process let us introduce some popular screen recorder iPhone to you.
1. Record it! :: Screen Recorder
The application could be used for recording screens on iPhones. With this screen recorder, you can record any demo video, any gaming video. Training videos and tutorials can also be recorded from your iPhone with this recorder. This is the best application for screen recording iPhone 12.
The application supports easy and fast export to platforms like YouTube, or else you can also email or AirDrop it. The screen recording can also be shared directly with your camera roll.

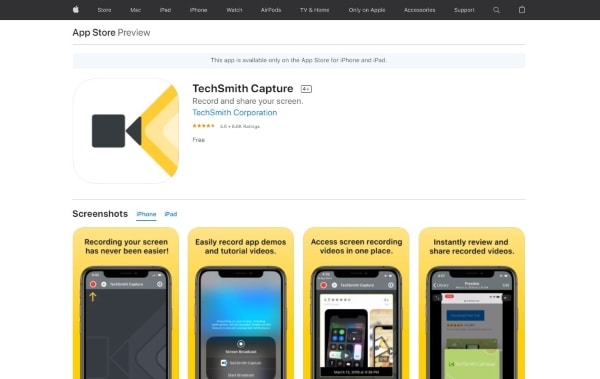
2. TechSmith Capture
Another Screen recorder for iPhone users is Techsmith Capture. With this, you can quickly record your application demos, training, and tutorials. Techsmith Capture uses iOS systems global recording APIs, which aid in recording one or more full-screen videos.
It can quickly transfer the screen recording videos over the internet to Camtasia and Snagit. The best part is that the application keeps all the recordings organized in the library.
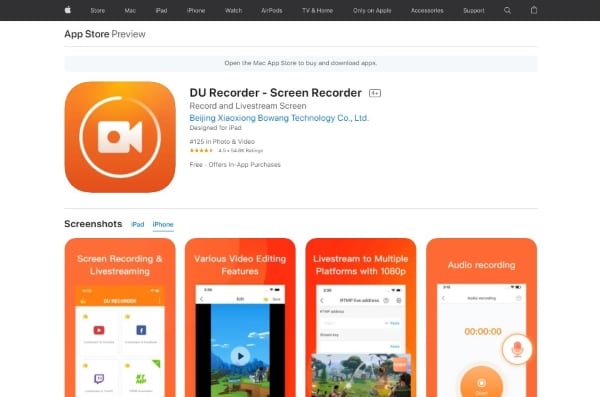
3. DU Recorder – Screen Recorder
The DU recorder is a very easy-to-use and reliable screen recording application for when it comes to screen recorder iPhone. The best part about using this application is that you can Livestream your screen to various platforms like YouTube, Facebook, Twitch, etc., and record your videos easily. The application promises to deliver high-quality screen recording video.
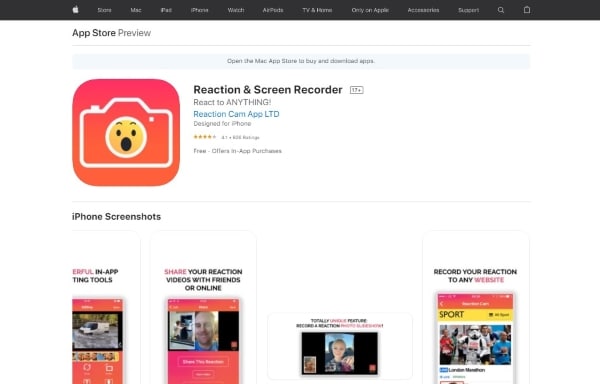
4. Reaction and Screen Recorder
As its name represents, this application can be used for screen recording as well as for recording your reactions to any cool YouTube video or maybe TikTok. It has some amazing features, which include pausing and rewinding your video while recording it.
With the help of this application, you can react directly to things on platforms like Facebook and Instagram. The platform provides the ability to share your video online with friends and on TikTok directly.
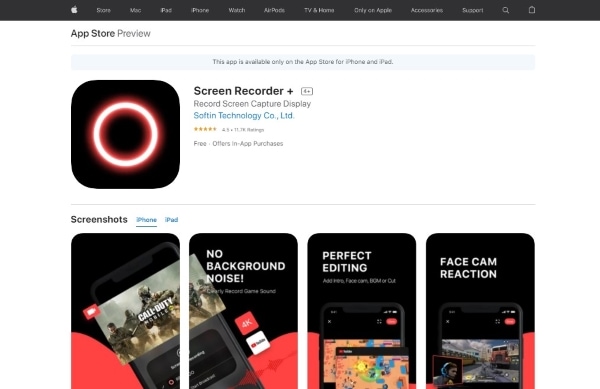
5. Screen Recorder +
The last application to be discussed is ‘Screen Recorder +.’ With this application, you can set the settings to HD before you start recording. By using Screen Recorder +, you can also record your reactions from the Face Cam. Customize your videos by adding your reaction. The microphone of the application will help you add voiceover to your videos.
Part 3. Recommend Desktop Screen Recorder -Wondershare Filmora
Now that you all have learned a lot about the screen recorder iPhone and how that works, it’s time to talk about a screen recorder that could be used to record material from your Windows or Mac screens. Wondershare Filmora has a Screen Recorder that could be used for this purpose. It guarantees high-quality screen recordings. Filmora also has a little additional surprise that will be disclosed later.
For Win 7 or later (64-bit)
For macOS 10.12 or later
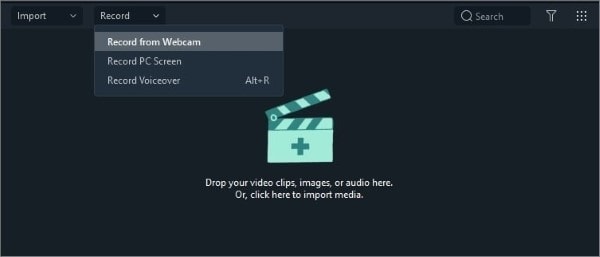
The screen recorder offers three types of recordings to its users. With Wondershare Filmora Screen Recorder, you can either Record from Webcam, where your video and audio are recorded simultaneously. The other option is to Record Voiceover, where the user can only record their voice to add later to any video. Lastly, the usual, Record PC Screen to capture everything from the screen.
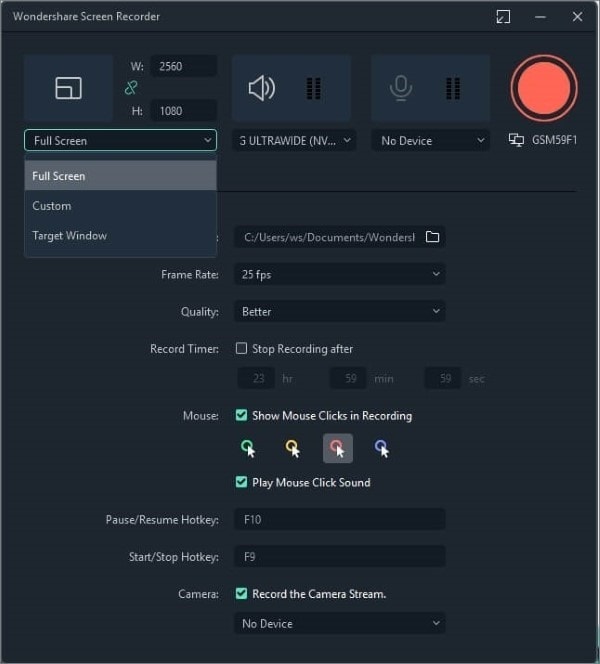
The Screen Recording Software has different types of recording options, like either record ‘Full Screen’ or ‘Custom’ option; you can customize the screen recording. Lastly, you can record any targeted screen by using the ‘Target’ option.
You can thoroughly plan and customize your recording activity. Filmora lets you set the ‘Frame Rate’ by yourself. You can also select a Quality option that what kind of result quality do you want. It allows offers you to pre-set a Record time to end the recording. You can also use the F9 key to stop recording. Once the recording is stopped, the file spontaneously goes into the media library.
Now comes the time to disclose the little surprise, that is, the Wondershare Filmora Video Editor. After you have recorded anything, you can edit it by adding cool transitions and effects to it. With Filmora Video editor, add text and titles to make your video seem classy and organized.
Ending Thoughts
As promised in the beginning to discuss in detail how to set up screen record on iPhone, the promise is fulfilled. This article is a complete guide for all iPhone users to learn about screen recording. Not just that, but various popular screen recorder iPhones have also been mentioned. You don’t have to wonder anymore in search of a good screen recorder.
Lastly, the article revealed the magical screen recorder for Windows and Mac. Wondershare Filmora Screen Recorder is the best option to record your Windows or Mac screens with promised quality and perfection.
Versatile Video Editor - Wondershare Filmora
An easy yet powerful editor
Numerous effects to choose from
Detailed tutorials provided by the official channel
02 5 Popular Screen Recorder for iPhone
03 Recommend Desktop Screen Recorder
Part 1. How Do You Screen Record on iPhone?
iOS devices have different features, functionality, and entirely different working. Unlike Android devices, iOS deals with things differently. Due to this reason, there is a slight difference in screen recording when it comes to iPhone. Not every iPhone user knows how to enable screen recording on iPhone but don’t worry; we got you. Let’s share the steps for enabling your iPhone’s settings.
Step 1: To enable screen recording in your iPhone, firstly head over to the ‘Settings’ app and then look for ‘Control Center.’ Tap on the ‘Customize Controls’ option from the Control Center screen.
Step 2: Now, from the Customize Controls section, find the option of ‘Screen Recording.’ If the option is not available in the ‘Include’ section, hit the plus sign in green, and it will be moved to the ‘Include’ section.
These are the steps you should follow if you plan to enable the screen recording on your iPhone. Whereas the process for screen recorder iPhone is different and is still unrevealed. Follow the steps given below to record fun stuff from your iPhone screen.
Step 1: First of all, you should access the iPhone’s Control Center by swiping the screen down from the top right corner. Or else, people having the iPhone with a home button can simply swipe up from the bottom.
Step 2: Now, you have to tap on the ‘Record’ option, which appears as a bigger circle with a shaded smaller circle in it.
Step 3: After that, it will hardly take 3 seconds, and then the Record button will turn red, indicating that the recording has been started. Now you can close the Control Center, and it will record everything going on the screen. The recording time appears in red at the top left corner.
Step 4: Once you have recorded everything, you can either stop the recording by hitting the Record button from the Control Center. Or else, tap on the red time in the top left corner and click on ‘Stop.’
Part 2. 5 Popular Screen Recorder for iPhone
iPhones require different and yet special environments for various tasks. Some applications could be used to record screens on iPhone. Now that you have a fair knowledge about enabling screen recording in iPhone and its process let us introduce some popular screen recorder iPhone to you.
1. Record it! :: Screen Recorder
The application could be used for recording screens on iPhones. With this screen recorder, you can record any demo video, any gaming video. Training videos and tutorials can also be recorded from your iPhone with this recorder. This is the best application for screen recording iPhone 12.
The application supports easy and fast export to platforms like YouTube, or else you can also email or AirDrop it. The screen recording can also be shared directly with your camera roll.
2. TechSmith Capture
Another Screen recorder for iPhone users is Techsmith Capture. With this, you can quickly record your application demos, training, and tutorials. Techsmith Capture uses iOS systems global recording APIs, which aid in recording one or more full-screen videos.
It can quickly transfer the screen recording videos over the internet to Camtasia and Snagit. The best part is that the application keeps all the recordings organized in the library.
3. DU Recorder – Screen Recorder
The DU recorder is a very easy-to-use and reliable screen recording application for when it comes to screen recorder iPhone. The best part about using this application is that you can Livestream your screen to various platforms like YouTube, Facebook, Twitch, etc., and record your videos easily. The application promises to deliver high-quality screen recording video.
4. Reaction and Screen Recorder
As its name represents, this application can be used for screen recording as well as for recording your reactions to any cool YouTube video or maybe TikTok. It has some amazing features, which include pausing and rewinding your video while recording it.
With the help of this application, you can react directly to things on platforms like Facebook and Instagram. The platform provides the ability to share your video online with friends and on TikTok directly.
5. Screen Recorder +
The last application to be discussed is ‘Screen Recorder +.’ With this application, you can set the settings to HD before you start recording. By using Screen Recorder +, you can also record your reactions from the Face Cam. Customize your videos by adding your reaction. The microphone of the application will help you add voiceover to your videos.
Part 3. Recommend Desktop Screen Recorder -Wondershare Filmora
Now that you all have learned a lot about the screen recorder iPhone and how that works, it’s time to talk about a screen recorder that could be used to record material from your Windows or Mac screens. Wondershare Filmora has a Screen Recorder that could be used for this purpose. It guarantees high-quality screen recordings. Filmora also has a little additional surprise that will be disclosed later.
For Win 7 or later (64-bit)
For macOS 10.12 or later
The screen recorder offers three types of recordings to its users. With Wondershare Filmora Screen Recorder, you can either Record from Webcam, where your video and audio are recorded simultaneously. The other option is to Record Voiceover, where the user can only record their voice to add later to any video. Lastly, the usual, Record PC Screen to capture everything from the screen.
The Screen Recording Software has different types of recording options, like either record ‘Full Screen’ or ‘Custom’ option; you can customize the screen recording. Lastly, you can record any targeted screen by using the ‘Target’ option.
You can thoroughly plan and customize your recording activity. Filmora lets you set the ‘Frame Rate’ by yourself. You can also select a Quality option that what kind of result quality do you want. It allows offers you to pre-set a Record time to end the recording. You can also use the F9 key to stop recording. Once the recording is stopped, the file spontaneously goes into the media library.
Now comes the time to disclose the little surprise, that is, the Wondershare Filmora Video Editor. After you have recorded anything, you can edit it by adding cool transitions and effects to it. With Filmora Video editor, add text and titles to make your video seem classy and organized.
Ending Thoughts
As promised in the beginning to discuss in detail how to set up screen record on iPhone, the promise is fulfilled. This article is a complete guide for all iPhone users to learn about screen recording. Not just that, but various popular screen recorder iPhones have also been mentioned. You don’t have to wonder anymore in search of a good screen recorder.
Lastly, the article revealed the magical screen recorder for Windows and Mac. Wondershare Filmora Screen Recorder is the best option to record your Windows or Mac screens with promised quality and perfection.
Versatile Video Editor - Wondershare Filmora
An easy yet powerful editor
Numerous effects to choose from
Detailed tutorials provided by the official channel
Also read:
- [New] 2024 Approved Cutting-Edge Simulators for Sony's PlayStation 3 Games (PC)
- [New] 2024 Approved Organizing Virtual Gatherings Setting Up Zoom on Android
- [New] In 2024, Detailed Process of Saving Movies on Various OS
- [New] In 2024, Screen Stream Showdown Who Wins, OBS or ShadowGL?
- [New] In 2024, Secrets of Flawless Video Capture Top 4 Apps for PC/Mac
- [Updated] 2024 Approved Fast Fixes to Skyrocket Your Podcast Live
- [Updated] 2024 Approved Quick-Shift Video Techniques Mastering Transitions
- [Updated] 2024 Approved Record to Win Optimizing Your Twitch Broadcasting Skills
- [Updated] Charismatic Charm of Moving Text on Screen
- [Updated] Essential Techniques Recording Live TV Online
- [Updated] Expert Picks The Finest Photo Frame Software for 2024
- [Updated] In 2024, Unlock Your Potential with These Influential Biz Video Hubs
- [Updated] Streamline Your Gaming with Xbox Screen Recorders for 2024
- 2024 Approved Guide to Integrating Sound Into Presentations (PowerPoint)
- In 2024, How to Track WhatsApp Messages on Nokia C110 Without Them Knowing? | Dr.fone
- Kodi Media Center Multimedia Alternative for PCs
- Step-by-Step Tutorial: Downloading Music From Spotify Using Windows 10/11 Software Tools
- Title: 2024 Approved Uncomplicated Walkthrough of Easy iPhone Screen Capture
- Author: Queen
- Created at : 2024-12-11 08:04:11
- Updated at : 2024-12-14 06:55:27
- Link: https://screen-mirroring-recording.techidaily.com/2024-approved-uncomplicated-walkthrough-of-easy-iphone-screen-capture/
- License: This work is licensed under CC BY-NC-SA 4.0.