
"2024 Approved Essential Tools for Documenting Computer Speakers & Mics"
Essential Tools for Documenting Computer Speakers & Mics
Sometimes you may wonder if it is possible to record system audio and microphone voice at the same time, especially when editing videos. You may be able to record either computer sound or microphone voices, but recording both at the same time may be difficult. This is quite a devastating thing to somebody working on a schedule.
It is inconvenient when you want to record a voice-over or lecture tutorial on a computer and do not know how to do it. With the help of several audio recorders available in the market today, this is no longer a problem.
These programs allow users to record the computer screen, computer sounds, and microphone voices simultaneously. Below are some of the programs that you c
integration with your computer to make this possible.

1. Use Stereo Mix
Step 1: Access the sound control center.
If you are using Windows 10 Sound Control Panel, you can access your sound setting through the search box.
After opening the Sound Settings Window, click the sound control panel link on the right-hand side. Your sound control panel will open, then you will go to step 2.
Step 2: Set Up Stereo Mix.
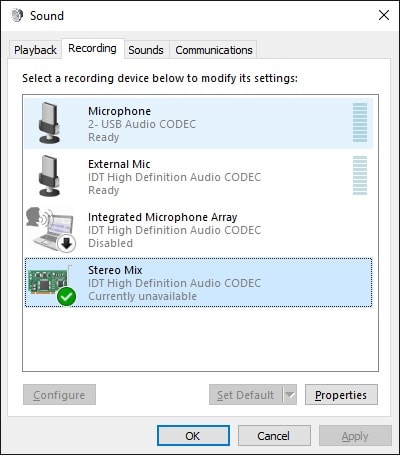
Remember Stereo Mix device is the Window’s default aggressive device. This device is disabled by default, so you need to enable it. Go to your Sound Control Panel and Right-Click the ‘Recording’ tab and then select Show Disabled Devices.
When you see the Stereo Mix, Right-Click to Enable and then select it again with a right-click to Set as Default Device.
To this far you are almost there! You can now use a microphone to feed into the Stereo Mix device. Right-click the appropriate microphone you will use to record and select Properties. After Window displays, select the Listen tab and enable listen to the device.
Step 3: Record
This being the final step, you will have to launch the recorder you are using to start the recording, and then select the Stereo Mix Device from the microphone icon. This will allow your recorder to record PC sound and microphone at the same time.
2. Filmora
You may be interested in adding your voice to a video, making a voice-over demo for your social media networks, or even when preparing an important staff that requires your demonstration. Using Wondershare Filmora Editor, you can successfully combine your microphone voice with other computer sounds. This is because Filmora software has a voiceover function that allows you to record your voice or add voice-over files to a video. You can also use this function to customize the pitch, speech, and volume of the recorded voiceover. There are two options for incorporating sound in the other recordings using Filmora; you can edit your video first and then record the voiceover after. Or, start with recording the voiceover and then edit the video. in any of these ways, you need to prepare the script for smooth recording.
 CalendarBudget - Monthly subscription membership to CalendarBudget via web browser or mobile app. Support included.
Here are steps you can follow to record system audio and microphone and add voiceover files when editing videos with Filmora software.
For Win 7 or later (64-bit)
For macOS 10.12 or later
Step 1: Connect your Microphone to your computers.
When you are ready to start the recording you can connect the microphone to your computer or use external microphones to capture clear and quality voiceovers.
Step 2: Record voiceover.
If you have successfully installed Filmora software on your computer and have set the microphone, then click to launch the software, and in the starting interface click the ‘New Project’ indication icon to create a new project.
Go to the Record tab and then click ‘Record a Voiceover’ to wake the audio record Window.
Step 3: Edit recorded voiceover to a video.
To start editing the recorded voiceovers, click on the audio track and the new window will pop up for you to adjust audio settings such as the speed, volume, and pitch of your voiceovers.
Using this feature, you can trim and cut out the unwanted sound sections from the voiceover. Also, there is a ‘fade-in and fade-out effect’, which you can use to create smoother voiceover transitions.
Step 4: Sync voiceover to video
Filmora can support up to100 audio tracks, and this feature can allow you to add background music to the voiceover records.
‘Drag-n-drop’ the video track to the video track and then ‘drag-n-drop’ the audio track to the right position to combine it with the video. Keep the video track and the audio in the same length if need be.
After this, you can export and save your new video files in your preferred formats.
3. Audacity
Audacity is a free-to-use recording tool that can work with different operating systems such as Windows, macOS, and Linux. It is referred to as an open-source audio editing and recording tool as it can be used as a powerful cross-platform audio recorder. It can be used to record PC sound and microphone at the same time.
 KoolReport Pro is an advanced solution for creating data reports and dashboards in PHP. Equipped with all extended packages , KoolReport Pro is able to connect to various datasources, perform advanced data analysis, construct stunning charts and graphs and export your beautiful work to PDF, Excel, JPG or other formats. Plus, it includes powerful built-in reports such as pivot report and drill-down report which will save your time in building ones.
 It will help you to write dynamic data reports easily, to construct intuitive dashboards or to build a whole business intelligence cockpit.
KoolReport Pro package goes with Full Source Code, Royal Free, ONE (1) Year Priority Support, ONE (1) Year Free Upgrade and 30-Days Money Back Guarantee.
Developer License allows Single Developer to create Unlimited Reports, deploy on Unlimited Servers and able deliver the work to Unlimited Clients.

The following steps will teach you how to record computer audio and microphone mac voices using Audacity.
Step 1: Select the sounds.
The first step when recording computer audio and microphone voice with Audacity software is to select the “Sound” option by right-clicking on the microphone icon. All the recording devices you are using will be found under the “Recording” tab. Right-click the microphone, then click “Properties” under the “Listen” tab, and tick the box before “Listen to the device.”
This will enable the computer audio and the microphone voices to be recorded simultaneously.
Step 2: Select Stereo Mix
Through the drop-down menu behind the microphone icon in the upper left corner of Audacity’s main interface, select the “Stereo Mix” from the menu.
Step 3: Record
Start your recording by clicking on the top red button. The recording will commence and it can capture both voice and computer audio simultaneously.
After the recording is over, click the stop button to end, the recording.
4. Bandicam
Bandicam recording tool is an easy-to-use, multi-track sound editor and recorder. This application is compatible with Windows Vista 7/8/10. This software is used to record the computer audios and microphone sounds simultaneously on the windows computers.
Here are steps to follow when you want to record microphone and computer sounds in your windows 10:
Step 1: Download and install a Bandicam.
If you have not installed a Bandicam on your windows 10 computer, you need to download and install it. Then open and launch your software to start recording.
Step2: Navigate to “Video” >”Settings”
After navigation, the new windows will pop out.
Step 3: Choose Speakers and a microphone.
On the “Sounds” tab available in the “Primary Sound Device,” choose speakers as Default Output Device” and then choose the microphone.
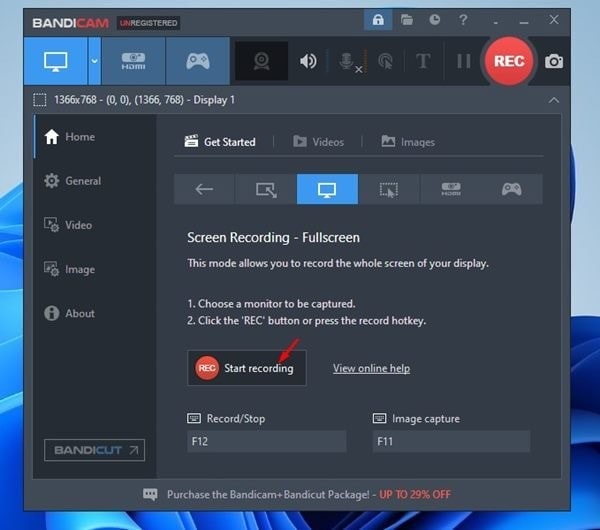
Step 4: Record.
Now that you are done setting your Bandicam recorder, go back to the main interface and click the “REC” button on the top-right corner of your program screen to start recording.
 The Tube Sites Submitter is a fast and efficient tool for anyone who needs to upload videos quickly, easily and automatically to hundreds of tube sites in mere minutes .
 5. QuickTime Player
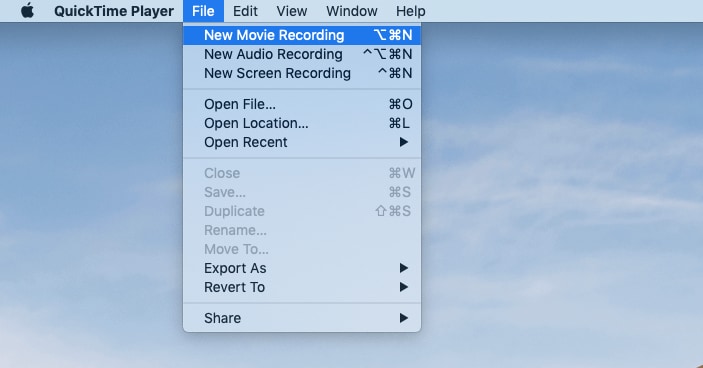
Another method of recording both the computer audio and microphone at the same time on a Mac is by using the QuickTime Player audio recording tool. It is also an effective tool that can be used to record zoom meetings.
Steps to follow when recording computer audios together with microphone audios with this tool;
Step1: Just like any other device, the first step is to download and install this software in your system.
Step2: Open the macOS MIDI configuration app which is an in-built app for Mac. In the MIDI setup click the select icon situated on the left bottom and choose to create a “Multi-Output Device.”
Step3: As it is integrated with Soundflower Aggregate to work on the Mac, Open QuickTime and select Soundflower as the source device. Now you can record system audio and microphone simultaneously.
6. EaseUS Experts
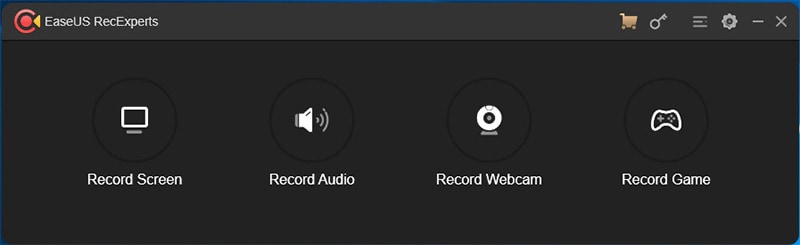
EaseUS Expert is a powerful screen and microphone sound recorder that can enable you to record webcam, audio, and screen at the same time. Using this tool you can either choose to record computer audio and microphone mac sound separately or both of them at the same time. This recording program supports many formats and you can select any supported audio format as per your recording’s target format.
Here are key steps to help you record computer sound and microphone simultaneously using this tool;
Step 1: Launch the software
After making sure that your microphones are plugged appropriately, you can launch this program and select ‘Audio’ from the four modes.
Step 2: select sound.
The next step is to choose the speaker by clicking the speaker icon in the bottom left-hand corner. After this, click on ‘Microphone and Sounds’. If you are using more than one microphone you can click “Options ” to select a specific Microphone Device.
Step 3: Record.
After you are done with the settings start your recording by clicking on the orange button “REC” to capture the computer audio and the microphone simultaneously. When your recording is finished, click the red “STOP” button to stop the recording.
Step 4: Save audio.
The captured audio will be saved automatically on your computer and will be available in the recordings.
7. Movavi Screen Recorder
Movavi Screen recorder is video and audio recording software for Windows that can be downloaded and installed to solve all the video and audio recording challenges. It is quite an easy and intuitive video and audio capturing tool that takes a short time to understand. This screen recorder with audio allows one to record, edit and save appropriately.
Here are steps to follow when recording computer audio and microphone voice;
Step 1: Set up the audio
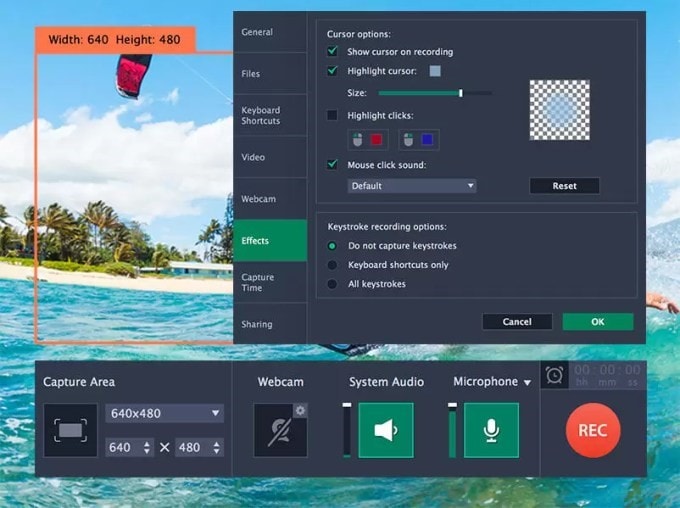
In the Movavi Screen Capture Studio, launch Windows and click ‘Record Screen’. On the recording panel, choose the recording source or sources you want to record from. You can record the system sounds by clicking the System Audio button.
To record voices from any of the microphones or any other device connected to your PC, click the ‘Microphone’ button. When recording from different devices click the arrow above the button to select your preferred device.
Step 2: Record the audio.
Click the ‘REC’ button when you are fully set and the audio recording will start.
You can click F10 on your keyboard or ‘Stop’ on the panel to stop the recording.
Step 3: Save the audio file.
Click ‘Save As’ to open the exporting options.
8. Screencapture.com
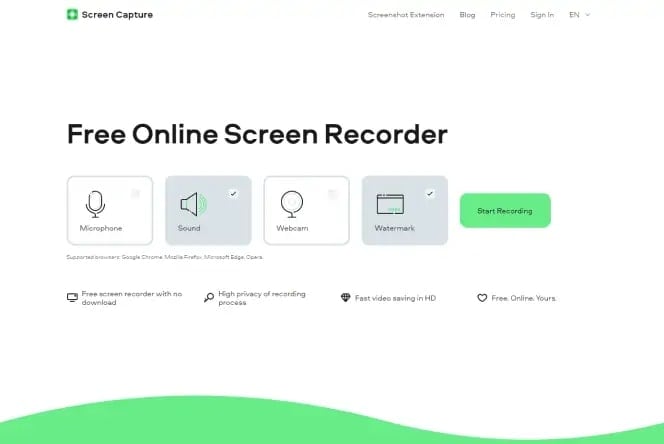
Using Screen Capture may be the fastest way of capturing your computer screen, audio, and microphone voices simultaneously. This is a free online audio recorder tool. It can capture output from speakers, video playback, or internal audio from your system. It has a smart interface that can allow you to record computer sound and microphone simultaneously or separately.
To archive this, here are some steps to follow;
Step1: Open Screen Capture
To start recording sounds on your computer, you will need to open the app online.
Step 2: Set up audio recording and record.
Enable the ‘Sound’ icon to record your computer audios, and if you want to capture audios from the microphone and the speakers, activate the ‘Microphone’ icon.
Press the ‘Start Recording’ Icon to capture the sounds playing. You need to allow access to your microphones and webcam.
Step 3: Save the file
When you finish recording, you can download the recording to your computer. All the files are confidential.
 PCDJ Karaoki is the complete professional karaoke software designed for KJs and karaoke venues. Karaoki includes an advanced automatic singer rotation list with singer history, key control, news ticker, next singers screen, a song book exporter and printer, a jukebox background music player and many other features designed so you can host karaoke shows faster and easier!
Conclusion
This article highlights the various methods that can be used to record pc sound and microphone at the same time simultaneously. The above-described programs are just but some of the best programs that can capture audios from both inputs and as well edit them. These tools can be used to combine audio and videos or separate the same without losing the quality of both.
For macOS 10.12 or later
Step 1: Connect your Microphone to your computers.
When you are ready to start the recording you can connect the microphone to your computer or use external microphones to capture clear and quality voiceovers.
Step 2: Record voiceover.
If you have successfully installed Filmora software on your computer and have set the microphone, then click to launch the software, and in the starting interface click the ‘New Project’ indication icon to create a new project.
Go to the Record tab and then click ‘Record a Voiceover’ to wake the audio record Window.
Step 3: Edit recorded voiceover to a video.
To start editing the recorded voiceovers, click on the audio track and the new window will pop up for you to adjust audio settings such as the speed, volume, and pitch of your voiceovers.
Using this feature, you can trim and cut out the unwanted sound sections from the voiceover. Also, there is a ‘fade-in and fade-out effect’, which you can use to create smoother voiceover transitions.
Step 4: Sync voiceover to video
Filmora can support up to100 audio tracks, and this feature can allow you to add background music to the voiceover records.
‘Drag-n-drop’ the video track to the video track and then ‘drag-n-drop’ the audio track to the right position to combine it with the video. Keep the video track and the audio in the same length if need be.
After this, you can export and save your new video files in your preferred formats.
3. Audacity
Audacity is a free-to-use recording tool that can work with different operating systems such as Windows, macOS, and Linux. It is referred to as an open-source audio editing and recording tool as it can be used as a powerful cross-platform audio recorder. It can be used to record PC sound and microphone at the same time.
The following steps will teach you how to record computer audio and microphone mac voices using Audacity.
Step 1: Select the sounds.
The first step when recording computer audio and microphone voice with Audacity software is to select the “Sound” option by right-clicking on the microphone icon. All the recording devices you are using will be found under the “Recording” tab. Right-click the microphone, then click “Properties” under the “Listen” tab, and tick the box before “Listen to the device.”
This will enable the computer audio and the microphone voices to be recorded simultaneously.
Step 2: Select Stereo Mix
Through the drop-down menu behind the microphone icon in the upper left corner of Audacity’s main interface, select the “Stereo Mix” from the menu.
Step 3: Record
Start your recording by clicking on the top red button. The recording will commence and it can capture both voice and computer audio simultaneously.
After the recording is over, click the stop button to end, the recording.
4. Bandicam
Bandicam recording tool is an easy-to-use, multi-track sound editor and recorder. This application is compatible with Windows Vista 7/8/10. This software is used to record the computer audios and microphone sounds simultaneously on the windows computers.

Here are steps to follow when you want to record microphone and computer sounds in your windows 10:
Step 1: Download and install a Bandicam.
If you have not installed a Bandicam on your windows 10 computer, you need to download and install it. Then open and launch your software to start recording.
Step2: Navigate to “Video” >”Settings”
After navigation, the new windows will pop out.
Step 3: Choose Speakers and a microphone.
On the “Sounds” tab available in the “Primary Sound Device,” choose speakers as Default Output Device” and then choose the microphone.
Step 4: Record.
Now that you are done setting your Bandicam recorder, go back to the main interface and click the “REC” button on the top-right corner of your program screen to start recording.
5. QuickTime Player
Another method of recording both the computer audio and microphone at the same time on a Mac is by using the QuickTime Player audio recording tool. It is also an effective tool that can be used to record zoom meetings.

Steps to follow when recording computer audios together with microphone audios with this tool;
Step1: Just like any other device, the first step is to download and install this software in your system.
Step2: Open the macOS MIDI configuration app which is an in-built app for Mac. In the MIDI setup click the select icon situated on the left bottom and choose to create a “Multi-Output Device.”
Step3: As it is integrated with Soundflower Aggregate to work on the Mac, Open QuickTime and select Soundflower as the source device. Now you can record system audio and microphone simultaneously.
6. EaseUS Experts
EaseUS Expert is a powerful screen and microphone sound recorder that can enable you to record webcam, audio, and screen at the same time. Using this tool you can either choose to record computer audio and microphone mac sound separately or both of them at the same time. This recording program supports many formats and you can select any supported audio format as per your recording’s target format.
Here are key steps to help you record computer sound and microphone simultaneously using this tool;
Step 1: Launch the software
After making sure that your microphones are plugged appropriately, you can launch this program and select ‘Audio’ from the four modes.
Step 2: select sound.
The next step is to choose the speaker by clicking the speaker icon in the bottom left-hand corner. After this, click on ‘Microphone and Sounds’. If you are using more than one microphone you can click “Options ” to select a specific Microphone Device.
Step 3: Record.
After you are done with the settings start your recording by clicking on the orange button “REC” to capture the computer audio and the microphone simultaneously. When your recording is finished, click the red “STOP” button to stop the recording.
Step 4: Save audio.
The captured audio will be saved automatically on your computer and will be available in the recordings.
7. Movavi Screen Recorder
Movavi Screen recorder is video and audio recording software for Windows that can be downloaded and installed to solve all the video and audio recording challenges. It is quite an easy and intuitive video and audio capturing tool that takes a short time to understand. This screen recorder with audio allows one to record, edit and save appropriately.
Here are steps to follow when recording computer audio and microphone voice;
Step 1: Set up the audio
In the Movavi Screen Capture Studio, launch Windows and click ‘Record Screen’. On the recording panel, choose the recording source or sources you want to record from. You can record the system sounds by clicking the System Audio button.
To record voices from any of the microphones or any other device connected to your PC, click the ‘Microphone’ button. When recording from different devices click the arrow above the button to select your preferred device.
Step 2: Record the audio.
Click the ‘REC’ button when you are fully set and the audio recording will start.
You can click F10 on your keyboard or ‘Stop’ on the panel to stop the recording.
Step 3: Save the audio file.
Click ‘Save As’ to open the exporting options.
8. Screencapture.com
Using Screen Capture may be the fastest way of capturing your computer screen, audio, and microphone voices simultaneously. This is a free online audio recorder tool. It can capture output from speakers, video playback, or internal audio from your system. It has a smart interface that can allow you to record computer sound and microphone simultaneously or separately.
To archive this, here are some steps to follow;
Step1: Open Screen Capture
To start recording sounds on your computer, you will need to open the app online.
Step 2: Set up audio recording and record.
Enable the ‘Sound’ icon to record your computer audios, and if you want to capture audios from the microphone and the speakers, activate the ‘Microphone’ icon.
Press the ‘Start Recording’ Icon to capture the sounds playing. You need to allow access to your microphones and webcam.
Step 3: Save the file
When you finish recording, you can download the recording to your computer. All the files are confidential.

Conclusion
This article highlights the various methods that can be used to record pc sound and microphone at the same time simultaneously. The above-described programs are just but some of the best programs that can capture audios from both inputs and as well edit them. These tools can be used to combine audio and videos or separate the same without losing the quality of both.
For macOS 10.12 or later
Step 1: Connect your Microphone to your computers.
When you are ready to start the recording you can connect the microphone to your computer or use external microphones to capture clear and quality voiceovers.
Step 2: Record voiceover.
If you have successfully installed Filmora software on your computer and have set the microphone, then click to launch the software, and in the starting interface click the ‘New Project’ indication icon to create a new project.
Go to the Record tab and then click ‘Record a Voiceover’ to wake the audio record Window.
Step 3: Edit recorded voiceover to a video.
To start editing the recorded voiceovers, click on the audio track and the new window will pop up for you to adjust audio settings such as the speed, volume, and pitch of your voiceovers.
Using this feature, you can trim and cut out the unwanted sound sections from the voiceover. Also, there is a ‘fade-in and fade-out effect’, which you can use to create smoother voiceover transitions.
Step 4: Sync voiceover to video
Filmora can support up to100 audio tracks, and this feature can allow you to add background music to the voiceover records.
‘Drag-n-drop’ the video track to the video track and then ‘drag-n-drop’ the audio track to the right position to combine it with the video. Keep the video track and the audio in the same length if need be.
After this, you can export and save your new video files in your preferred formats.
3. Audacity
Audacity is a free-to-use recording tool that can work with different operating systems such as Windows, macOS, and Linux. It is referred to as an open-source audio editing and recording tool as it can be used as a powerful cross-platform audio recorder. It can be used to record PC sound and microphone at the same time.
The following steps will teach you how to record computer audio and microphone mac voices using Audacity.
Step 1: Select the sounds.
The first step when recording computer audio and microphone voice with Audacity software is to select the “Sound” option by right-clicking on the microphone icon. All the recording devices you are using will be found under the “Recording” tab. Right-click the microphone, then click “Properties” under the “Listen” tab, and tick the box before “Listen to the device.”
This will enable the computer audio and the microphone voices to be recorded simultaneously.
Step 2: Select Stereo Mix
Through the drop-down menu behind the microphone icon in the upper left corner of Audacity’s main interface, select the “Stereo Mix” from the menu.
Step 3: Record
Start your recording by clicking on the top red button. The recording will commence and it can capture both voice and computer audio simultaneously.
After the recording is over, click the stop button to end, the recording.
4. Bandicam
Bandicam recording tool is an easy-to-use, multi-track sound editor and recorder. This application is compatible with Windows Vista 7/8/10. This software is used to record the computer audios and microphone sounds simultaneously on the windows computers.
Here are steps to follow when you want to record microphone and computer sounds in your windows 10:
Step 1: Download and install a Bandicam.
If you have not installed a Bandicam on your windows 10 computer, you need to download and install it. Then open and launch your software to start recording.
Step2: Navigate to “Video” >”Settings”
After navigation, the new windows will pop out.
Step 3: Choose Speakers and a microphone.
On the “Sounds” tab available in the “Primary Sound Device,” choose speakers as Default Output Device” and then choose the microphone.
Step 4: Record.
Now that you are done setting your Bandicam recorder, go back to the main interface and click the “REC” button on the top-right corner of your program screen to start recording.

5. QuickTime Player
Another method of recording both the computer audio and microphone at the same time on a Mac is by using the QuickTime Player audio recording tool. It is also an effective tool that can be used to record zoom meetings.
Steps to follow when recording computer audios together with microphone audios with this tool;
Step1: Just like any other device, the first step is to download and install this software in your system.
Step2: Open the macOS MIDI configuration app which is an in-built app for Mac. In the MIDI setup click the select icon situated on the left bottom and choose to create a “Multi-Output Device.”
Step3: As it is integrated with Soundflower Aggregate to work on the Mac, Open QuickTime and select Soundflower as the source device. Now you can record system audio and microphone simultaneously.

WPS Office Premium ( File Recovery, Photo Scanning, Convert PDF)–Yearly
6. EaseUS Experts
EaseUS Expert is a powerful screen and microphone sound recorder that can enable you to record webcam, audio, and screen at the same time. Using this tool you can either choose to record computer audio and microphone mac sound separately or both of them at the same time. This recording program supports many formats and you can select any supported audio format as per your recording’s target format.
Here are key steps to help you record computer sound and microphone simultaneously using this tool;
Step 1: Launch the software
After making sure that your microphones are plugged appropriately, you can launch this program and select ‘Audio’ from the four modes.
Step 2: select sound.
The next step is to choose the speaker by clicking the speaker icon in the bottom left-hand corner. After this, click on ‘Microphone and Sounds’. If you are using more than one microphone you can click “Options ” to select a specific Microphone Device.
Step 3: Record.
After you are done with the settings start your recording by clicking on the orange button “REC” to capture the computer audio and the microphone simultaneously. When your recording is finished, click the red “STOP” button to stop the recording.
Step 4: Save audio.
The captured audio will be saved automatically on your computer and will be available in the recordings.
7. Movavi Screen Recorder
Movavi Screen recorder is video and audio recording software for Windows that can be downloaded and installed to solve all the video and audio recording challenges. It is quite an easy and intuitive video and audio capturing tool that takes a short time to understand. This screen recorder with audio allows one to record, edit and save appropriately.

Here are steps to follow when recording computer audio and microphone voice;
Step 1: Set up the audio
In the Movavi Screen Capture Studio, launch Windows and click ‘Record Screen’. On the recording panel, choose the recording source or sources you want to record from. You can record the system sounds by clicking the System Audio button.
To record voices from any of the microphones or any other device connected to your PC, click the ‘Microphone’ button. When recording from different devices click the arrow above the button to select your preferred device.
Step 2: Record the audio.
Click the ‘REC’ button when you are fully set and the audio recording will start.
You can click F10 on your keyboard or ‘Stop’ on the panel to stop the recording.
Step 3: Save the audio file.
Click ‘Save As’ to open the exporting options.
8. Screencapture.com
Using Screen Capture may be the fastest way of capturing your computer screen, audio, and microphone voices simultaneously. This is a free online audio recorder tool. It can capture output from speakers, video playback, or internal audio from your system. It has a smart interface that can allow you to record computer sound and microphone simultaneously or separately.
To archive this, here are some steps to follow;
Step1: Open Screen Capture
To start recording sounds on your computer, you will need to open the app online.
Step 2: Set up audio recording and record.
Enable the ‘Sound’ icon to record your computer audios, and if you want to capture audios from the microphone and the speakers, activate the ‘Microphone’ icon.
Press the ‘Start Recording’ Icon to capture the sounds playing. You need to allow access to your microphones and webcam.
Step 3: Save the file
When you finish recording, you can download the recording to your computer. All the files are confidential.
Conclusion
This article highlights the various methods that can be used to record pc sound and microphone at the same time simultaneously. The above-described programs are just but some of the best programs that can capture audios from both inputs and as well edit them. These tools can be used to combine audio and videos or separate the same without losing the quality of both.
For macOS 10.12 or later
Step 1: Connect your Microphone to your computers.
When you are ready to start the recording you can connect the microphone to your computer or use external microphones to capture clear and quality voiceovers.
Step 2: Record voiceover.
If you have successfully installed Filmora software on your computer and have set the microphone, then click to launch the software, and in the starting interface click the ‘New Project’ indication icon to create a new project.
Go to the Record tab and then click ‘Record a Voiceover’ to wake the audio record Window.
Step 3: Edit recorded voiceover to a video.
To start editing the recorded voiceovers, click on the audio track and the new window will pop up for you to adjust audio settings such as the speed, volume, and pitch of your voiceovers.
Using this feature, you can trim and cut out the unwanted sound sections from the voiceover. Also, there is a ‘fade-in and fade-out effect’, which you can use to create smoother voiceover transitions.
Step 4: Sync voiceover to video
Filmora can support up to100 audio tracks, and this feature can allow you to add background music to the voiceover records.
‘Drag-n-drop’ the video track to the video track and then ‘drag-n-drop’ the audio track to the right position to combine it with the video. Keep the video track and the audio in the same length if need be.
After this, you can export and save your new video files in your preferred formats.
3. Audacity
Audacity is a free-to-use recording tool that can work with different operating systems such as Windows, macOS, and Linux. It is referred to as an open-source audio editing and recording tool as it can be used as a powerful cross-platform audio recorder. It can be used to record PC sound and microphone at the same time.
The following steps will teach you how to record computer audio and microphone mac voices using Audacity.
Step 1: Select the sounds.
The first step when recording computer audio and microphone voice with Audacity software is to select the “Sound” option by right-clicking on the microphone icon. All the recording devices you are using will be found under the “Recording” tab. Right-click the microphone, then click “Properties” under the “Listen” tab, and tick the box before “Listen to the device.”
This will enable the computer audio and the microphone voices to be recorded simultaneously.
Step 2: Select Stereo Mix
Through the drop-down menu behind the microphone icon in the upper left corner of Audacity’s main interface, select the “Stereo Mix” from the menu.
Step 3: Record
Start your recording by clicking on the top red button. The recording will commence and it can capture both voice and computer audio simultaneously.
After the recording is over, click the stop button to end, the recording.

4. Bandicam
Bandicam recording tool is an easy-to-use, multi-track sound editor and recorder. This application is compatible with Windows Vista 7/8/10. This software is used to record the computer audios and microphone sounds simultaneously on the windows computers.
Here are steps to follow when you want to record microphone and computer sounds in your windows 10:
Step 1: Download and install a Bandicam.
If you have not installed a Bandicam on your windows 10 computer, you need to download and install it. Then open and launch your software to start recording.
Step2: Navigate to “Video” >”Settings”
After navigation, the new windows will pop out.
Step 3: Choose Speakers and a microphone.
On the “Sounds” tab available in the “Primary Sound Device,” choose speakers as Default Output Device” and then choose the microphone.
Step 4: Record.
Now that you are done setting your Bandicam recorder, go back to the main interface and click the “REC” button on the top-right corner of your program screen to start recording.

5. QuickTime Player
Another method of recording both the computer audio and microphone at the same time on a Mac is by using the QuickTime Player audio recording tool. It is also an effective tool that can be used to record zoom meetings.
Steps to follow when recording computer audios together with microphone audios with this tool;
Step1: Just like any other device, the first step is to download and install this software in your system.
Step2: Open the macOS MIDI configuration app which is an in-built app for Mac. In the MIDI setup click the select icon situated on the left bottom and choose to create a “Multi-Output Device.”
Step3: As it is integrated with Soundflower Aggregate to work on the Mac, Open QuickTime and select Soundflower as the source device. Now you can record system audio and microphone simultaneously.
6. EaseUS Experts
EaseUS Expert is a powerful screen and microphone sound recorder that can enable you to record webcam, audio, and screen at the same time. Using this tool you can either choose to record computer audio and microphone mac sound separately or both of them at the same time. This recording program supports many formats and you can select any supported audio format as per your recording’s target format.
Here are key steps to help you record computer sound and microphone simultaneously using this tool;
Step 1: Launch the software
After making sure that your microphones are plugged appropriately, you can launch this program and select ‘Audio’ from the four modes.
Step 2: select sound.
The next step is to choose the speaker by clicking the speaker icon in the bottom left-hand corner. After this, click on ‘Microphone and Sounds’. If you are using more than one microphone you can click “Options ” to select a specific Microphone Device.
Step 3: Record.
After you are done with the settings start your recording by clicking on the orange button “REC” to capture the computer audio and the microphone simultaneously. When your recording is finished, click the red “STOP” button to stop the recording.
Step 4: Save audio.
The captured audio will be saved automatically on your computer and will be available in the recordings.
7. Movavi Screen Recorder
Movavi Screen recorder is video and audio recording software for Windows that can be downloaded and installed to solve all the video and audio recording challenges. It is quite an easy and intuitive video and audio capturing tool that takes a short time to understand. This screen recorder with audio allows one to record, edit and save appropriately.
Here are steps to follow when recording computer audio and microphone voice;
Step 1: Set up the audio
In the Movavi Screen Capture Studio, launch Windows and click ‘Record Screen’. On the recording panel, choose the recording source or sources you want to record from. You can record the system sounds by clicking the System Audio button.
To record voices from any of the microphones or any other device connected to your PC, click the ‘Microphone’ button. When recording from different devices click the arrow above the button to select your preferred device.
Step 2: Record the audio.
Click the ‘REC’ button when you are fully set and the audio recording will start.
You can click F10 on your keyboard or ‘Stop’ on the panel to stop the recording.
Step 3: Save the audio file.
Click ‘Save As’ to open the exporting options.
8. Screencapture.com
Using Screen Capture may be the fastest way of capturing your computer screen, audio, and microphone voices simultaneously. This is a free online audio recorder tool. It can capture output from speakers, video playback, or internal audio from your system. It has a smart interface that can allow you to record computer sound and microphone simultaneously or separately.
To archive this, here are some steps to follow;
Step1: Open Screen Capture
To start recording sounds on your computer, you will need to open the app online.
Step 2: Set up audio recording and record.
Enable the ‘Sound’ icon to record your computer audios, and if you want to capture audios from the microphone and the speakers, activate the ‘Microphone’ icon.
Press the ‘Start Recording’ Icon to capture the sounds playing. You need to allow access to your microphones and webcam.
Step 3: Save the file
When you finish recording, you can download the recording to your computer. All the files are confidential.
 Lyric Video Creator Professional Version
Conclusion
This article highlights the various methods that can be used to record pc sound and microphone at the same time simultaneously. The above-described programs are just but some of the best programs that can capture audios from both inputs and as well edit them. These tools can be used to combine audio and videos or separate the same without losing the quality of both.
- Title: 2024 Approved Essential Tools for Documenting Computer Speakers & Mics
- Author: Queen
- Created at : 2024-07-20 08:37:54
- Updated at : 2024-07-21 08:37:54
- Link: https://screen-mirroring-recording.techidaily.com/2024-approved-essential-tools-for-documenting-computer-speakers-and-mics/
- License: This work is licensed under CC BY-NC-SA 4.0.